今天主要要來做打開相簿並選取相片顯示,假如打開相簿的時候或選取圖片發生錯誤,有可能是要添加讀取的權限至Manifest中。
    <uses-permission android:name="android.permission.WRITE_EXTERNAL_STORAGE"/>
    <uses-permission android:name="android.permission.READ_EXTERNAL_STORAGE"/>
那麼接著來設計需要的UI介面。
<?xml version="1.0" encoding="utf-8"?>
<androidx.constraintlayout.widget.ConstraintLayout xmlns:android="http://schemas.android.com/apk/res/android"
    xmlns:app="http://schemas.android.com/apk/res-auto"
    xmlns:tools="http://schemas.android.com/tools"
    android:layout_width="match_parent"
    android:layout_height="match_parent"
    tools:context=".MainActivity">

    <Button
        android:id="@+id/btn_picker"
        android:layout_width="wrap_content"
        android:layout_height="wrap_content"
        android:text="Button"
        app:layout_constraintBottom_toBottomOf="parent"
        app:layout_constraintEnd_toEndOf="parent"
        app:layout_constraintHorizontal_bias="0.498"
        app:layout_constraintStart_toStartOf="parent"
        app:layout_constraintTop_toTopOf="parent"
        app:layout_constraintVertical_bias="0.755" />

    <ImageView
        android:id="@+id/imageView"
        android:layout_width="264dp"
        android:layout_height="292dp"
        android:layout_marginTop="48dp"
        app:layout_constraintEnd_toEndOf="parent"
        app:layout_constraintHorizontal_bias="0.496"
        app:layout_constraintStart_toStartOf="parent"
        app:layout_constraintTop_toTopOf="parent"/>
</androidx.constraintlayout.widget.ConstraintLayout>
目前我UI介面的imageView是先不設定圖,主要透過相簿中點選相片後進行設定,那麼接著先進到跳轉相簿的動作。
首先會需要去打開相簿的這個動作,可以用Intent來跳轉,而在選取完照片之後,可以接回傳的照片。
 //打開相簿
Intent intent = new Intent();
intent.setType("image/*");
intent.setAction(Intent.ACTION_GET_CONTENT);
//進行跳轉,當選取完回到畫面後會呼叫onActivityForResult取得回傳的照片路徑。
startActivityForResult(intent, 1);
//回傳接收
@Override
protected void onActivityResult(int requestCode, int resultCode, Intent data) {
    if (resultCode == RESULT_OK) {
        Uri uri = data.getData();//取得相片路徑
        try {
            //將該路徑的圖片轉成bitmap
            Bitmap bitmap = BitmapFactory.decodeStream(resolver.openInputStream(uri));
            //設定ImageView圖片
            imageView.setImageBitmap(bitmap);
        } catch (FileNotFoundException e) {
            e.printStackTrace();
        }
    }
    super.onActivityResult(requestCode, resultCode, data);
}
public class MainActivity extends AppCompatActivity {
    private Button btn_picker;
    private ImageView imageView;
    private ContentResolver resolver;
    @Override
    protected void onCreate(Bundle savedInstanceState) {
        super.onCreate(savedInstanceState);
        setContentView(R.layout.activity_main);
        imageView=findViewById(R.id.imageView);
        resolver=this.getContentResolver();
        btn_picker=findViewById(R.id.btn_picker);
        btn_picker.setOnClickListener(view->{
            //打開相簿
            Intent intent = new Intent();
            intent.setType("image/*");
            intent.setAction(Intent.ACTION_GET_CONTENT);
            //選擇相片後接回傳
            startActivityForResult(intent, 1);
        });
    }
    @Override
    protected void onActivityResult(int requestCode, int resultCode, Intent data) {
        if (resultCode == RESULT_OK) {
            Uri uri = data.getData();//取得相片路徑
            try {
                //將該路徑的圖片轉成bitmap
                Bitmap bitmap = BitmapFactory.decodeStream(resolver.openInputStream(uri));
                //設定ImageView圖片
                imageView.setImageBitmap(bitmap);
            } catch (FileNotFoundException e) {
                e.printStackTrace();
            }
        }
        super.onActivityResult(requestCode, resultCode, data);
    }
}
設計完程式後,接著看到選取照片後的成果。
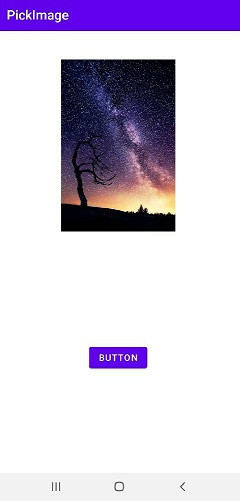
這樣就完成了今天相簿選取相片顯示的小應用,那麼明天來講Spinner的應用。


 iThome鐵人賽