教學的內容如果投影片(Slide)或跑馬燈(Carousel)呈現方式,一定更具教學效果。其實老師們已經很常用投影片教學了,像是powerpoint、keynote,這也是最常用的投影片製作軟體。用powerpoint、keynote製作投影片雖然方便,但是,要畫出我們想要的幾何圖形,絕對要你費盡窮荒之力,更別說是具有JSXGraph這般具有立即反應效果的動態幾何能力。你有沒有想過,網頁如果也能做成投影片,那就二全其美了。
你沒聽錯,網頁也可以做成投影片,也能有跑馬燈的效果,今天我們就要完成這項任務。
昨天已經完成了翻頁效果,而整個網頁的編排也搭配JSXGraph,形成左邊圖形,右邊是文字和按鈕操控區。因為右邊的文字頁寬較小,我們將利用跑馬燈的效果,讓右邊的文字頁面能呈現多個頁面文字。
稍微修改昨天的HTML配置,現在頁面的樣式(class)我們會加入值current。
<div class="back">
    <div class="faceContainer">
        <div class="proof-swiper">
              <div class="proofs">
                <div class="proof-slider current">proof1</div>
                <div class="proof-slider">proof2</div>
                <div class="proof-slider">proof3</div>
                <div class="proof-slider">proof4</div>
              </div>
              <a href="#" class="prev-btn inactive"><i class="fa-solid fa-angles-left"></i></a>
              <a href="#" class="next-btn"><i class="fa-solid fa-angles-right"></i></a>
        </div>
        <button class="backBtn">Go to back</button>
    </div>
</div>
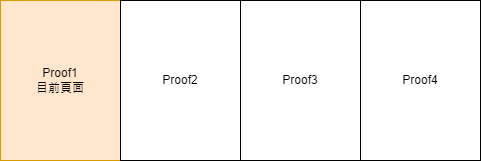
我們將.poofs和proof-slider的position都設定為absolute,用javascript計算各個頁面的位置,將4個樣式為proof-slider的頁面利用,定位成連續橫排的頁面,如圖所示,現在頁面指的是出現在。
當按下一頁按鈕時,則將整個父層proofs整個向右移;而按上一頁按鈕時,則將整個父層proofs整個向左移。
.proof-swiper {
  position: relative;
  width: 90%;
  height: 100%;
  margin: 0 auto;
  overflow: hidden;
  background: rgba(255, 0, 0, 0.1);
}
.proofs {
  position: absolute;
  width: 100%;
  height: 100%;
  transition: transform 250ms ease-in;
}
.proof-slider {
  position: absolute;
  top: 0;
  bottom: 0;
  width: 100%;
  margin: 0 auto;
  display: flex;
  justify-content: center;
  align-items: center;
  font-size: 30px;
  background: rgba(0, 0, 0, 0.2)
}
const proofs = document.querySelector('.proofs')
const prevBtn = document.querySelector('.prev-btn')
const nextBtn = document.querySelector('.next-btn')
const proofSliders = [...document.querySelectorAll('.proof-slider')] //所有頁面DOM所成的陣列
const sliderLenght = proofSliders.length // 所有頁面數量
const sliderWidth = proofSliders[0].getBoundingClientRect().width
// 進行所有頁面定位
const setSliderPosition = (slider, index) => {
  slider.style.left = sliderWidth * index + 'px'
}
proofSliders.forEach(setSliderPosition)
getBoundingClientRect()可以得到DOM元素的width和height,以及其相對於可視範圍 (viewport) 的x和y位置。
.proof-swiper a.inactive {
  background-color: rgba(0, 0, 0, 0.15);
  color: rgba(0, 0, 0, 0.2);

}
.prev-btn, .next-btn {
  position: absolute;
  z-index: 100;
  bottom: 60px;
  font-size: 12px;
  background-color: #37613C;
  padding: 5px 10px;
  border-radius: 10px;
  color: white;
  cursor: pointer;
}
.prev-btn {
  left: 32px;
}
.next-btn {
  right: 32px;
}
我們在上下頁箭頭中加入inactive樣式,當頁面在第一頁時,上一頁箭頭會呈現灰色;而頁面在最後一頁時,下一頁箭頭會呈現灰色。
const moveToSlider = (currentSlider, targetSlider) => {
  proofs.style.transform = `translateX(-${targetSlider.style.left})`
  currentSlider.classList.remove('current')
  targetSlider.classList.add('current')
}
// 下一頁監聽操作
nextBtn.addEventListener('click', () => {
  const currentSlider = proofs.querySelector('.current')
  const currentIndex = proofSliders.findIndex(slider => slider === currentSlider)
  const nextSlider = currentSlider.nextElementSibling
  prevBtn.classList.remove('inactive') // 只要按下一頁,上一頁馬上移除inactive樣式
  if (currentIndex === sliderLenght - 1) return // 如果已經是最後一頁,直接返回
  if (currentIndex === sliderLenght - 2) {
    nextBtn.classList.add('inactive') // 倒數第二頁時按下一頁,下一頁按鈕加入inactive樣式
  } else {
    nextBtn.classList.remove('inactive')
  }
  paginationButtons[currentIndex].classList.remove('current')
  paginationButtons[currentIndex + 1].classList.add('current')
  moveToSlider(currentSlider, nextSlider)
})
.proof-slider中有額外current樣式的即為目前的頁面。
不要使用nextSibling,而要使用nextElementSibling,因為nextSibling會取到下一個空白字元的text node。
proofPagination.addEventListener('click', e => {
  const currentSlider = proofs.querySelector('.current')
  const currentButton = proofPagination.querySelector('.current')
  const targetButton = e.target.closest('button') // 是否按到button
  if (!targetButton) return
  const targetIndex = paginationButtons.findIndex(button => button === targetButton)
  // 處理上下頁按鈕樣式
  if (targetIndex === 0) {
    prevBtn.classList.add('inactive')
    nextBtn.classList.remove('inactive')
  } else if (targetIndex === sliderLenght - 1) {
    prevBtn.classList.remove('inactive')
    nextBtn.classList.add('inactive')
  } else {
    prevBtn.classList.remove('inactive')
    nextBtn.classList.remove('inactive')
  }
  // 處理.pagination-button的樣式
  currentButton.classList.remove('current')
  paginationButtons[targetIndex].classList.add('current')
  // 最後移動頁面
  const targetSlider = proofSliders[targetIndex]
  moveToSlider(currentSlider, targetSlider)
})
.proof-pagination {
  position: absolute;
  bottom: 60px;
  margin: 0 auto;
  left: 0;
  right: 0;
  display: flex;
  justify-content: center;
  align-items: center;
}
.pagination-button {
  width: 15px;
  height: 15px;
  border-radius: 50%;
  border: 0;
  margin: 5px;
  background: rgba(0, 0, 0, 0.1);
}

.pagination-button.current {
  background-color: #37613C;
}
如果目前頁面在第二頁,則第二個.pagination-button的classList會加入current的樣式。
昨天已經完成了翻頁效果,而整個網頁的編排也搭配JSXGraph,形成左邊圖形,右邊是文字和按鈕操控區。因為右邊的文字頁寬較小,我們將尤拉線定理證明的過程,切成幾個頁面,再利用今天所製作的跑馬燈,進行頁面的切換。
