
現在有不少指令以外,可以將 git commit 紀錄視覺化的工具與插件(例如:Tower、Git History)。如果你在使用 git 時有搭配 branch 習慣,卻沒有制定一套使用 branch 的工作流程(branch-based workflow)的話,在你使用上述這些視覺化工具顯示包含多個 branch 的 git commit 紀錄時,常會得到一個盤根錯節、不易讀的圖形結果,這也表示較難從你的 git commit 紀錄去了解你的開發過程。如果你跟我一樣不希望在專案開發一段時間後有相似的情況發生,那就可以看一下接下來要介紹的內容。
以下段落參考 GitHub Docs 的 GitHub flow 章節。
GitHub flow 故名思義,需要搭配 GitHub 帳號與 repository 一同使用,是一種輕量(lightweight)且基於分枝的工作流程(branch-based workflow)。
依照 GitHub flow,每次要對專案中的檔案進行更動時,都會經歷下面列出的六個步驟:
從以上六個步驟可以看出,GitHub flow 適合團隊成員使用同一個 repository 進行開發時的溝通。然而在本次「基於自然語言處理的新聞意見提取應用」的開發過程中,主要是由我一人獨立進行,所以建立 pull request 的機制顯得不是太必要,因此會採用接下來要講到的 Git flow。等到之後此專案開發到一定程度,決定在 GitHub 上開源時,才會搭配 GitHub flow。
算然 Git flow 這一個 model 早在 2010 年就問世了。我卻是在不久前閱讀高見龍的為你自己學 Git 時,才從Git Flow 是什麼?為什麼需要這種東西? 得知 Git flow 這一概念的。文中提到 Git flow 這一概念是源自 A successful Git branching model,下面介紹也參考自這篇文章的內容。
於文章開頭的 reflect 中有提到:
- 如果你的團隊正在持續交付(continuous delivery)軟體,則建議採用一個更簡單的工作流程(如GitHub flow),而不是試圖將 Git flow 硬塞進你的團隊中。
- 但是,如果你正在構建需要明確版本控制的軟體,或者你需要支持軟體在外的多個版本,那麼 Git Flow 可能仍然適合你的團隊,就像過去10年來對人們一樣。
所以是否一定要使用 Git flow 或是任何 git 工作流程並不是絕對的。根據我過去跟同學合作的經驗,如果在自己或其他人不熟悉要使用的 git 工作流程,或者只是一個小型、短期或是簡單的專案開發的情況下,盲目使用 Git flow 或是任何 git 工作流程可能會增加工作上的卡頓。所以在使用之前建議一定要三思。單就我這次的個人開發而言,配合後續會介紹的工具使用 Git flow ,可說是幾乎無額外負擔,雖然這次無關團隊合作的順利進行,但可以讓我的開發步驟有條有理,容易被閱讀。
Git flow 中的分枝種類可以分成以下兩群,每群由數個使用場景不同的分支類型組成:
無限生命週期的數個主要分支
有限生命週期的數個次要分支
master 和 develop 這兩個主要分枝會長期存在於遠端的 repository。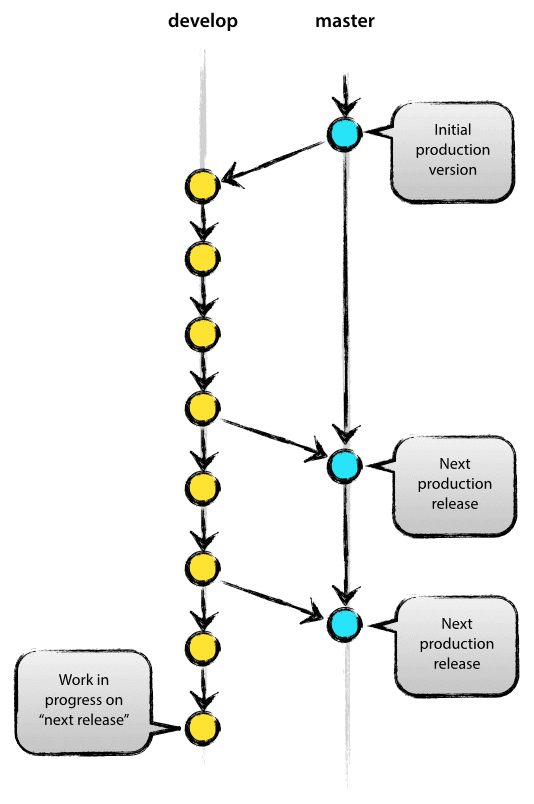
圖片出自 A successful Git branching model
如上圖中所示,開發中的版本會持續在 develop 這一分枝上進行(黃色點),而當 develop 這一分枝上的版本確定可以被發佈後(at production-ready state),就會被合併(merge)到 master 這個分枝上(藍色點),並且賦予新增節點一個 tag 來標記版本,例如 v2.2.1 或 2.2.1。
Feature branch、Release branch 和 Hotfix branch 這些有限生命週期的次要分枝,分別適用不同的使用場景,以下將一一介紹。
Feature branch 用於為即將發佈或未來的版本開發新功能。在開始開發某個功能時,之後將包含此功能的目標版本通常是未知的。功能分支的本質是,只要功能處於開發階段,它就存在,但最終將被合併回(以明確地將新功能添加到即將發佈的版本中)或丟棄(如果新功能令人失望)。
Feature branch 通常僅存在於開發人員的 repository 中,而不存在於遠端的 repository 中(如 origin)。
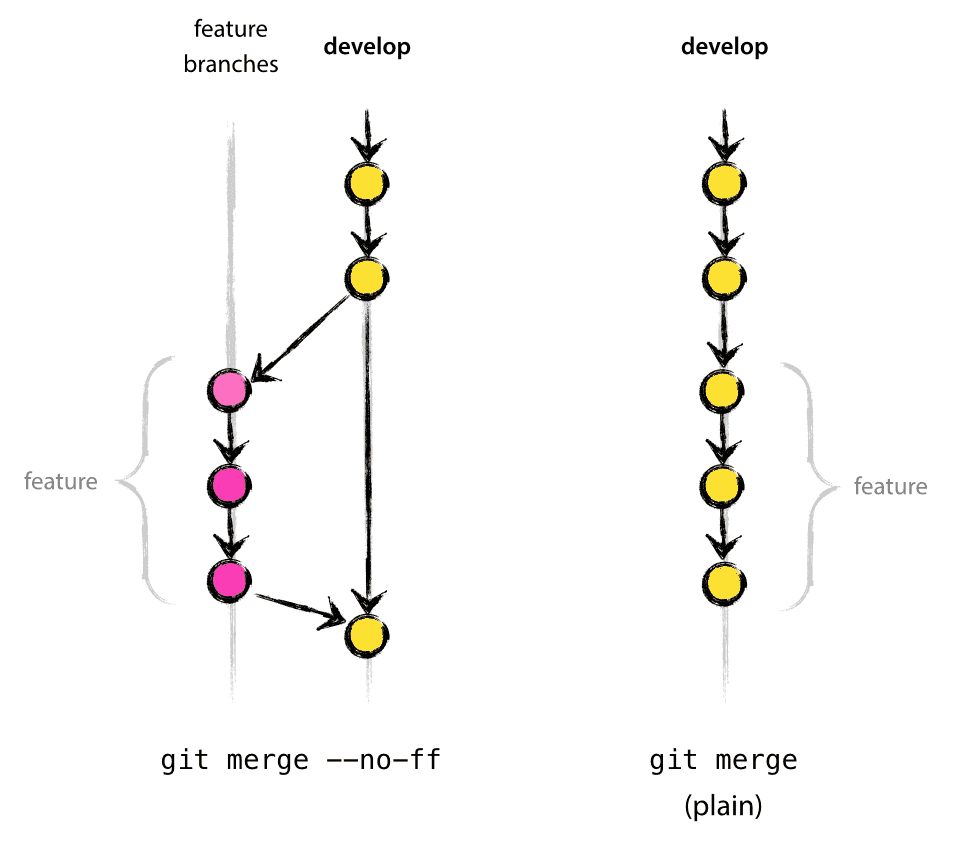
圖片出自 A successful Git branching model
如上圖所示,Feature branch 只會從 develop 分枝出去,並且只會合併(merge)回develop 分枝。
Release branch 只會從 develop 分枝出去,並且需要同時合併(merge)到 develop 和 master 分枝。通常會命名為 release-*。
一旦獲得了足夠的功能用於發佈(或者預定的發佈日期即將來臨),您就可以從 develop 中分叉出一個 Release branch,用來進行上線前的最後測試。
創建 Release branch 後 develop 分支將進入下一個發佈週期,因此在此之後不會添加任何新功能至建立的 Release branch,只有 bug 修復、文件撰寫和其他面向發佈的任務應位於此分支中。一旦準備好,建立的 Release branch 分支就會合併(merge)到 master 分枝並標記一個版本號。概念如下圖所示:
圖片及上一段參考自 https://www.atlassian.com/git/tutorials/comparing-workflows/gitflow-workflow
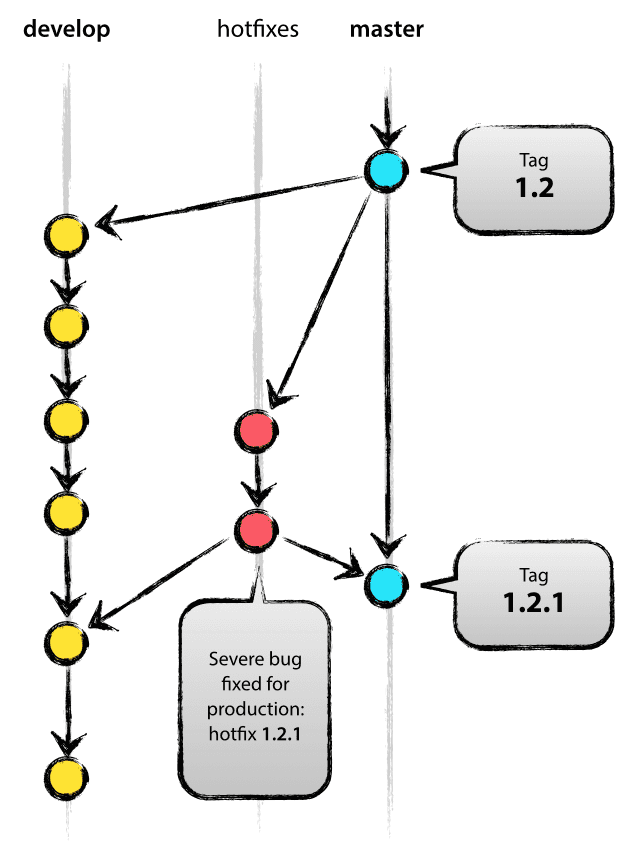
Hotfix branch 只會從 master 分枝出去,並且需要同時合併(merge)到 develop 和 master 分枝。通常會命名為 hotfix-*。
當必須立即解決 master 分枝上生產版本中的關鍵 Bug 時,從 master 分枝上的相應標記版本分支出 Hotfix branch,用來解決此 Bug 並產生新的小改版。如下圖所示:
如果你對 GitLab flow 感興趣,可以參考 Introduction to GitLab Flow
由於這次專案沒有採用,且我過去沒有相關的使用經驗,在此就不多做介紹。
稍早介紹了 Git flow 的基本概念,但是如果要純用 git 指令來完成該流程中的每一個步驟,先不論能否記得起來,可能還是免不了不小心打錯 git 指令的情況,造成的爛攤子要復原可是件麻煩事。所以可以使用 git-flow 這一工具。
以下內容參考 https://www.atlassian.com/git/tutorials/comparing-workflows/gitflow-workflow
brew install git-flow
其他作業系統安裝方法請參考 https://www.atlassian.com/git/tutorials/comparing-workflows/gitflow-workflow
cd 到專案資料夾git flow init
可以發現完成後 develop 分枝被建立,終端視窗中效果如下圖:
$ git flow init

Initialized empty Git repository in ~/project/.git/
No branches exist yet. Base branches must be created now.
Branch name for production releases: [main]
Branch name for "next release" development: [develop]

How to name your supporting branch prefixes?
Feature branches? [feature/]
Release branches? [release/]
Hotfix branches? [hotfix/]
Support branches? [support/]
Version tag prefix? []

$ git branch
* develop
 main
git flow feature start 新功能或特徵的名稱
feature/新功能或特徵的名稱 的分枝。git flow feature finish 新功能或特徵的名稱
git flow release start 版本號(例如:0.1.0)
release/版本號 的分枝。git flow release finish '版本號'(例如:0.1.0)
git flow hotfix start 要修理的項目名稱
git flow hotfix finish 要修理的項目名稱
這部份摘自 https://www.atlassian.com/git/tutorials/comparing-workflows/gitflow-workflow
Some key takeaways to know about Gitflow are:
- The workflow is great for a release-based software workflow.
- Gitflow offers a dedicated channel for hotfixes to production.
除了前面提到的 git 分枝工作流程外,git commit message 也同為專案開發過程中的重要環節。我想多數人都會希望自己與要查看開發紀錄的其他人會看的懂過去的 commit message,所以好的 commit message 格式規範必然少不了,下面介紹我在本次開發過程中給自己的規範。
好的標題格式可以讓你在查看 git log 時賞心悅目,這次專案中我使用 Commit Message Guide 裡提到的規範,採用下面的形式:
<type>: <description>
以下為 type 的補充描述:
- chore
For commits that complete routine/automated tasks such as upgrading dependencies.- deprecate
For commits that deprecate functionality.- feat
For commits that add new functionality to Blockly.- fix
For commits that fix bugs/errors in Blockly.- release
For commits that relate to the release of a new version.
寫的有些匆忙,如果文章有錯誤,歡迎指正~

