每天的專案會同步到 github 上,可以前往 這個網址 如果對於專案有興趣或是想討論一些問題,歡迎留言 OR 來信討論,信箱為:nickchen1998@gmail.com
昨天有提到在 pytest 當中有一個叫做 fixture 的功能,可以做到類似 setup、teardown 的功能,fixture 和他們最大的差別在於,fixture 可以參數化,並且可以回傳出參數提供其他 test case 做使用,今天我們就來好好介紹他
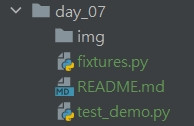
在開始撰寫之前,先介紹一下本次的目錄架構,由於不想造成程式碼太過混亂,fixture 的部分會存放在 fixtures.py 當中,要使用的時候再使用 import 進來進行使用,而各個 test case 則是寫在 test_demo.py 當中
fixture 裝飾器參數介紹
程式解釋
@pytest.fixture 標註該函式為 fixtureimport pytest
from fake_useragent import FakeUserAgent
@pytest.fixture(name="headers", scope="function", autouse=False)
def headers_fixture() -> dict:
ua = FakeUserAgent()
headers = {"User-Agent": ua.random}
return headers
接著我們回到 test_demo.py 當中,來使用剛剛所製作的 fixture。使用的方式則非常簡單,首先我們必須將剛剛撰寫好的 fixture 的 function 給 import 進來,這樣 pytest 才抓地到,接著只需要在 test case 接收參數的地方打上剛剛為 fixture 命名的名稱 (若無則預設為 fixture 的 function name),接著我們就可以在 test case 內使用此 fixture 回傳出的內容了。
程式碼解析:
https://httpbin.org/headers 來取得我們送出去的 headers備註:本測試範例只使用了一個 fixture 作為展示,實際上一個 test case 可以同時使用多個 fixture 是沒問題的
import requests
from fixtures import headers_fixture

# 單純不讓 pycharm 跳驚嘆號,沒有實際用途
use_fixtures = [headers_fixture]


def test_assert_headers(headers: dict):
    url = "https://httpbin.org/headers"
    res = requests.get(url=url, headers=headers)

    print(res.status_code)
    print(res.json())

    assert res.status_code == 200
    assert res.json()['headers']["User-Agent"] == headers["User-Agent"]
fixture 除了可以在 test case 當中使用,同樣也可以在不同的 fixture 間使用,下面用一個簡單的例子來介紹。
簡單來說,就是將前面原本寫在 test_case 內取出 User-Agent 的部分,抽出來另外撰寫一個 fixture 做處理,這樣 test_case 內就只需要負責進行驗證即可。
@pytest.fixture(name="make_user_agent", scope="function", autouse=False)
def make_user_agent_fixture() -> dict:
    ua = FakeUserAgent()
    headers = {"User-Agent": ua.random}

    return headers


@pytest.fixture(name="parse_user_agent", scope="function", autouse=False)
def parse_user_agent_fixture(make_user_agent: dict) -> dict:
    url = "https://httpbin.org/headers"
    res = requests.get(url=url, headers=make_user_agent)
    user_agent = res.json()["headers"]['User-Agent']

    return {"User-Agent": user_agent}
from fixture import parse_user_agent_fixture, make_user_agent_fixture

use_fixtures = [make_user_agent_fixture, parse_user_agent_fixture]


def test_assert_user_agent(make_user_agent: dict, parse_user_agent: dict):
    assert make_user_agent == parse_user_agent
今天我們介紹了 fixture 的一些基本用法,相信 fixture 可以很好的協助我們進行測試程式的撰寫,讓測試程式越來越集中在驗證該驗證的東西上,而不是寫了一堆和想驗證的東西無關的程式
明天我們會教大家兩個虛擬的資料庫,讓我們可以在不用建立實體資料庫的情況下,就可以測試一些和資料庫操作有關的函式,而這個部分則會搭配今天所教的 fixture 進行使用
