此次我們的爬蟲目標是將 2022 鐵人賽 DevOps 組的所有文章進行爬取。
爬蟲程式邏輯大致如下:
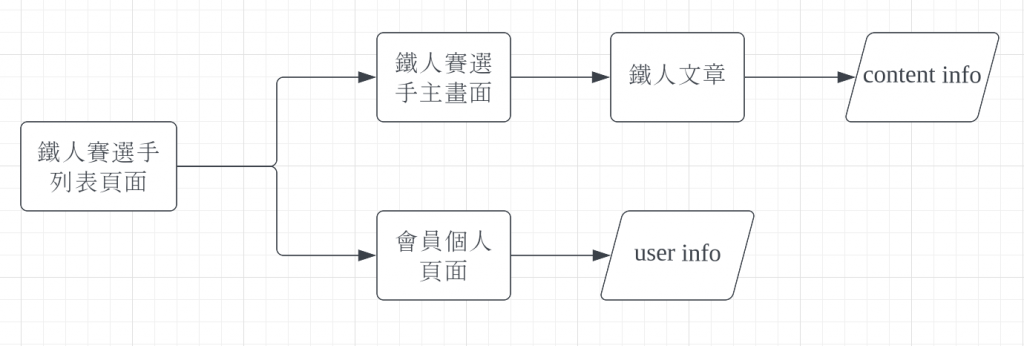
首先的起始畫面會定在 https://ithelp.ithome.com.tw/2022ironman/signup/list?group=devops,並取得頁面上各個參加選手的鐵人賽主畫面網址 https://ithelp.ithome.com.tw/users/20151613/ironman/5333
觀察鐵人賽主畫面網址可以發現網址規則為https://ithelp.ithome.com.tw/users/{使用者 ID}/ironman/{鐵人賽 ID}因此可以將 使用者 ID 從鐵人賽主畫面網址分離出來後https://ithelp.ithome.com.tw/users/20151613,就可以得到會員個人頁面的訪問網址。
從鐵人賽主畫面網頁中,可以得到此次發文的 Like、留言 、評論 等與文章相關的屬性以及各篇鐵人文章的網址。
訪問各篇鐵人文章,以 html 標籤 h3 p li 為目標及提取較為有閱讀價值的內文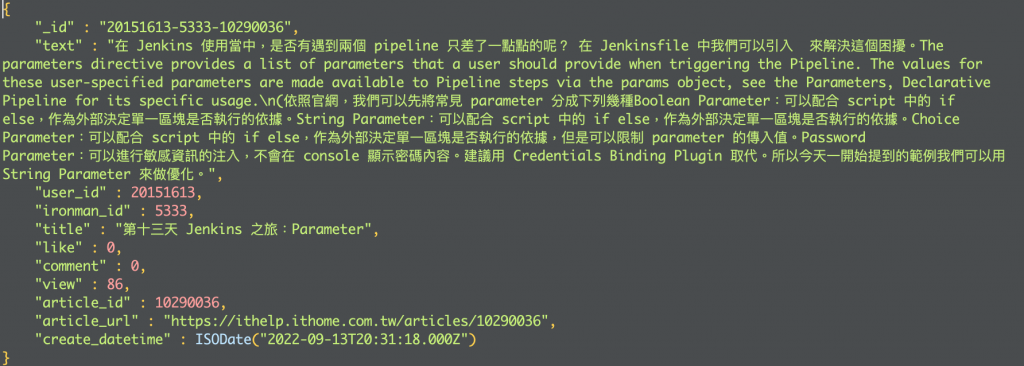
在實作爬蟲程式前,我們需要來定義欄位。總共我們會得到兩種資料
| 欄位名稱 | 資料屬性 | 範例資料 | 說明 |
|---|---|---|---|
| user_id | int | 20151613 | ithome 使用者 ID |
| user_name | str | BenLiu | ithome 使用者名稱 |
| ithome_level | str | iT邦新手 5 級 | ithome 使用者等級 |
| ithome_point | int | 90 | ithome 使用者點數 |
| user_viewed | int | 887 | ithome 使用者總被觀看數 |
| user_followed | int | 2 | ithome 使用者總被追蹤數 |
| ask_question | int | 0 | ithome 使用者發問數 |
| article | int | 21 | ithome 使用者總文章數 |
| answer | int | 0 | ithome 使用者總回答數 |
| invitation_answer | int | 0 | ithome 使用者總被邀請回答數 |
| best_answer | int | 0 | ithome 使用者總被最佳解答數 |
| 欄位名稱 | 資料屬性 | 範例資料 | 說明 |
|---|---|---|---|
| user_id | int | 20151613 | ithome 使用者 ID |
| ironman_id | int | 5333 | 鐵人賽 ID |
| title | str | 第二天 Jenkins 之旅: Welcome to Jenkins! | 鐵人賽文章標題 |
| like | int | 0 | 鐵人賽文章按讚數 |
| comment | int | 0 | 鐵人賽文章留言數 |
| view | int | 450 | 鐵人賽文章觀看數 |
| article_id | int | 10287313 | 鐵人賽文章 ID |
| article_url | str | https://ithelp.ithome.com.tw/articles/10287313 | 鐵人賽文章網址 |
| create_datetime | datetime | ISODate("2022-09-20T00:32:35.000Z") | 鐵人賽文章發表時間 |
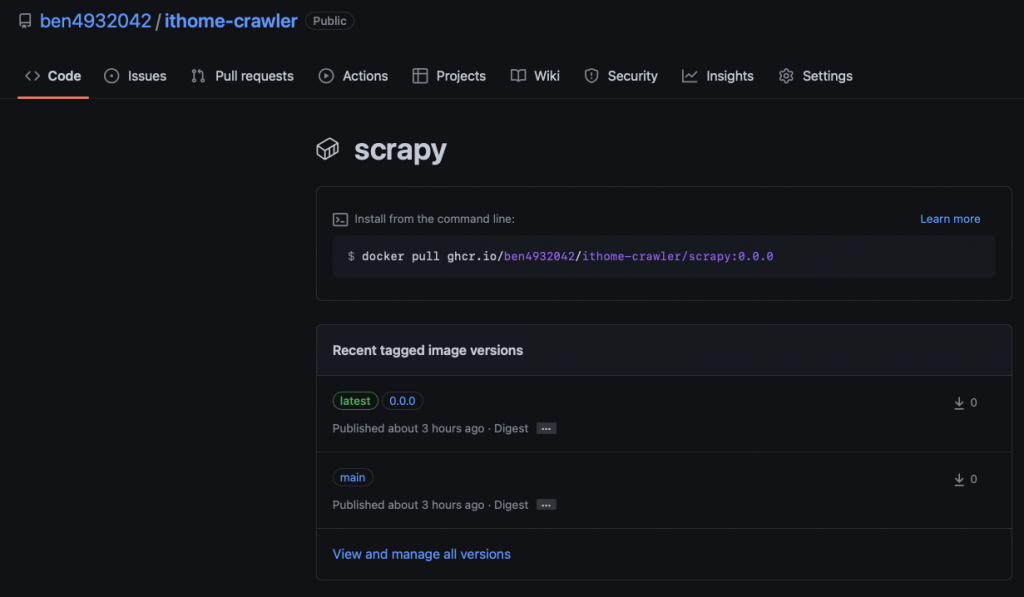
Github 專案位置:https://github.com/ben4932042/ithome-crawler
首先, CI Pipeline 的部分我會沿用在 Multibranch Pipeline,並進行小部分修改。
pipeline{
    agent {
            label 'gcp-agent-1'
        }

    environment {
        IMAGE_REFERENCE = "docker.pkg.github.com/ben4932042/ithome-crawler/scrapy:${env.BRANCH_NAME}"
        IMAGE_LATEST = "docker.pkg.github.com/ben4932042/ithome-crawler/scrapy:latest"
    }

    stages{
        stage("Setup registry auth"){
            when {
                anyOf{
                    branch "main"
                    tag "*"
                }
            }
            steps{
                withCredentials([usernamePassword(credentialsId: 'github-registry-secret', usernameVariable: 'USER', passwordVariable: 'TOKEN')]){
                    script{
                        sh "docker login docker.pkg.github.com -u ${USER} -p ${TOKEN}"
                    }
                }
            }
        }

        stage("build and test the project") {
            agent {
                docker {
                        image "python:3.7-slim"
                        args '-u root'
                    }
            }
            stages {
               stage("Setup requirements") {
                   steps {
                       sh """
                        pip3 install -r requirements.txt
                        pip3 install pylint=='2.13.7'
                        pip3 install pytest=='7.1.2'
                       """
                   }
               }

               stage("Lint") {
                    steps{
                        sh """
                            export PYTHONPATH=${WORKSPACE}
                            pylint --fail-under=10 src
                        """
                    }
               }

               stage("Test") {
                   steps {
                       sh """
                            export PYTHONPATH=${WORKSPACE}
                            pytest tests
                        """
                   }
               }
            }
        }

        stage("Build"){
            when {
                anyOf{
                    branch "main"
                    tag "*"
                }
            }
            steps{
                sh "docker build -t ${IMAGE_REFERENCE} ."
            }
        }

        stage("Push"){
            when {
                anyOf{
                    branch "main"
                    tag "*"
                }
            }
            steps{
                sh "docker push ${IMAGE_REFERENCE}"
            }
        }
        stage("Update Latest image"){
            when {
                tag "*"
            }
            steps{
                sh """
                    docker tag ${IMAGE_REFERENCE} ${IMAGE_LATEST}
                    docker push ${IMAGE_LATEST}
                """
            }
        }
    }
    post{
        always{
            cleanWs()
        }
    }
}

接著我們從 stage 順序來說明:
Setup registry auth:進行 Github container registry 的登入。build and test the project:準備一個 python:3.7 的 container 並以 root 身份來跑我們的 pipeline。Setup requirements:在 container 內安裝 python 的相依套件。Lint:用 pylint 來對我們的 python script 來做靜態檢查,亦可因實際狀況換成其他第三方靜態程式碼分析工具,像是 SonarQube。Test:以 pytest 進行 unit test (這部分的 test 我只先寫了一個範例 script 讓他跑而已)Build:以我們宣告的 Dockerfile 進行 docker image 的建置,並且 image 的版本為當前 branch 名稱,例如 docker.pkg.github.com/ben4932042/ithome-crawler/scrapy:0.0.0 或是 docker.pkg.github.com/ben4932042/ithome-crawler/scrapy:main
Push:上傳我們剛剛建立的 docker image 到 github container registry,並且可以在 Github Project 下看到。FROM python:3.7-slim
LABEL org.opencontainers.image.source https://github.com/ben4932042/ithome-crawler
RUN mkdir /crawler
WORKDIR /crawler
COPY . /crawler
RUN pip install --no-cache-dir -r requirements.txt
Update Latest image:在 branch 為 main 的情況下,將我們剛建立的 image tag 成 latest 的 docker image 並且上傳到 Github。Declarative: Post Actions: 做 workspace 的 housekeeping。下面為在 Multibranch Pipeline 的截圖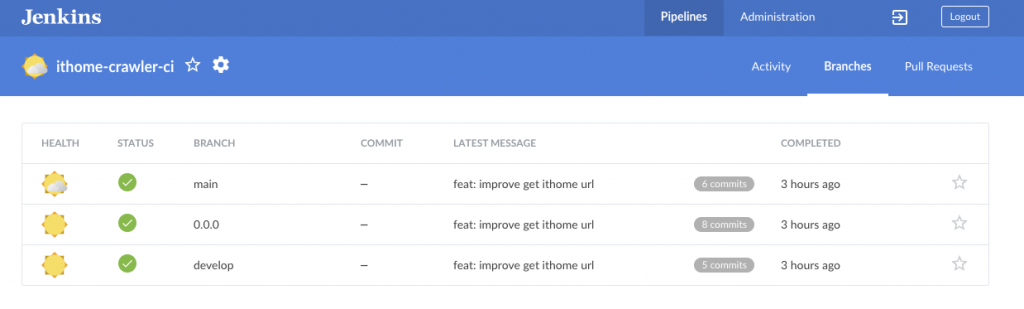
本地測試 image:
cd {{ GITHUB_PROJECT_PATH }}

# docker
cd deploy/docker && docker-compose up

# kubernetes
cd deploy/kubernetes/ithome_crawler && helm install {{ RELEASE }} . \
    --set schedule="* * * * *" \ # crawler job 執行頻率
    --set env.mongo.host=mongodb://localhost:27017 \ # mongodb 位置
    --set env.mongo.db=ithome_ironman   # mongodb database 名稱


 iThome鐵人賽