先前已經針對 Angular 的管道 (Pipe) 與服務 (Server) 撰寫單元測試程式,接下來會陸陸續續說明如何撰寫 Angular 元件 (Component) 各種情境的測試程式。Angular 元件 (Component) 與服務 (Service) 不同地方在於:元件包含的頁面範本,以供使用者操作的頁面,而今天會先說明頁面顯示的正確性要如何透過單元測試程式進行驗證。
這一篇會利用首頁元件 AppComponent (檔名為 app.component.ts) 進行說明。
<mat-toolbar color="primary">
  <span class="title">2022 鐵人賽範例</span>
  <button mat-raised-button color="primary" [routerLink]="['product', 'list']">
    產品清單
  </button>
  <span class="spacer"></span>
  <button mat-icon-button [routerLink]="['shopping-cart', 'list']">
    <mat-icon>shopping_cart</mat-icon>
  </button>
  <button mat-icon-button [routerLink]="['login']">
    <mat-icon>login</mat-icon>
  </button>
</mat-toolbar>
<div>
  <router-outlet></router-outlet>
</div>
如上面程式,在 AppComponent 元件中,使用了多個 Angular Material 的元件,因此如同於 AppMoulde 的設定一樣,需要在測試模組中引用對應的 Angular Material 元件模組;並將此元件加入測試模組的 declarations 陣列屬性中。
describe('AppComponent', () => {
  beforeEach(async () => {
    await TestBed.configureTestingModule({
      imports: [
        RouterTestingModule,
        MatButtonModule,
        MatToolbarModule,
        MatIconModule,
      ],
      declarations: [AppComponent],
    }).compileComponents();
  });
});
如一開始所說的,Angular 元件 (Component) 不同於服務 (Service) 的是多了使用者操作頁面,為此 Angular 提供了 ComponentFixture 來讓我們可以針對元件的頁面範本與邏輯程式進行測試。
describe('AppComponent', () => {
  let component: AppComponent;
  let fixture: ComponentFixture<AppComponent>;

  beforeEach(async () => {
    await TestBed.configureTestingModule({ ... }).compileComponents();

    fixture = TestBed.createComponent(AppComponent);
    component = fixture.componentInstance;
    fixture.detectChanges();
  });
});
因此,如上面程式,在定義完 TestBed 之後,就會利用 TestBed 的 createComponent 方法來取得指定元件的ComponentFixture 物件,此物件內的 componentInstance 屬性記錄著 AppComponent 元件實體。需要注意的是,在呼叫此方法之後,TestBed 的組態定義就無法被更動。
最後,就可以利用從 fixture.componentInstance 屬性取得的元件實體,來判斷此元件是否在 Angular 應用程式執行時可以被建立,這也是在利用 Angular CLI 建立元件時,預設會新增的第一個測試案例。
it('元件應可以被建立', () => expect(component).toBeTruthy());
ComponentFixutre 物件也提供了 debugElement 屬性,讓我們可以取得運行過程中,頁面 DOM 元素的樣式與屬性。因此我們就可以利用這個屬性,來檢驗頁面顯示的資訊是否正確。
it('標題應顯示為"2022 鐵人賽範例"', () => {
  // Arrange
  fixture.debugElement.query(By.css('.title'));

  // Act

  // Assert
});
我們可以利用 debugElement 屬性提供的 query 方法來搜尋頁面的 DOM 元素。我們可以如同上面程式,使用 By.css(‘.title’) 語句來取得頁面上包含 .title 樣式類別的 DOM 元素;By.css() 方法指定的是一 CSS 選擇器字串,所以除了 css 類別外,也可以指定標籤名稱或 ID 名稱。
除了利用樣式搜尋頁面 DOM 元素外,也可以利用 By.directive() 方法來取得指定特定元件類型的頁面元素。例如,當我們希望取得頁面上 MatButton 按鈕元件時,就可以寫成:
const button = fixture.debugElement.query(By.directive(MatButton));
不過,在 AppComponent 元件中有三個 MatButton 按鈕元件,利用上面程式只會取得第一個元件,若要取得所有的按鈕元件,則會使用 debugElement 的 queryAll() 方法。
const buttons = fixture.debugElement.queryAll(By.directive(MatButton));
在利用 query() 方法取得標題元素後,就可以利用 DebugElement 內的 nativeElement 取得原生的 DOM 元素,進而去驗證此 DOM 元素屬性值內容。
it('標題應顯示為"2022 鐵人賽範例"', () => {
  // Arrange
  const titleElement = fixture.debugElement.query(By.css('.title')).nativeElement;

  // Act

  // Assert
  expect(titleElement.textContent).toBe('2022 鐵人賽範例');
});
如先前文章一樣,最後利用 ng test 命令來確認測試結果。
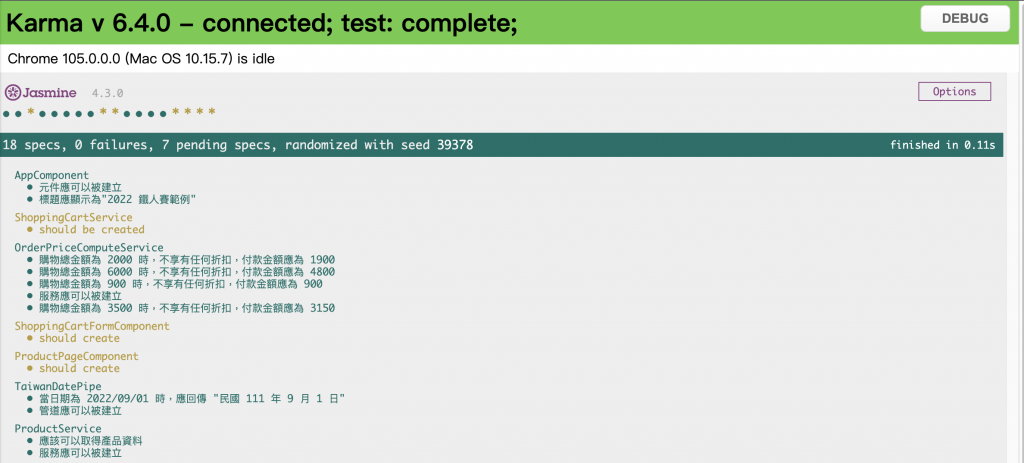
這一篇先透過固定的標題文字來說明如何測試 Angular 元件頁面顯示結果,完整的測試程式放在 GitHub 中。不過,實務上更常實作的是:依照使用的資料顯示頁面內容;接下來就會針對此種測試案例進行說明。