iT邦幫忙

2022 iThome 鐵人賽

DAY 17
0
Mobile Development

寫Jetpack Compose ,會很有畫面哦!系列 第 17

寫Jetpack Compose ,會很有畫面哦! - Day17 Compose 的版面配置 part5

  • 分享至 

  • xImage
  •  

Compose 的版面配置 Layouts

Jetpack Compose 可協助您為應用程式輕鬆設計高效率的版面配置。
以下頁面詳細介紹如何設計和實作版面配置:
  • Layout basics 版面配置基本概念:瞭解直觀應用程式 UI 的建構模塊。
  • Material Components and layouts 質感元件和版面配置:瞭解 Compose 的質感元件和版面配置。
  • Custom layouts 自訂版面配置:瞭解如何控管應用程式的版面配置,以及如何設計自己的自訂版面配置。
  • Build adaptive layouts 建立自動調整版面配置:瞭解如何使用 Compose 根據不同螢幕大小、方向和板型規格建構版面配置。
  • Alignment lines 對齊線條:瞭解如何建立自訂對齊線條,以精確對齊並定位 UI 元素。
  • Intrinsic measurements 固有測量尺寸:瞭解如何為 UI 元素設定固有高度或寬度,讓您精確控管元素在版面配置中的編排方式。
  • ConstraintLayout:瞭解如何在 Compose UI 中使用 ConstraintLayout。

ConstraintLayout

ConstraintLayout 這個大家應該都很熟悉的物件了,在Compose也有。
ConstraintLayout 出來就是要解決

  • 用LinearLayout產生的結構太深
  • 用元件的相依性,來適應畫面尺寸位置,和結構扁平化

在Compose中使用 ConstraintLayout

要先在 build.gradle 中加

	implementation "androidx.constraintlayout:constraintlayout-compose:1.0.1"

Compose 中的 ConstraintLayout 是使用 DSL,那使用方法是:

  • 用 createRefs() 建立一群物件名稱 或是createRef()來建立單一物件名稱,在可組合函式中宣告使用的參照名稱用
  • 使用 constrainAs() 來宣告用ConstraintLayout中的物件 和修飾符物件基準點。
  • 使 linkTo() 來指定基準點的參數。
  • 基準點的參數 parent 是現有的參數,可組合項本身的限制。

以下是使用 ConstraintLayout 的可組合項範例:

@Composable
fun Greeting(name: String) {
    //Text(text = "Hello $name!")
    ConstraintLayout {
        // Create references for the composables to constrain
		//宣告一群物件名稱
        val (button , text) = createRefs()
		//宣告單一物件名稱
        val kevin = createRef()
        //最上的
        Button(
            onClick = { /* Do something */ },
            // Assign reference "button" to the Button composable
            // and constrain it to the top of the ConstraintLayout
            //宣告用的物件名稱
            modifier = Modifier.constrainAs(button) {
				 //修飾符物件的基準點
                //最頂 
                top.linkTo(parent.top, margin = 16.dp)
                start.linkTo(parent.start, margin = 16.dp)
                end.linkTo(parent.end, margin = 16.dp)
            }
        ) {
            Text("Button")
        }
        
        //最下的
        // Assign reference "text" to the Text composable
        // and constrain it to the bottom of the Button composable
        Text( "Hello $name!", Modifier.constrainAs(text) {
            //kevin物件的底
            top.linkTo(kevin.bottom, margin = 16.dp)
            start.linkTo(parent.start, margin = 16.dp)
            end.linkTo(parent.end, margin = 16.dp)
            //最底
            bottom.linkTo(parent.bottom, margin = 16.dp)
        },textAlign=TextAlign.Center
        )
        
        //中間的
		Text( "$name!", Modifier.constrainAs(kevin) {
            //bottom物件的底
            top.linkTo(button.bottom, margin = 16.dp)
            start.linkTo(parent.start, margin = 16.dp)
            end.linkTo(parent.end, margin = 16.dp)
            //text物件的上面
            bottom.linkTo(text.top, margin = 16.dp)
        },textAlign=TextAlign.Center
        )
    }
}
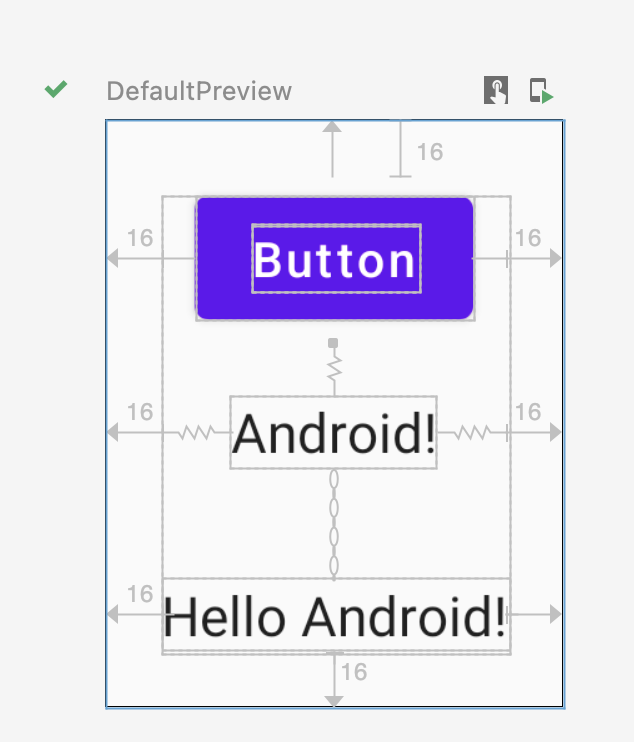
https://ithelp.ithome.com.tw/upload/images/20220923/20121643fdnhKSkgi1.png

使用心得:

一開始看可以使用ConstraintLayout覺得還滿好的呀,但實際用寫的方法,確沒有用拉的方法還快,
官網也建議不是很複雜的畫面就用Column 和 Row 就好了,但複雜的定義是~~~~什麼,就等用上專案吧

參考:

https://developer.android.com/jetpack/compose/layouts/constraintlayout


上一篇
寫Jetpack Compose ,會很有畫面哦! - Day16 Compose 的版面配置 part4
下一篇
寫Jetpack Compose ,會很有畫面哦! - Day18 Compose 的清單和格線 Lists and grids
系列文
寫Jetpack Compose ,會很有畫面哦!30
圖片
  直播研討會
圖片
{{ item.channelVendor }} {{ item.webinarstarted }} |
{{ formatDate(item.duration) }}
直播中

尚未有邦友留言

立即登入留言