這是一個使用相機模組的範例,在YT上面要找到符合我的需求的沒想到最後找到一個用西班牙語?的教學影片我一句都聽不懂的情況下照著影片keyin 還是順利完成
圖1: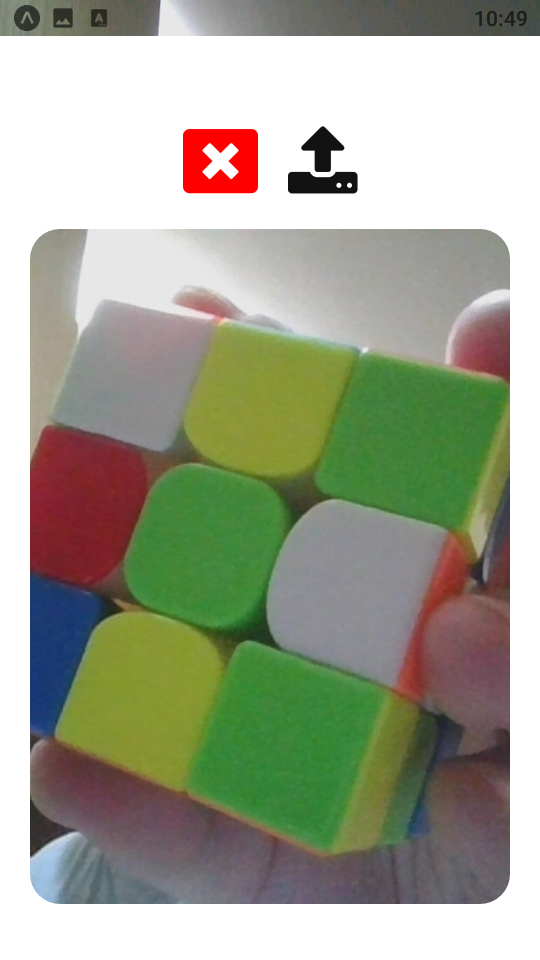
圖2:
圖3: 第一次開啟程式時會要求相機的使用權限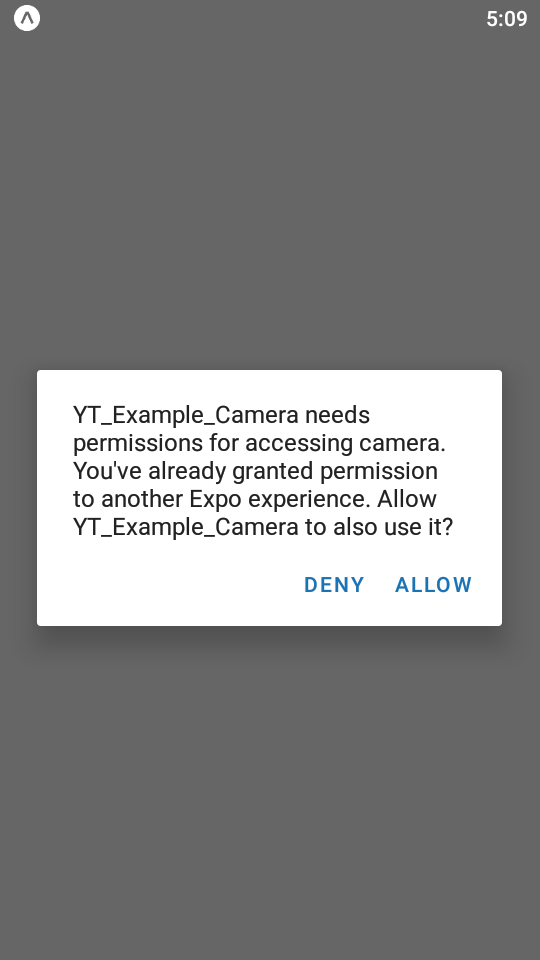
圖4: 照片都會存在DCIM的資料夾內,在模擬器裡用檔案管理員可以查看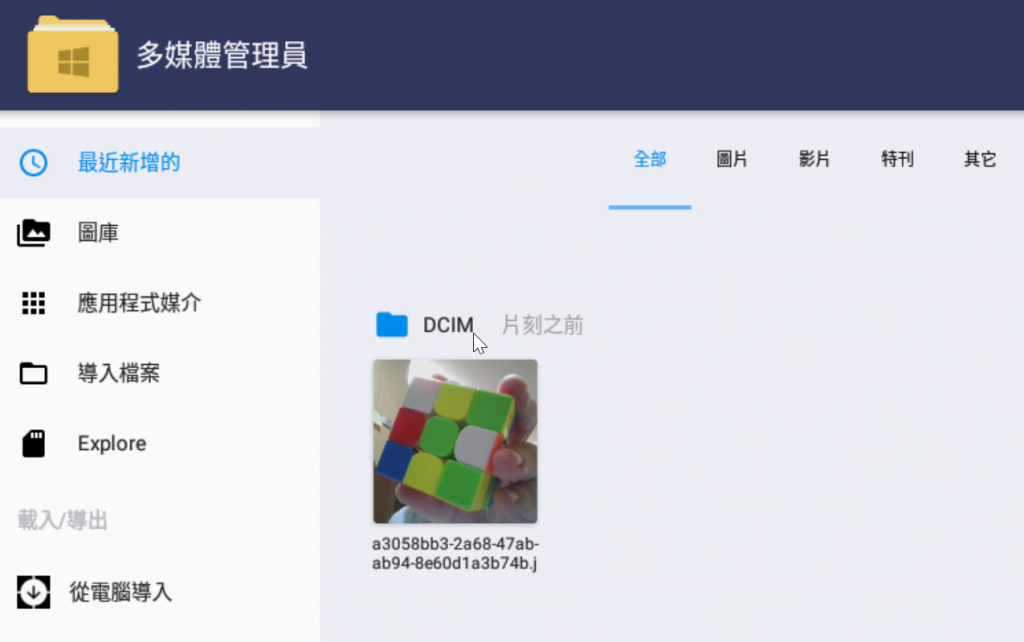
part1:
part2:
import React, { useState, useEffect, useRef } from 'react';
import { SafeAreaView, StyleSheet, Text, View, TouchableOpacity, Modal, Image, Alert } from 'react-native';
import { Camera } from 'expo-camera';
import { CameraType } from 'expo-camera/build/Camera.types';
import { FontAwesome, Ionicons } from '@expo/vector-icons';
// import * as Permissions from "expo-permissions";
import * as Location from 'expo-location';

import * as MediaLibrary from "expo-media-library";

export default function App() {
  const camRef = useRef(null)
  const [type, setType] = useState(Camera.Constants.Type.back)
  const [hasPermission, setHasPermission] = useState(null)
  const [cpaturedPic, setCpaturedPic] = useState(null)
  const [open, setOpen] = useState(null)

  const takePicture = async () => {
    // console.log("take picture")
    if (camRef) {
      const data = await camRef.current.takePictureAsync()
      // console.log(data)
      setCpaturedPic(data.uri)
      setOpen(true)
    }
  }

  // 儲存照片
  const savePicture = async () => {
    // console.log("save picture")
    const asset = await MediaLibrary.createAssetAsync(cpaturedPic)
      .then(() => {
        Alert.alert("Success", "照片存檔成功")
        setOpen(false)
      }).catch((e) => {
        console.log("error: ", e)
      });

  }

  //另一寫法
  // async function takePicture() {
  //   if (camRef) {
  //     const data = await camRef.current.takePictureAsync()
  //     console.log(data)
  //   }
  // }

  useEffect(() => {
    (async () => {
      const { status } = await Camera.requestCameraPermissionsAsync();
      setHasPermission(status === "granted")
    })();

    (async () => {
      // const { status } = await Permissions.askAsync(Permissions.CAMERA_ROLL)
      const { status } = await Location.requestForegroundPermissionsAsync();
      // console.log("status= ", status)
      setHasPermission(status === "granted")

    })();

  }, [])

  if (hasPermission === null) {
    return <View />
  } else if (hasPermission === false) {
    return <Text>沒有照相機的使用權限!!!</Text>
  }

  return (
    <SafeAreaView style={styles.container}>
      {/* 拍照區塊 */}
      <Camera
        style={{ flex: 1, }}
        type={type}
        ref={camRef}
      >
        <View style={{ flex: 1, backgroundColor: "transparent", flexDirection: "row" }}>
          <TouchableOpacity style={{
            position: "absolute",
            bottom: 20,
            left: 20,
          }}
            onPress={() => {
              setType(type === Camera.Constants.Type.back)
                ? Camera.Constants.Type.front
                : Camera.Constants.Type.back
            }}
          >
            {/* 前後鏡頭交換 的圖示按鈕 */}
            {/* <Text style={{ fontSize: 20, marginBottom: 15, color: "#fff" }}> 前後鏡頭交換</Text> */}
            <Ionicons name="ios-camera-reverse-sharp" size={24} color="white" />
          </TouchableOpacity>

        </View>
      </Camera>
      <TouchableOpacity
        style={styles.button}
        onPress={takePicture}
      >
        <FontAwesome
          name="camera"
          size={25}
          color="#fff"
        />
      </TouchableOpacity>

      {/* 展示照片區 */}
      {cpaturedPic &&
        <Modal
          animationType="slide"
          transparent={false}
          visible={open}
        >
          <View style={{ flex: 1, justifyContent: "center", alignItems: "center", margin: 20 }}>
            <View style={{ margin: 10, flexDirection: "row" }}>
              {/* 關閉的圖示按鈕 */}
              <TouchableOpacity
                style={{ margin: 10 }}
                onPress={() => setOpen(false)}
              >
                <FontAwesome
                  name="window-close"
                  size={50}
                  color="red"
                />
              </TouchableOpacity>

              {/* 存檔的圖示按鈕 */}
              <TouchableOpacity
                style={{ margin: 10 }}
                onPress={savePicture}
              >
                <FontAwesome
                  name="upload"
                  size={50}
                  color="#121212"
                />
              </TouchableOpacity>
            </View>
            {/* 在畫面中秀出照片 */}
            <Image
              style={{
                width: "100%",
                height: 450,
                borderRadius: 20,
              }}
              source={{ uri: cpaturedPic }}
            />
          </View>
        </Modal>
      }

    </SafeAreaView>
  );
}

const styles = StyleSheet.create({
  container: {
    flex: 1,
    justifyContent: 'center',
  },
  button: {
    justifyContent: 'center',
    alignItems: "center",
    backgroundColor: "#121212",
    margin: 20,
    borderRadius: 10,
    height: 50,
  },
});
git clone https://smilehsu@bitbucket.org/smilehsu/rn_example_camera.git
影片的內容(part1)很順利地做完,做第二片(part2)實作存檔功能時就卡關了

expo-permissions is now deprecated ...又碰到 套件被放生的情況
還有在stackoverflow 有查到替代的方案,順利解決。


 iThome鐵人賽