這篇會加入新成員,也是就是我們這次會用到 retrofit 來進行串接 API 以及 Moshi 來解析資料,在實作之前會先來講講什麼是 retrofit,以下如有解釋不清或是描述錯誤的地方還請大家多多指教:
Http 請求的第三方套件,使用 RESTful API 的設計,由 square 開發與維護,最低使用條件為 Java 8+ 和 Android API 21+,在 2.6.0 以前的版本,必須透過 Call Adapter 並搭配 Deferred 的型別來使用 coroutine 像是以下範例,但 2.6.0 以後的版本我們可以直接使用 suspend function(下面實作會提到):
...
@GET("path")
fun getHomeList(): Deferred<HotsProperty>
...

// retrofit
private val retrofit = Retrofit.Builder()
    .addConverterFactory(MoshiConverterFactory.create(moshi))
    .addCallAdapterFactory(CoroutineCallAdapterFactory())
    .baseUrl(BASE_URL)
    .client(client)
    .build()
一樣是由 square 所開發的 Json parser 的 library,目前依舊是 Gson 使用人數較多,星星數也較多,雖然 Moshi 是由 Kotlin 和 Java 撰寫,但還是需要依據專案需求選擇較符合的 parser 或是 custom type adapter。
加入 Retrofit, Moshi, Coroutine 的 library。
implementation 'com.squareup.retrofit2:retrofit:2.9.0'
implementation 'com.squareup.retrofit2:converter-moshi:2.9.0'
implementation 'com.squareup.moshi:moshi-kotlin:1.14.0'
implementation 'com.squareup.okhttp3:logging-interceptor:4.10.0'

// coroutine
implementation 'org.jetbrains.kotlinx:kotlinx-coroutines-android:1.6.4'
在 AndroidManifest 加入 internet 的 permission。
<uses-permission android:name=”android.permission.INTERNET”></uses-permission>
建立請求 API 的 Service 並創建 Retrofit:
interface WeathbyService {
    @GET("forecast.json")
    suspend fun getForecast(
        @Query("key") key: String = KEY,
        @Query("q") query: String,
        @Query("days") days: Int = 7,
        @Query("aqi") airQuality: String = "no"
    ): Response<ForecastResponse>

    @GET("search.json")
    suspend fun getForecastSearch(
        @Query("key") key: String = KEY,
        @Query("q") query: String
    ): Response<ForecastResponse>
}
object WeathbyRetrofit {
    private const val BASE_URL = "https://api.weatherapi.com/v1/"

    private val moshi = Moshi.Builder()
        .add(KotlinJsonAdapterFactory())
        .build()

    private val client = OkHttpClient.Builder()
        .addInterceptor(HttpLoggingInterceptor().apply {
            level = HttpLoggingInterceptor.Level.BODY
        }).build()

    fun makeRetrofitService(): WeathbyService {
        return Retrofit.Builder()
            .addConverterFactory(MoshiConverterFactory.create(moshi))
			.baseUrl(BASE_URL)
            .client(client)
            .build().create(WeathbyService::class.java)
    }
}
data class ForecastResponse(
    @Json(name = "location") val location: Location,
    @Json(name = "current") val current: CurrentForecast,
    @Json(name = "forecast") val forecast: Forecast
)
先在 MainActivity 執行,等到介紹 ViewModel 時會將打資料邏輯放到 ViewModel 中:
fun getCurrentForecast() {
    val service = WeathbyRetrofit.makeRetrofitService()
    CoroutineScope(Dispatchers.IO).launch {
         withContext(Dispatchers.Main) {
            runCatching {
                service.getForecast(query = "London")
            }.onSuccess {
                Log.i("success", "onCreate: $it")
            }.onFailure {
                Log.i("fail", "onCreate: $it")
            }
        }
    }
}
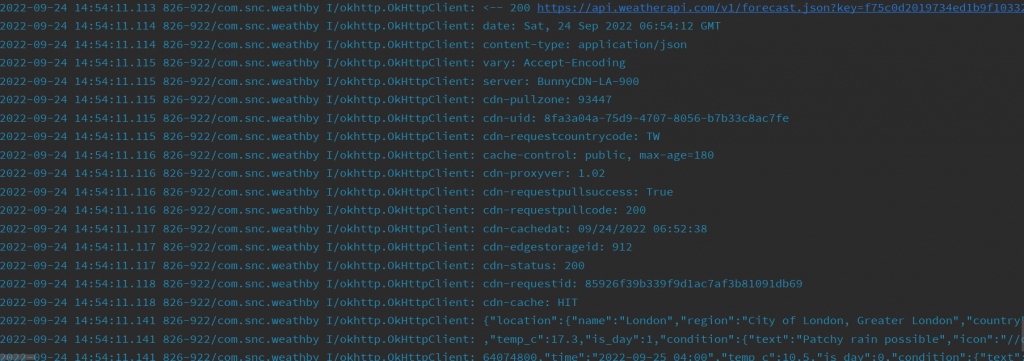
build 完 app 就可以在 logcat 上看到 API request 和 response 的狀態了:
Kotlin Coroutines and Retrofit
Retrofit with Kotlin Coroutine in Android
