專案開發後期會進入 QA 測試階段,其中免不了各種手動點擊切換頁面或迴歸測試等,每個功能都要人工進到畫面中看一遍有沒有問題,這樣不僅工作量大重複性高,且當項目越來越大時,手動測試會變得更不可靠也很容易遺漏某個頁面沒有測到,造成產品上線後的問題。
自動化測試的場景主要是想提高測試覆蓋率,包含用戶主要使用的項目,如登錄註冊,操作表單 CRUD,修改個人資料等。E2E 端對端測試透過使用者的工作流程來檢查應用程式是否按預期的進行。
自動測試前期需要投入規劃與開發的成本,且隨著專案需求的變化,自動化測試的程式也有可能需要跟著修改,建議一開始不需要太鑽牛角尖,先從基本常規的手動操作轉自動化開始,之後再持續不斷的改善,Cypress 將會是不限於 Angular 專案使用的自動化測試的好工具。
本專案整合使用 mockserver 配合假資料做自動測試
npm install cypress -D
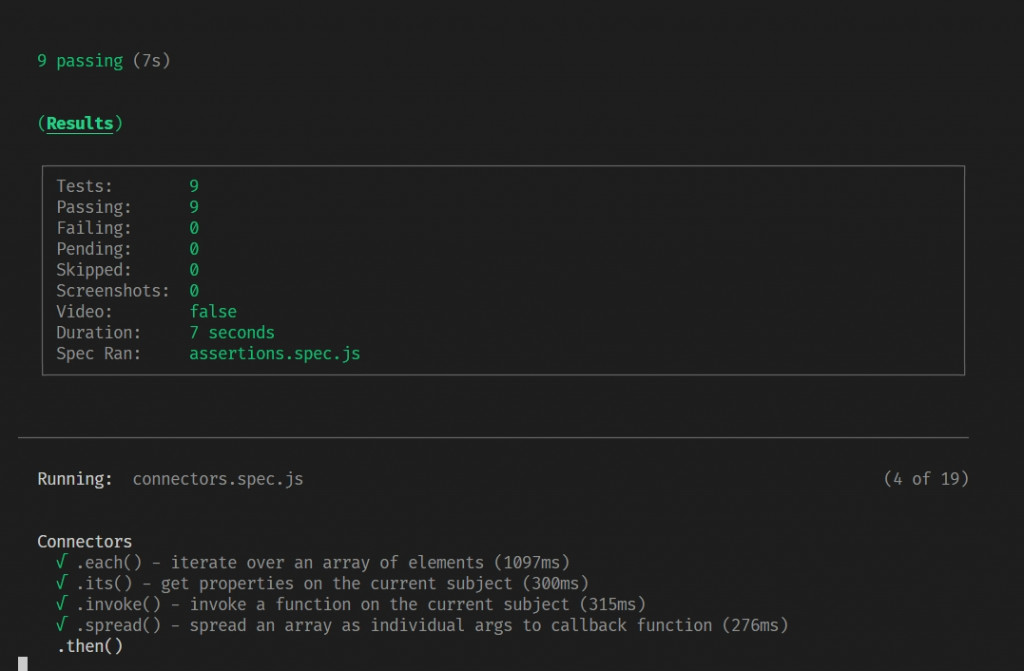
npx cypress run
npx cypress open
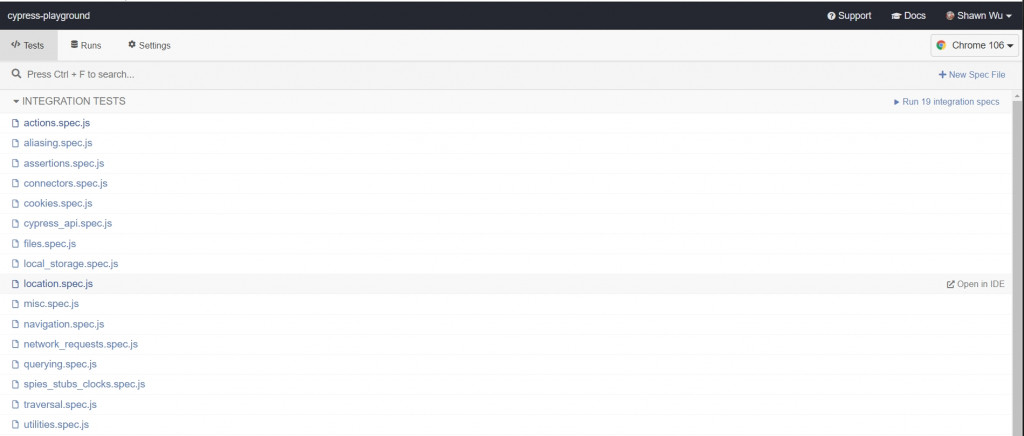
npx cypress open

npx cypress run

命令行模式
cypress run --reporter mochawesome --reporter-options reportDir="cypress/reports",overwrite=false,html=false,json=true
配置檔模式
module.exports = defineConfig({
  reporter: 'mochawesome',
  reporterOptions: {
    reportDir: 'cypress/reports',
    overwrite: false,
    html: false,
    json: true
  }
})
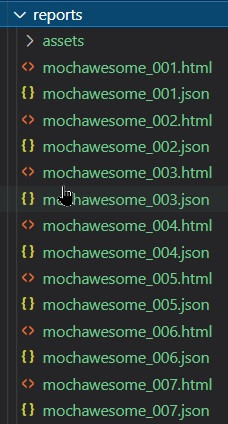
執行 Cypress 時自動產生測試報告靜態檔cypress/reports 包含測試用例個數、測試結果、測試代碼及測試結果。

cypress.json 檔案配置說明{
"projectId": "w8rdav",
"reporter": "mochawesome",
"reporterOptions": { // 自動測試報告檔案的路徑與設定
"reportDir": "cypress/reports",
"overwrite": false,
"html": true,
"json": true
},
"retries": 1, // 錯誤時重試的次數
"baseUrl": "http://localhost:3000", // network request發起的預設後臺路徑
// 自訂環境變數
"env": {
"isMock": true, // 是否調用 Mockserver API
"host": "http://localhost:4200",
}
}
Cypress 帶有自己的 API,用於創建自定義命令和覆蓋現有命令 (作用範圍全域)。
使用情境:登入指令作為客製化命令供自動測試代碼調用
support/commands
// -- This will overwrite an existing command --
// Cypress.Commands.overwrite('visit', (originalFn, url, options) => { ... })

// EC專案中訪問頁面加入 url的參數
Cypress.Commands.add("goVisit", (url, urlQueryParamStr = "") => {
    if (!url) return;

    const params_1 = "params_1=" + Cypress.env("params_1");
    const params_2 = "params_2=" + Cypress.env("params_2");
    const params_3 = "params_3=" + Cypress.env("params_3");
    const params_4 = "params_4=" + Cypress.env("params_4");
    const urlQueryParams = `${params_1}&${params_2}&${params_3}&${params_4}${urlQueryParamStr}`;

    cy.visit(`${Cypress.env("host")}/${url}?${urlQueryParams}`);
});
// 訪問 somewhere url
beforeEach(() => {
    cy.goVisit("somewhere_url");
});

// 訪問 somewhere url 須另外加入參數
beforeEach(() => {
    cy.goVisit("somewhere_url", "&groupShowAll=false&userName=CypressTest");
});
beforeEach(() => {
    cy.visit(url);
});
it("查詢某個元素是否存在", () => {
    // 檢查是否出現標題元素
    cy.get(".title").should("have.length", 1);

    // 檢查是否出現副標題元素
    cy.get(".sub-title").should("have.length", 1);

    // 檢查是否出現目標結果畫面
    cy.get(".result").children().should("have.class", "blocker");
});
it("按下功能按鈕", () => {
    // 點擊綁定按鈕
    cy.get(":nth-child(1) > .btn").click();

    // 攔截功能 API
    cy.intercept("POST", "API_URL").as("backendAPI");

    // 斷言 API結果正確性
    cy.wait("@backendAPI").then((xhr) => {
        expect(xhr.response.statusCode).to.equal(200);
    });
});
自動測試 - 完整代碼
describe("search-agent.component.spec", () => {
    beforeEach(() => {
        cy.visit(
            `${Cypress.env("host")}/searchAgent?identifyBy=${Cypress.env("identifyBy")}&identifyValue=${Cypress.env(
                "identifyValue"
            )}&chatKeepId=${Cypress.env("chatKeepId")}&department=${Cypress.env(
                "department"
            )}&groupShowAll=false&userName=CypressTest`
        );
    });

    it("是否進入專員綁定頁面", () => {
        cy.get(".title").should("have.length", 1);
        cy.get(".sub-title").should("have.length", 1);
        cy.wait(500);
        cy.get(".result").children().should("have.class", "blocker");
    });

    it("按下綁定專員按鈕", () => {
        cy.get(":nth-child(1) > .btn").click();
        cy.intercept("POST", `${Cypress.env("backend_host")}/ecp/expressChat/contactBindAgent`).as("backendAPI");
        cy.wait("@backendAPI").then((xhr) => {
            expect(xhr.response.statusCode).to.equal(200);
        });
    });
});
cypress\integration\playpround
const hello = {
add(a, b) {
return a + b;
}
};
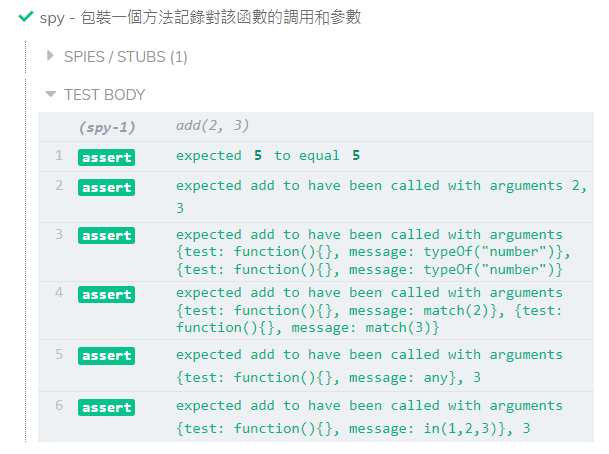
context("Spy與Stub的自動測試", () => {
it("spy - 包裝一個方法記錄對該函數的調用和參數", () => {
const spy = cy.spy(hello, "add");
expect(hello.add(2, 3)).to.equal(5);
expect(spy).to.be.calledWith(2, 3);
expect(spy).to.be.calledWith(Cypress.sinon.match.number, Cypress.sinon.match.number);
expect(spy).to.be.calledWith(Cypress.sinon.match(2), Cypress.sinon.match(3));
expect(spy).to.be.calledWith(Cypress.sinon.match.any, 3);
expect(spy).to.be.calledWith(Cypress.sinon.match.in([1, 2, 3]), 3);
});
});
cypress\integration\playpround
const hello = {
global: () => {
return "Mall";
},
world: () => {
return "Hello";
},
testReturn: () => {
return "testReturn";
},
greet(name) {
return `Hello, ${name}!`;
},
};
context("Spy與Stub的自動測試", () => {
it("最普通的執行方式", () => {
expect(hello.world()).to.equal("Hello");
});
it("stub - 創建一個存根並手動替換一個函數", () => {
hello.global = cy.stub();
hello.global();
expect(hello.global).to.be.calledOnce;
});
it("stub - 用存根代替方法", () => {
cy.stub(hello, "world");
hello.world();
expect(hello.world).to.be.calledOnce;
});
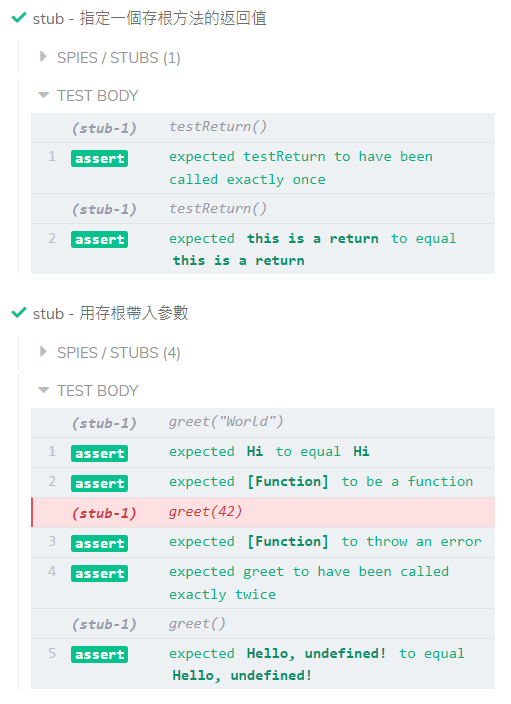
it("stub - 指定一個存根方法的返回值", () => {
cy.stub(hello, "testReturn").returns("this is a return");
const resp = hello.testReturn();
console.log(resp);
expect(hello.testReturn).to.be.calledOnce;
expect(hello.testReturn()).to.equal("this is a return");
});
it("stub - 用存根帶入參數", () => {
cy.stub(hello, "greet")
.callThrough()
.withArgs(Cypress.sinon.match.string)
.returns("Hi")
.withArgs(Cypress.sinon.match.number)
.throws(new Error("Invalid name"));
// input string
expect(hello.greet("World")).to.equal("Hi");
// input number
expect(() => hello.greet(42)).to.throw("Invalid name");
expect(hello.greet).to.have.been.calledTwice;
// when no input equal (Hello, undefined!)
expect(hello.greet()).to.equal("Hello, undefined!");
});
});
攔截後臺 API 攔截請求並覆寫 Response,不調用後臺 API,正確的用法如下,
cy.intercept('/users/**')
cy.intercept('GET', '/users*')
cy.intercept({
  method: 'GET',
  url: '/users*',
  hostname: 'localhost',
})

cy.intercept('POST', '/users*', {
  statusCode: 201,
  body: {
    name: 'Peter Pan',
  },
})

cy.intercept('/users*', { hostname: 'localhost' }, (req) => {
  /* do something with request and/or response */
})
實際範例攔截後臺 API 如下,
it("Intercept 使用範例", () => {
    // req.reply 提供假的回應如果不使用就會打真實後臺
    cy.intercept("POST", `${Cypress.env("host")}/somewhere_url`, {
        statusCode: 200,
        body: {
            name: "Peter Pan",
        },
    }).as("backendAPI");

    // cy.wait 等待 backendAPI 完成後執行
    cy.wait("@backendAPI").then((xhr) => {
        // statusCode 等於 200 即代表後端 API 回應完成
        expect(xhr.response.statusCode).to.equal(200);
    });
});
實際範例不攔截後臺 API 如下,
it("按下綁定專員按鈕", () => {
    // req.reply提供假的回應如果不使用就會打真實後臺
    cy.intercept("POST", `${Cypress.env("hostECP")}/somewhere_url`).as("backendAPI");

    // Response 沒有攔截會調用真實 API

    // cy.wait 等待 backendAPI 完成後執行
    cy.wait("@backendAPI").then((xhr) => {
        // statusCode 等於 200 即代表後端 API 回應完成
        expect(xhr.response.statusCode).to.equal(200);
    });
});
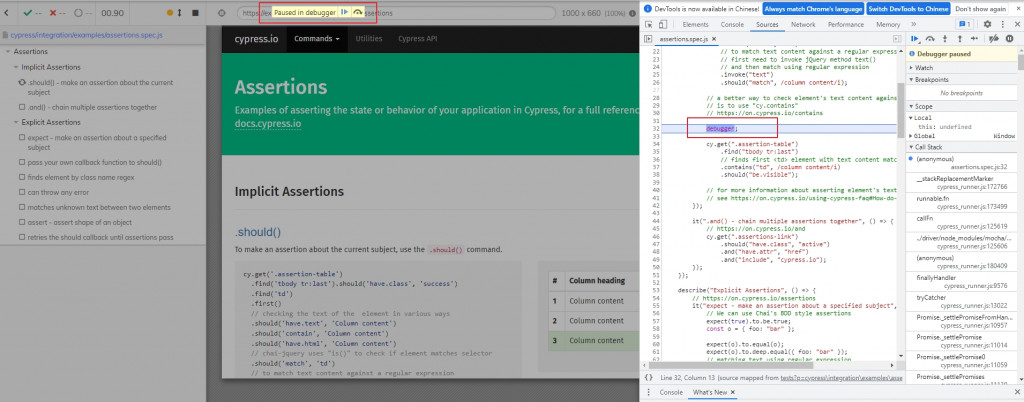
cy.debug() 或直接 F12打斷點 (Chrome引擎下)cy.debug()
cy.debug(options)
// 正確用法
cy.debug().getCookie('app') // Pause to debug at beginning of commands
cy.get('nav').debug() // Debug the `get` command's yield
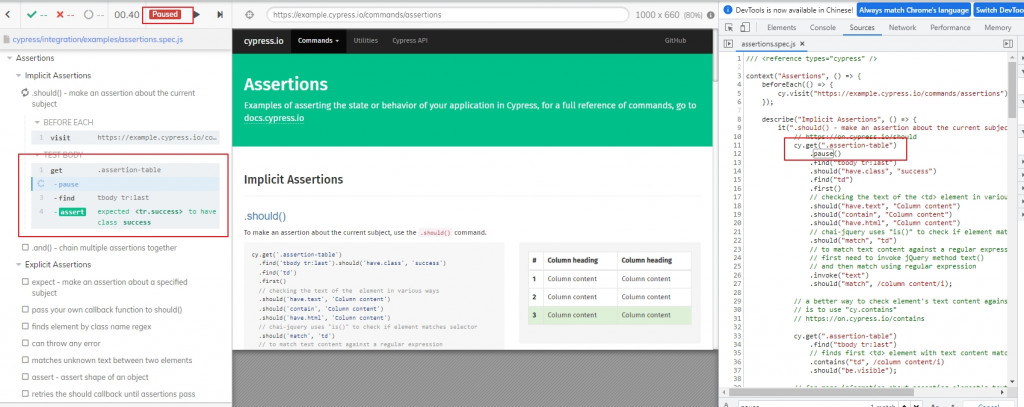
cy 運行命令並允許與被測應用程序交互。cy.pause()
cy.pause(options)
// 正確用法
cy.pause().getCookie('app') // Pause at the beginning of commands
cy.get('nav').pause() // Pause after the 'get' commands yield
.spec.js)全局變量
beforeAll(fn)
在此文件中的任何測試運行之前運行一個函數。
afterAll(fn)
在此文件中的所有測試完成後運行一個函數。
beforeEach(fn)
在此文件中的每個測試運行之前運行一個函數。
afterEach(fn)
在此文件中的每個測試完成後運行一個函數。
describe/context(name, fn)
describe(name, fn)創建一個塊,將多個相關測試組合在一個“測試套件”中。
test/it(name, fn)
測試文件中需要的只是test運行測試的方法。
測試語言類別
should
then
each:遍歷執行(對於數組)spread:then 的 each 版contains、get
children、closest、find
eq、filter、not
first、last
next、nextAll、nextUntil
parent、parents、parentsUntil
prev、prevAll、prevUntil
siblings
window、document、title
its:取得對象中的字段,如 cy.get('ul li').its('length')
root:當前上下文的根元素節點within:設定上下文元素click、dblclick、rightclick
blur、focus、focused
trigger
check、uncheck、select
clear
type
submit
scrollIntoView、scrollTo
invoke:調用對象中的函數,如 cy.get('div').invoke('show')
viewport
clearCookie、clearCookies、getCookie、getCookies、setCookie
clearLocalStorage
visit、reload
hash、location、url
go:相當於 window.history.go
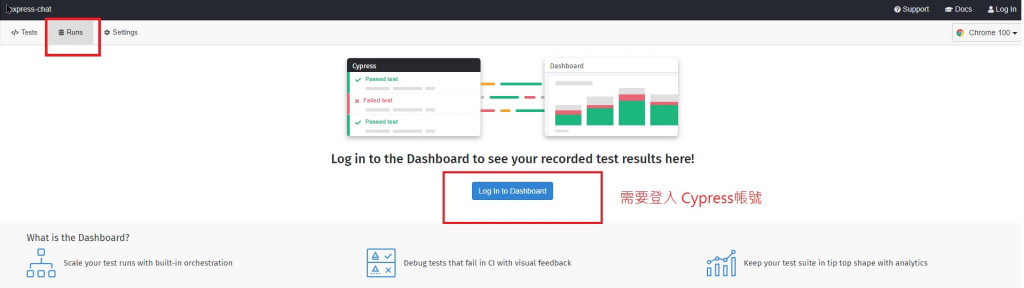
request:HTTP 請求as:設置為別名and:進行多個測試end:截斷當前測試(後續鏈式調用將重新計算)wrap:包裝一個對象(以便支持 cy 命令)spy:監聽對象中的函數stub:替換對象中的函數clock:覆寫原生時鐘(將會影響 setTimeout 等原生函數)tick:跳過時間,加快測試速度(需要先 cy.clock())wait:顯式等待[**Cypress._](https://docs.cypress.io/api/utilities/_.html#Syntax) Lodash**[**Cypress.$](https://docs.cypress.io/api/utilities/$.html) jQuery**進入Dashboard
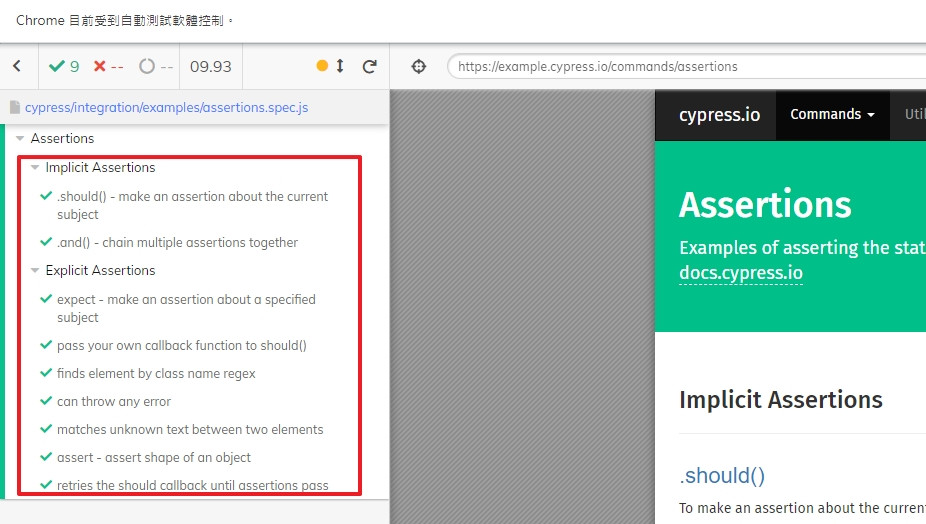
測試案例執行結果
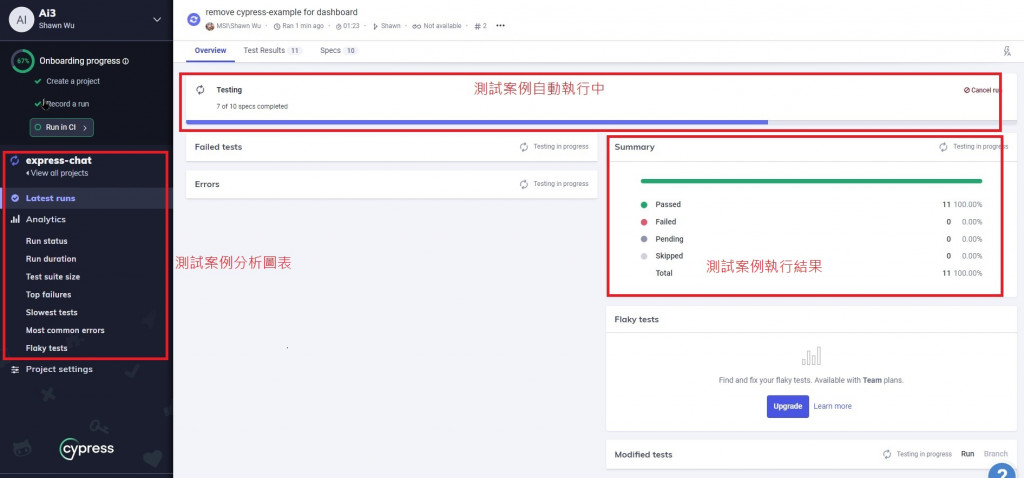
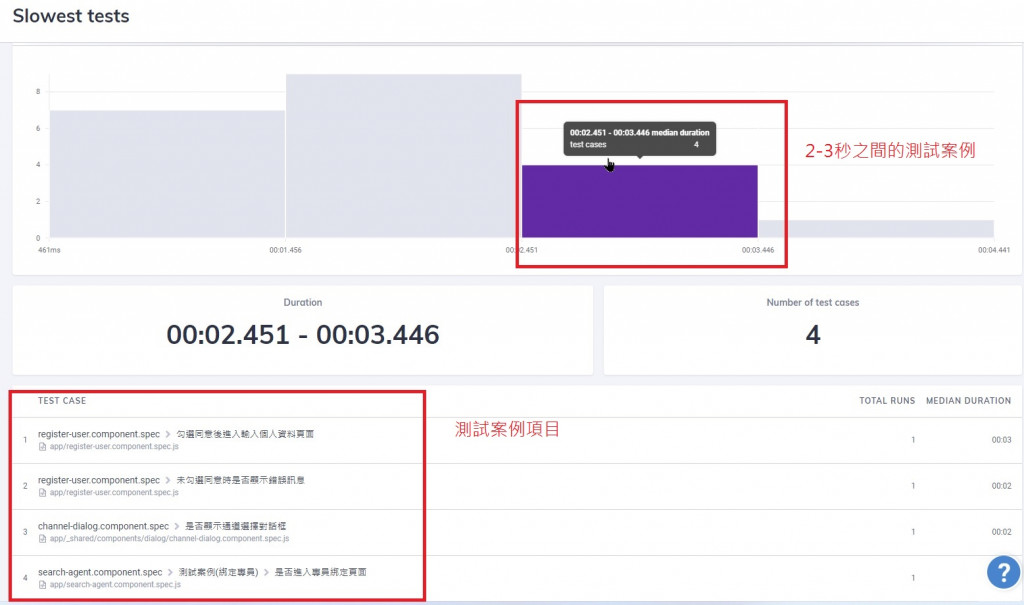
測試案例分析圖表
早期 Angular 專案建立時會連帶地將 Protractor 也配置妥當,讓使用者方便進行 E2E 的自動測試,隨著時間的推移 Angular v12 版本推出時宣佈在 Angular v12 後,Protractor 將不再內建於新專案中,預計會在 Angular v15 時,Angular 會正式終結 Protractor。
使用 Cypress 能幫助 Angular 專案非常出色地進行 E2E 測試且適用於任何前端框架或是網站,執行起來也比其他框架要快的多,相信未來 Cypress 會有更多關於 Angular 使用 Cypress 框架進行 E2E 測試的案例。
自動測試不需要一蹴而就,尤其當你面對的是那些原本都是人工測試的遺留專案時,透過慢慢將過去的測試案例轉化為自動測試代碼的同時,慢慢累積自動化能量,讓 QA 人員逐漸把過去手工的部份轉為自動,幾輪之後當提高自動測試的覆蓋率時,自然能享受到測試自動化所帶來的紅利。
單元測試與 E2E 測試都介紹完了,搭配自動工作流程,才能更好地發揮這些工具的價值,下一篇帶大家看一下 Gitlab CI/CD。