
Hello, 各位 iT 邦幫忙 的粉絲們大家好~~~
在本系列文會利用目前 Visual Studio 內建的專案樣本建立一個初始的 .NET MAUI 專案,並且透過此 .NET MAUI 專案來把 TopStore App 的開發從 Xamairn.Forms 轉換到 .NET MAUI 上進行。
本篇是 Re: 從零改成用 .NET MAUI 技術來繼續過去用 Xamarin 開發的一個 App : TopStore 系列 系列文的 EP23。
前一回的介紹裡已經確定在 CollectionView 當中可以看到 Product 的資料,但由於還沒有針對每個 Product 的資料進行呈現方式的設計,所以本回來介紹一下如何在 CollectionView 當中設計每個 Product 資料來呈現囉!
首先,由於會在這個 XAML 當中運用 Product 的定義,所以一樣在 ContentPage 的標記當中來增加命名空間的引用:
xmlns:models="clr-namespace:TopStoreApp.Models"
完成結果如下圖紅框所示: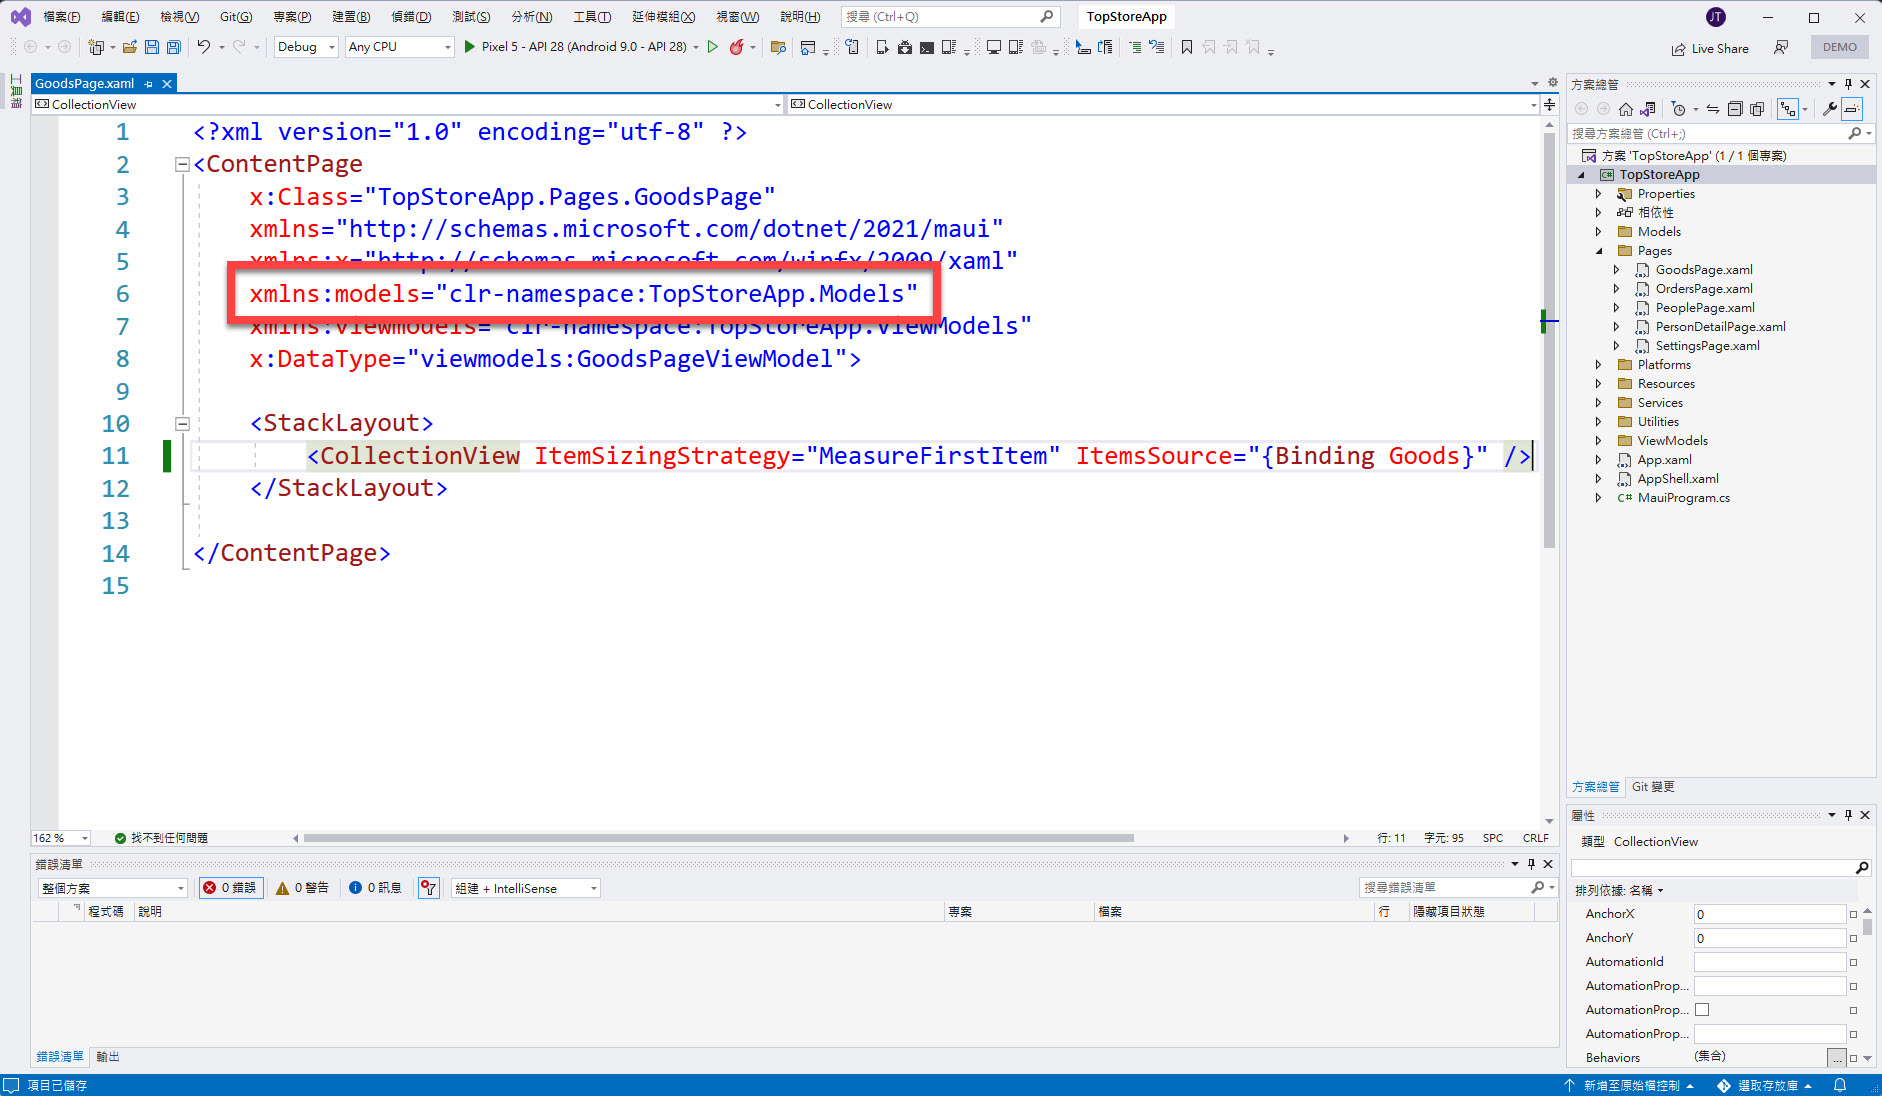
接著把原本的 CollectionView 標記,變更回 XAML 成對標記的語法後,在其中增加其 ItemTemplate 屬性與其 DataTemplate 的設定,並且在 DataTemplate 的屬性設定當中加入 Product 資料型別的使用。
    <CollectionView.ItemTemplate>
        <DataTemplate x:DataType="models:Product">

        </DataTemplate>
    </CollectionView.ItemTemplate>
完成結果如下圖紅框所示: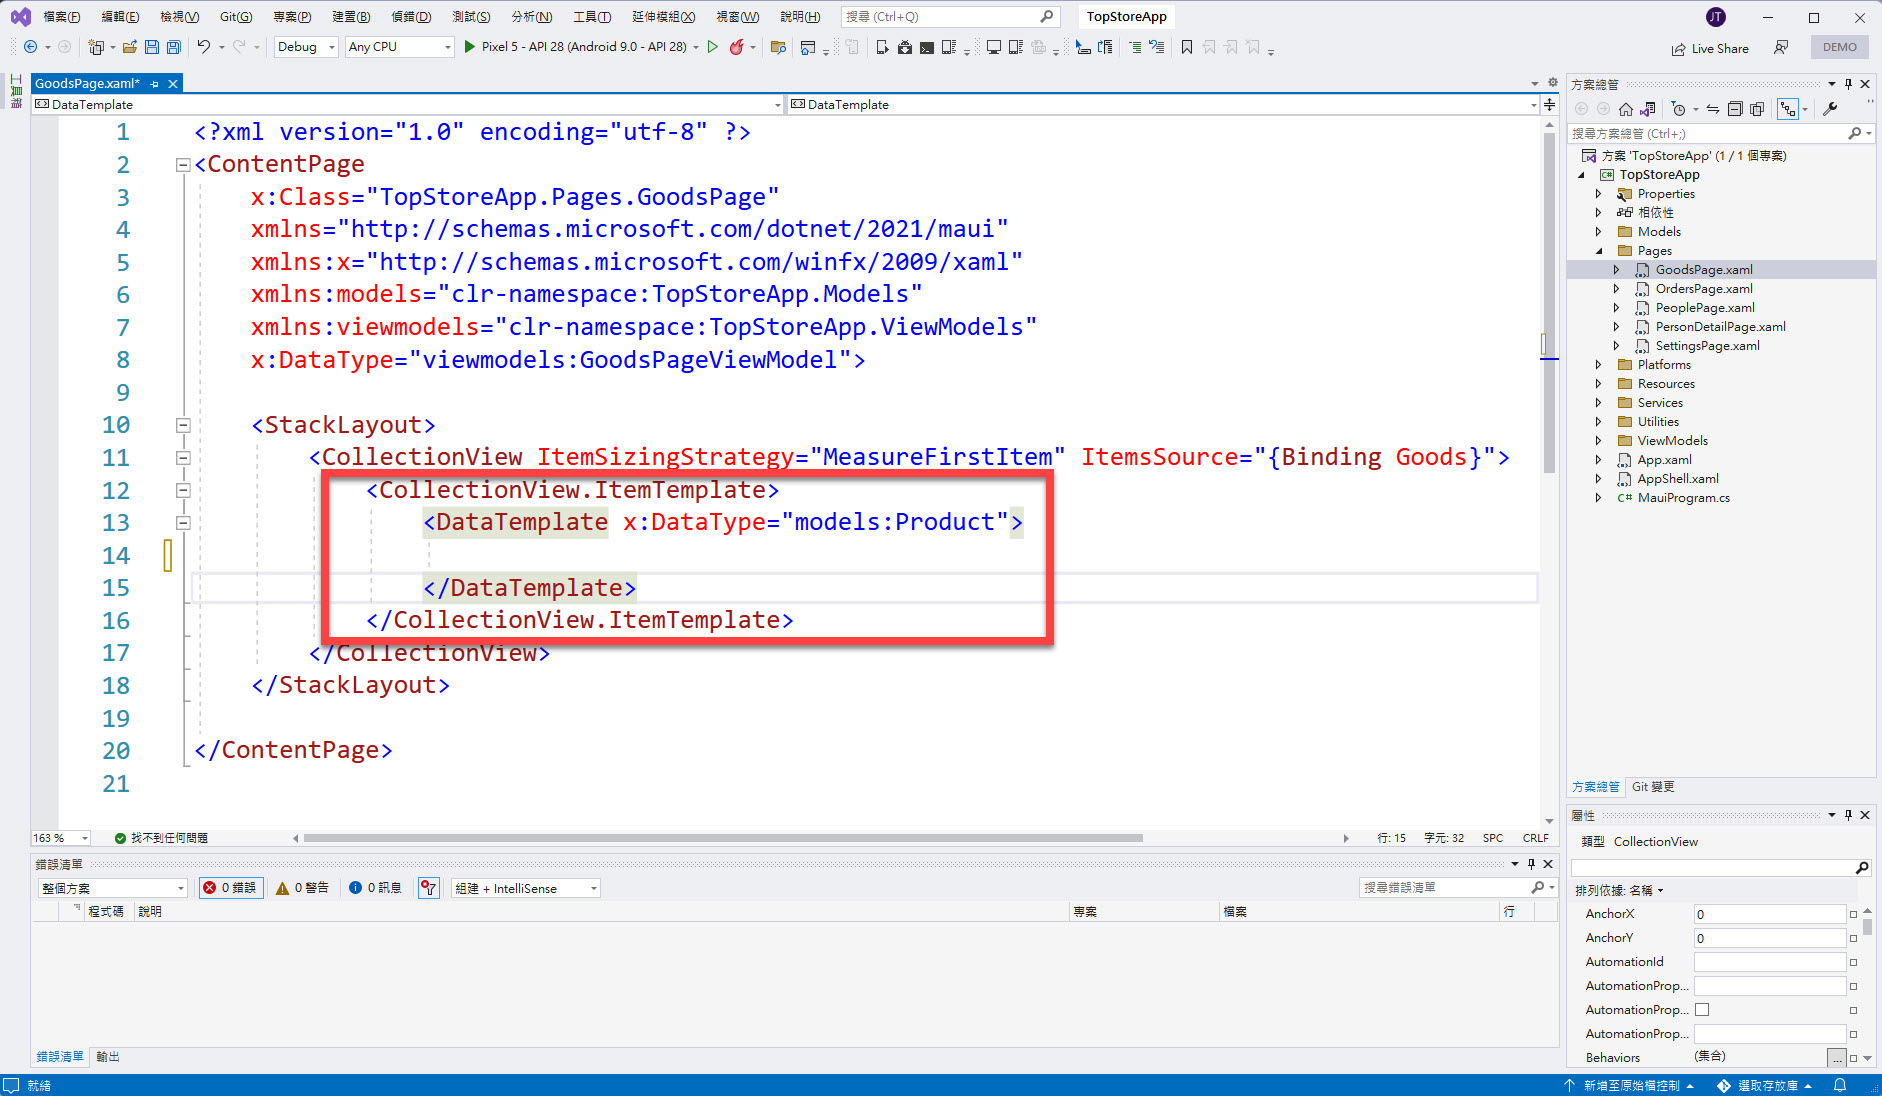
後續就利用 SwipeView 開始編輯其 DataTemplate 當中的描述:
    <SwipeView Margin="0,6">
        <SwipeView.LeftItems>
            <SwipeItems>
                <SwipeItem BackgroundColor="Red" Text="刪除" />
            </SwipeItems>
        </SwipeView.LeftItems>

    </SwipeView>
完成結果如下圖紅框所示: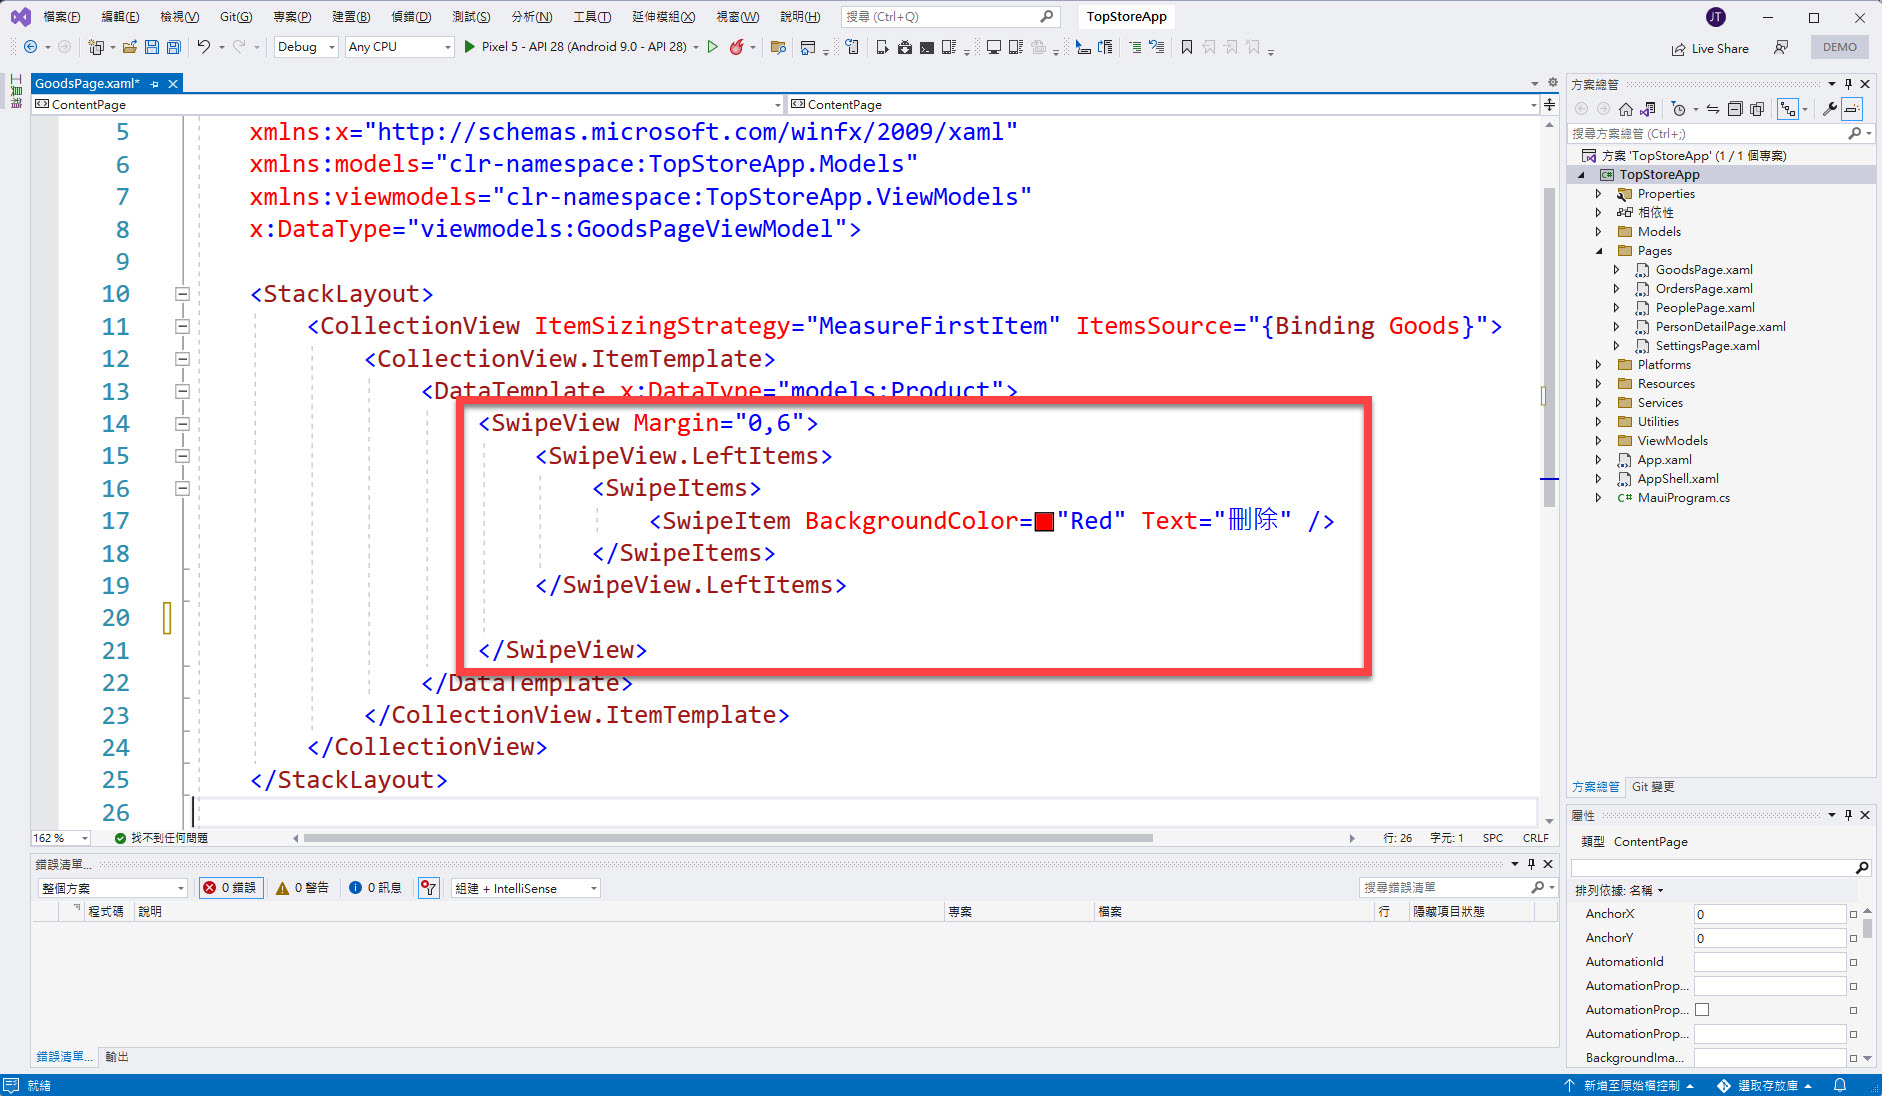
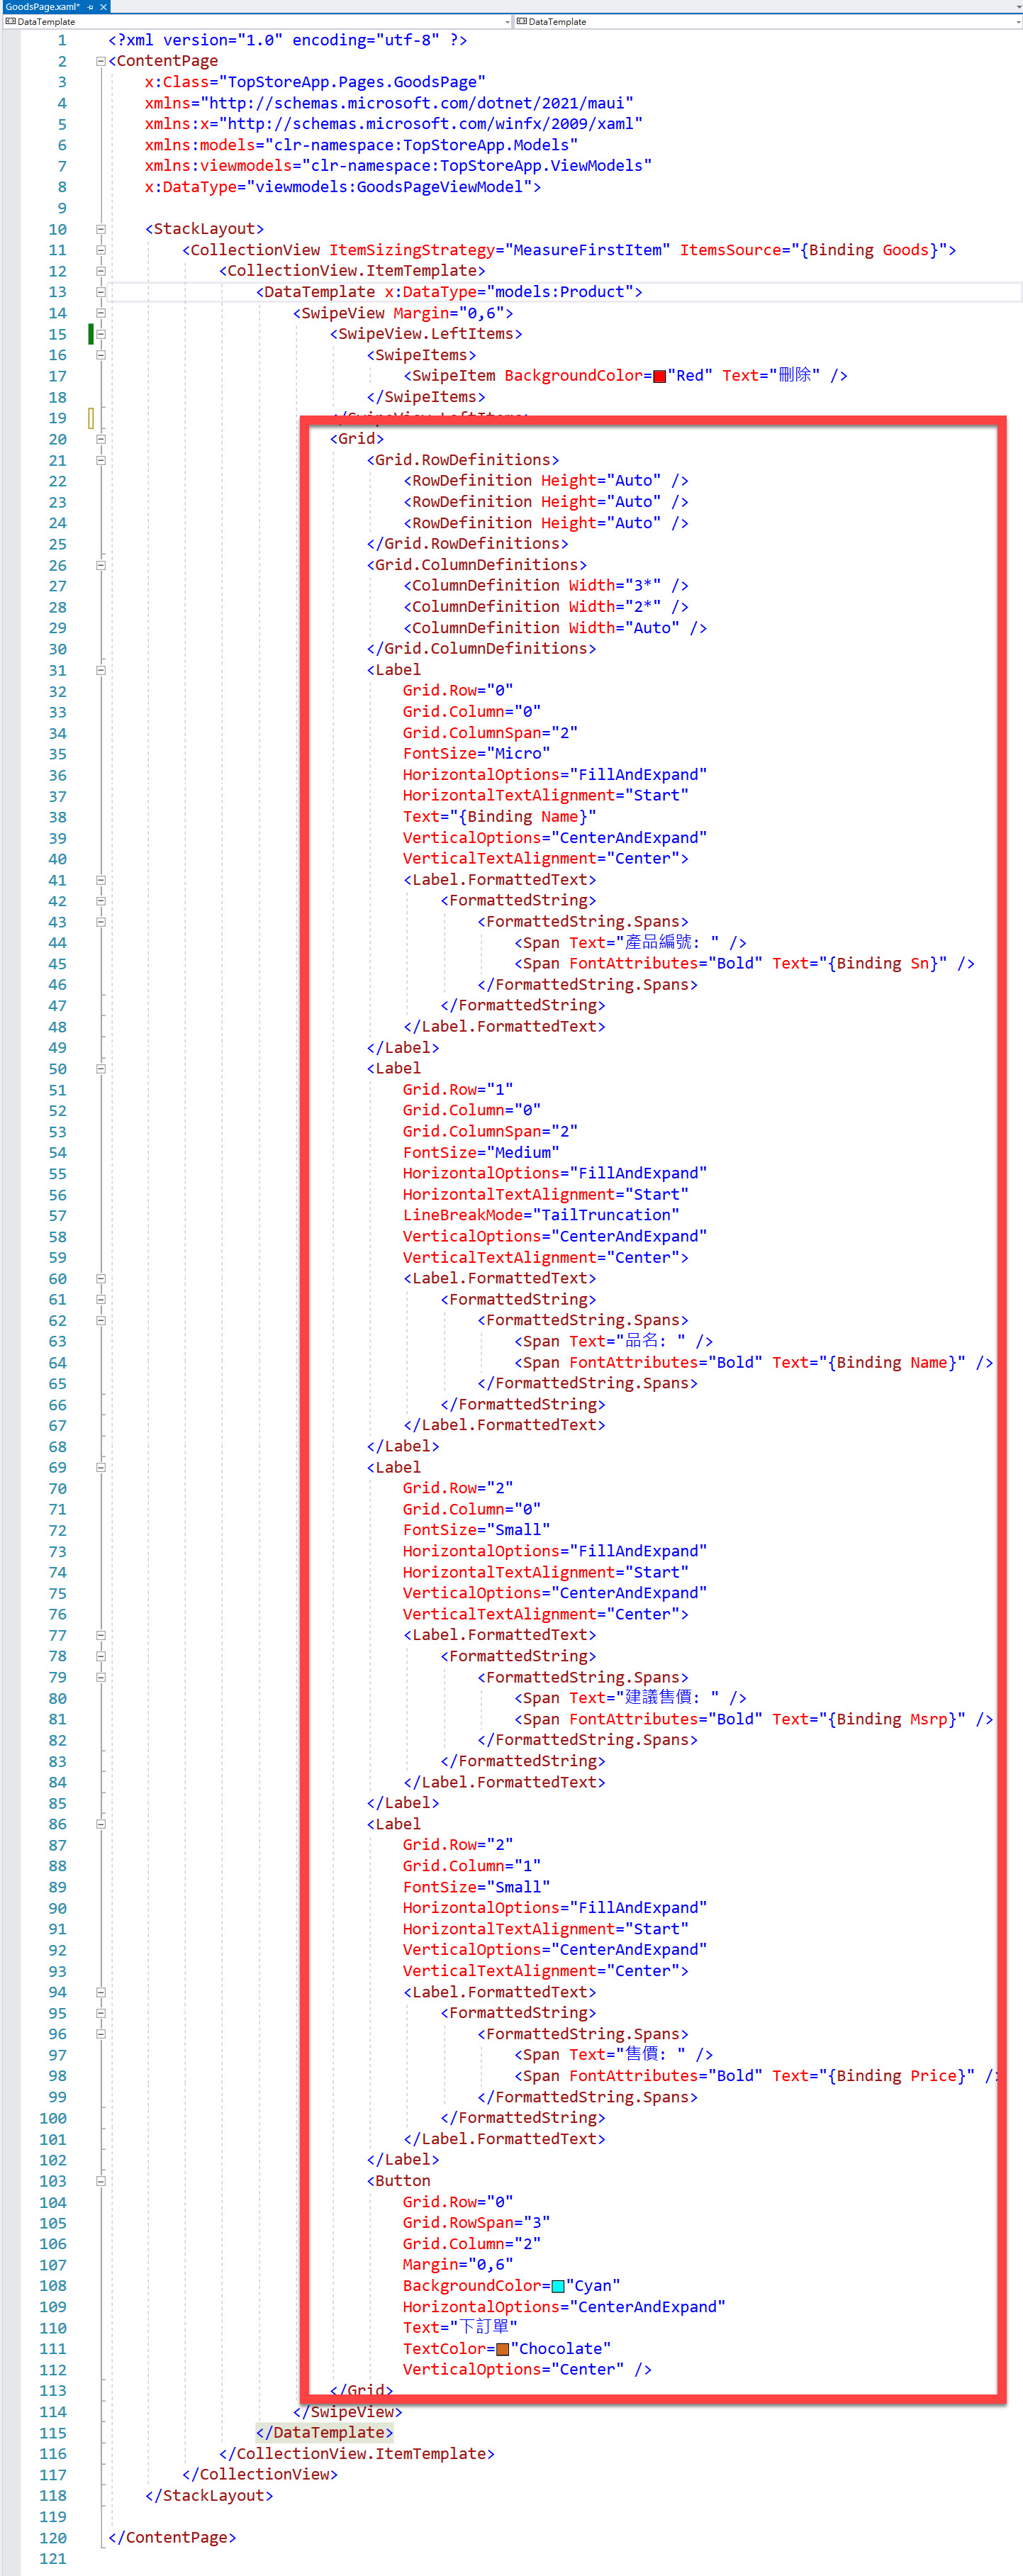
緊接著再繼續於 SwipeView 當中設定其項目的畫面規劃設計:
<Grid>
    <Grid.RowDefinitions>
        <RowDefinition Height="Auto" />
        <RowDefinition Height="Auto" />
        <RowDefinition Height="Auto" />
    </Grid.RowDefinitions>
    <Grid.ColumnDefinitions>
        <ColumnDefinition Width="3*" />
        <ColumnDefinition Width="2*" />
        <ColumnDefinition Width="Auto" />
    </Grid.ColumnDefinitions>
    <Label
        Grid.Row="0"
        Grid.Column="0"
        Grid.ColumnSpan="2"
        FontSize="Micro"
        HorizontalOptions="FillAndExpand"
        HorizontalTextAlignment="Start"
        Text="{Binding Name}"
        VerticalOptions="CenterAndExpand"
        VerticalTextAlignment="Center">
        <Label.FormattedText>
            <FormattedString>
                <FormattedString.Spans>
                    <Span Text="產品編號: " />
                    <Span FontAttributes="Bold" Text="{Binding Sn}" />
                </FormattedString.Spans>
            </FormattedString>
        </Label.FormattedText>
    </Label>
    <Label
        Grid.Row="1"
        Grid.Column="0"
        Grid.ColumnSpan="2"
        FontSize="Medium"
        HorizontalOptions="FillAndExpand"
        HorizontalTextAlignment="Start"
        LineBreakMode="TailTruncation"
        VerticalOptions="CenterAndExpand"
        VerticalTextAlignment="Center">
        <Label.FormattedText>
            <FormattedString>
                <FormattedString.Spans>
                    <Span Text="品名: " />
                    <Span FontAttributes="Bold" Text="{Binding Name}" />
                </FormattedString.Spans>
            </FormattedString>
        </Label.FormattedText>
    </Label>
    <Label
        Grid.Row="2"
        Grid.Column="0"
        FontSize="Small"
        HorizontalOptions="FillAndExpand"
        HorizontalTextAlignment="Start"
        VerticalOptions="CenterAndExpand"
        VerticalTextAlignment="Center">
        <Label.FormattedText>
            <FormattedString>
                <FormattedString.Spans>
                    <Span Text="建議售價: " />
                    <Span FontAttributes="Bold" Text="{Binding Msrp}" />
                </FormattedString.Spans>
            </FormattedString>
        </Label.FormattedText>
    </Label>
    <Label
        Grid.Row="2"
        Grid.Column="1"
        FontSize="Small"
        HorizontalOptions="FillAndExpand"
        HorizontalTextAlignment="Start"
        VerticalOptions="CenterAndExpand"
        VerticalTextAlignment="Center">
        <Label.FormattedText>
            <FormattedString>
                <FormattedString.Spans>
                    <Span Text="售價: " />
                    <Span FontAttributes="Bold" Text="{Binding Price}" />
                </FormattedString.Spans>
            </FormattedString>
        </Label.FormattedText>
    </Label>
    <Button
        Grid.Row="0"
        Grid.RowSpan="3"
        Grid.Column="2"
        Margin="0,6"
        BackgroundColor="Cyan"
        HorizontalOptions="CenterAndExpand"
        Text="下訂單"
        TextColor="Chocolate"
        VerticalOptions="Center" />
</Grid>
完成的結果如下圖所示:
那接下來就是執行看看囉~~~
上述所撰寫的 XAML 標記設計,其版面會是如此呈現:

如果對著某個資料項目去 "向右" 滑動時:
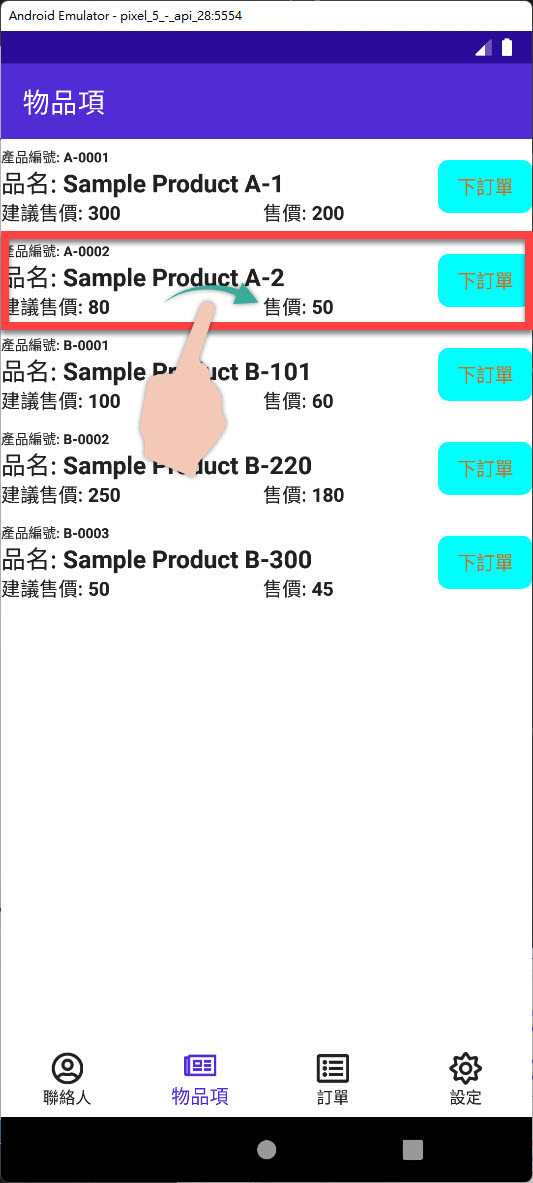
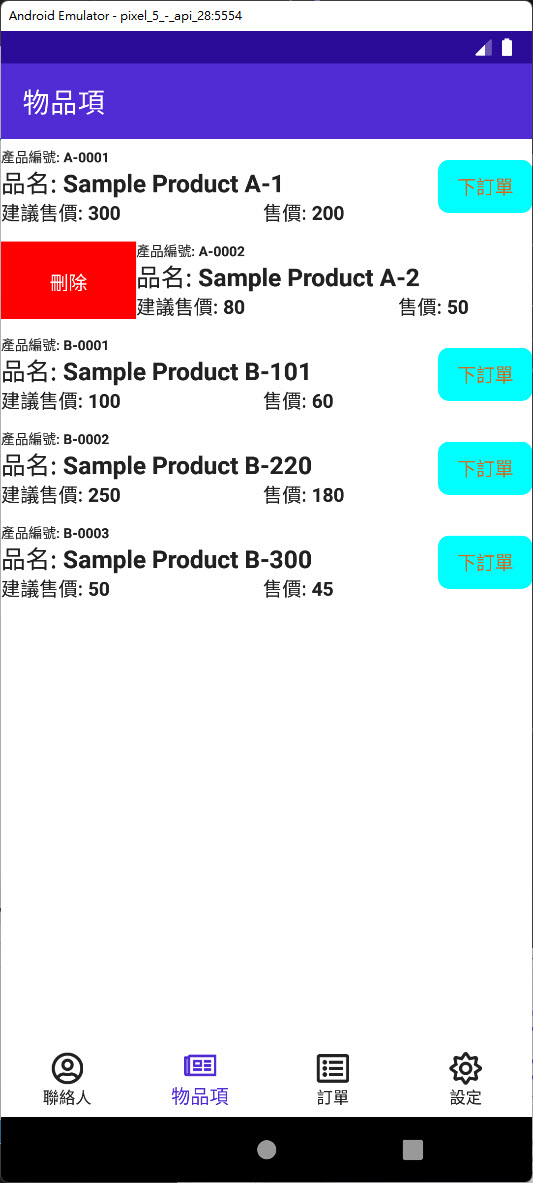
則會是呈現呈現如下結果(這是前面步驟中撰寫的 <SwipeView.LeftItems> 帶來的效果):
再對該資料項目去 "向左" 滑動時:
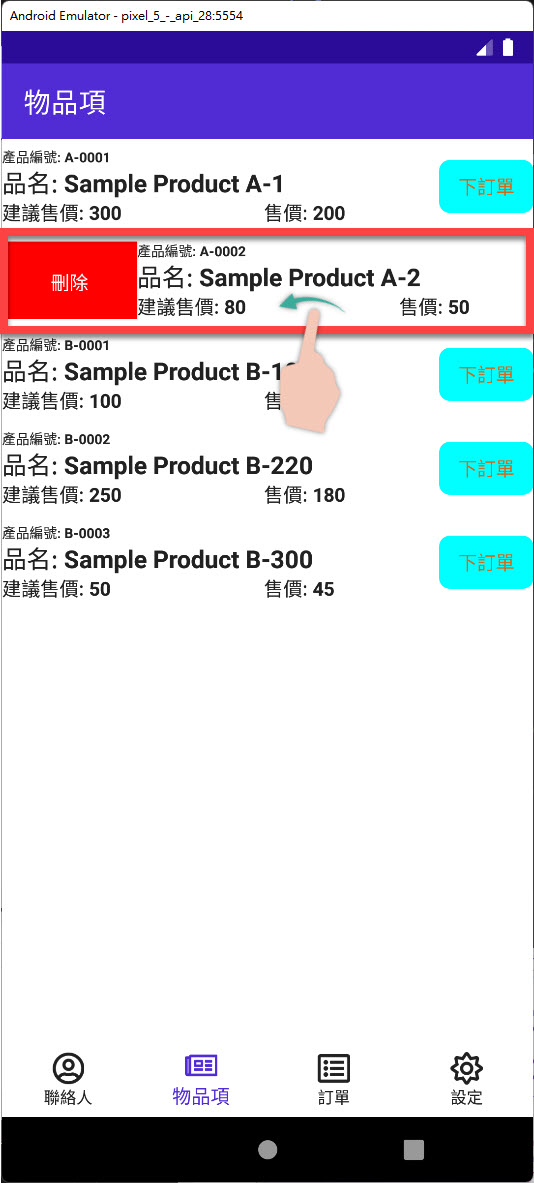
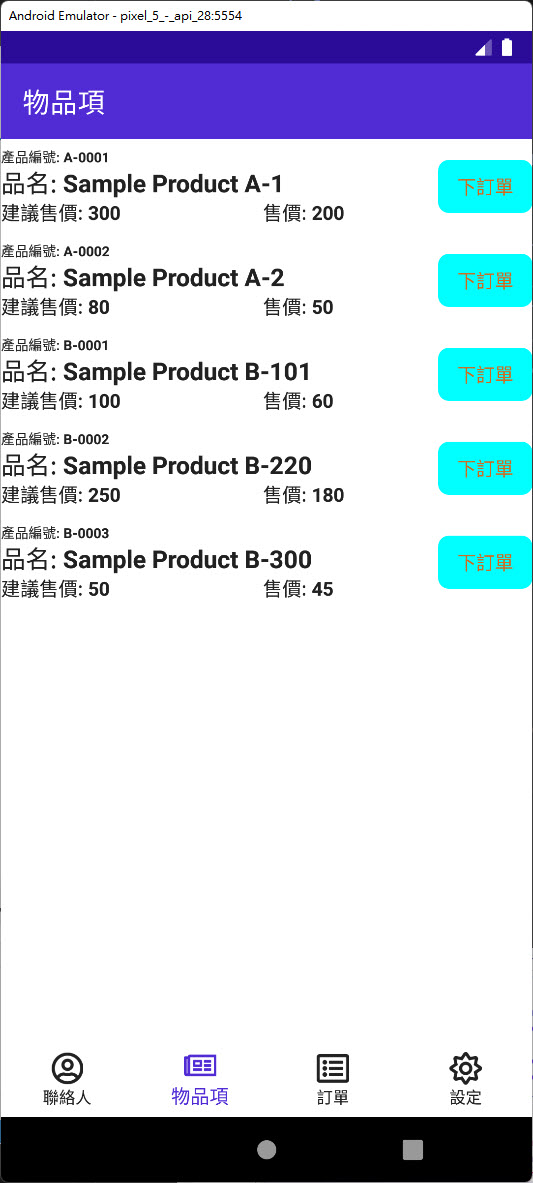
就會回到原本資料列表的呈現了:
本 EP 介紹所完成的範例程式碼可在此下載。

 iThome鐵人賽