今天來整理物件點擊拖拉的事件操作
在網頁的操作中,物件點擊拖拉事件,也就是「點,拖,放」的操作,
主要的操作是移動網頁內的元件位置,甚至可以說是元件的「平移,旋轉,縮放」的操作。
邏輯步驟如下
<body>
	<div>
	<button id="pan1">Translate</button>
	<button id="rotate1">Rotate</button>
	<button id="zoom1">Scale</button>
	<span id="sp">Action</span>
    </div>
	<img id="img1" src="assets/multicore_logo_300.png">
</body>
let img1;
let st = 0;  //-- 點擊狀態 0:未點擊狀態,1:點下狀態
let zIndex = 0; //-- img1的z-index的高度

let px1 = 0;
let py1 = 0;

function setup() {
	img1 = select("#img1");
	const pv1 = Object.assign({}, img1.position()); //-- 複製img1的原本的起始座標的獨立物件
	console.log(pv1);
	img1.position(pv1.x, pv1.y);

    px1 = pv1.x;
	py1 = pv1.y;
}

let px0 = 0; //-- 點下時的起始座標
let py0 = 0;
let dx = 0; //-- 拖動的與起始座標差距值
let dy = 0;
let nx = 0; //-- 新的img1的座標
let ny = 0;
function mousePressed(e) {
	if (e.target.id === 'img1') {
		px0 = mouseX;
		py0 = mouseY;
		zIndex = img1.style("z-index"); //-- 起始的z-index高度
		img1.style("z-index", "10"); //-- 調整img1的z-index的高度
		st = 1;
	}
	return false;
}

function mouseDragged(e) {
	console.log(e.target.id);
	if (e.target.id === 'img1' && st == 1) {
		dx = mouseX - px0;
		dy = mouseY - py0;
		px0 = mouseX;
		py0 = mouseY;
		nx = img1.position().x + dx;
		ny = img1.position().y + dy;
        img1.position(nx, ny);  //-- 以點擊時的座標為基準
		//img1.position(mouseX-150+px1, mouseY-150+py1); //-- 會移到圖像元件的中心
	}
	return false;
}


function mouseReleased(e) {
	img1.style("z-index", zIndex); //-- 設定回原本的z-index高度
	st  0;
	return false;
}
以上的方法是將img1當作是DOM的元件來操作,平移的部份可以用 img1.position().x 及 img1.position().y來處理,但是DOM元件的旋轉,縮放操作,就沒有那麼直覺了,變的有點複雜,因此,接下來會以將img1畫在canvas的方法來處理。
不過這裡又遇到一個問題,除了img元件可以畫在canvas中,其他的DOM元件也能畫在canvas中嗎,
看起來,似乎要徹底了解在DOM元件中的「平移 Translate,旋轉 Rotate,縮放 Scale」操作的方法。
接下來是在body中,放入3個按鈕,分別是「平移 Translate,旋轉 Rotate,縮放 Scale」,根據按下不同的按鍵執行不同的操作。
先來了解一下transform的原理,設定的語法如下
object.style.transform = "translate(tx, ty)"; //-- tx, ty: 要加上單位: 100px
object.style.transform = "rotate(sd)";   //-- sd: 要加上單位: 100deg
object.style.transform = "scale(rx, ry)";  //-- rx, ry: 1.2: 不用加上單位
在設定上,translate(), rotate(), scale() 若是要同時呼叫的話,如下設定,用空白字隔開。
object.style.transform = "translate(tx, ty) rotate(sd) scale(rx, ry)";
如果要同時執行的話,也可以改用matrix()的方法
object.style.transform = "matrix(a, b, c, d, e, f)";
a, b, c, d的參數用來設定旋轉及縮放
sz: 縮放比例,1.0是原大小
sd: 旋轉角度,單位是弳度,可以用p5的指令 radians(deg) 將角度轉換成弳度
角度正值為順時針,角度負值為逆時針,0度的方向在正的X軸
tx, ty: 是指以元件的中心點為基準,進行元件內部的偏移,並不是像
select("#img1").position(mouseX, mouseY); 是移動整個元件的座標。
因此,若tx, ty設定為0, 0 圖像就會以左上角會基準點。
若tx, ty設定為-150, -150 圖像就會以中心點會基準點。
a, b, c, d, tx, ty: 不用加上單位
let a = sz * cos(sd);
let b = sz * sin(sd);
let c = sz * -sin(sd);
let d = sz * cos(sd);
let tx = -150;
let ty = -150;
let mx = `matrix( ${a}, ${b}, ${c}, ${d}, ${tx}, ${ty} )`; //-- 使用樣板字串的寫法比較精簡
//-- DOM 的的語法
document.querySelector("#img1").style.transform = mx;
//-- p5的語法
select("#img1").style("transform", mx);
以上整理如下
tx = -select("#img1").width/2;
ty = -select("#img1").height/2;
若是要移動元件的話,要使用
select("#img1").position(mouseX, mouseY);
或是加上繞圈圈的語法
select("#img1").position(mouseX+250cos(sd), mouseY+250sin(sd));
另外還有一個style屬性為 transform-origin 用來設定transform的原點座標,一般來說,預設座標是元件的中心點位置,例如:img的width及height分別為 300 x 300, transform-origin的預設值是 150px 150px,基本上可以不用處理,可以console.log()出來查看一下
設定如下:
object.style.transformOrigin = "150px 150px";
object.style.transformOrigin = "center center";
要查看的話,要用p5.js的元件呼叫才查得到實際的座標數值,如下
console.log(select("#img1").style("transform-origin"));
transform-origin 要在 transfrom 指令的後面,才會有作用,等於是在設定要以什麼transform-origin的位置來呈現transform的結果。
這個是p5的Element元件,有提供的指令,很方便使用。
這也是如果可以的話,要多多使用p5的DOM的功能,可以減少很多程式碼。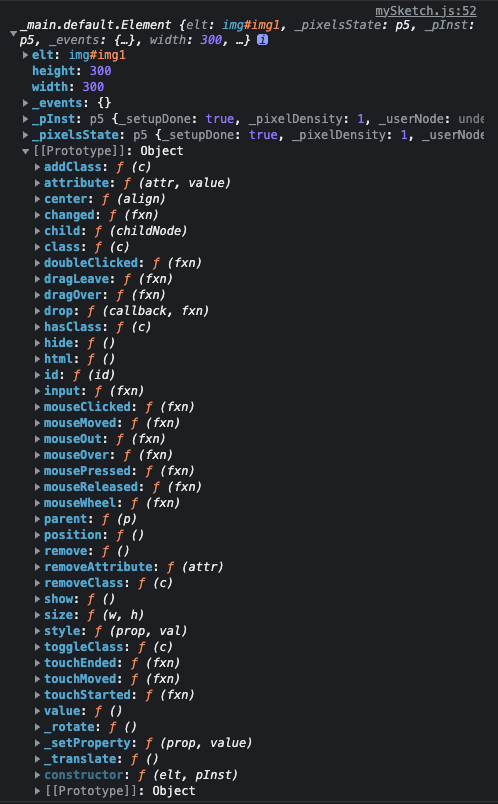
以下是完整的程式碼
let imgw = 0;
let imgh = 0;

let sd = 0;
let sz = 1;

let px0 = 0;
let py0 = 0;
let img1;

function setup() {
	img1 = select("#img1");
	console.log(select("#img1"));

	imgw = img1.width;
	imgh = img1.height;
	console.log(imgw+", "+imgh);

	const pv1 = Object.assign({}, img1.position()); //-- 複製img1的原本的起始座標的獨立物件
	console.log(pv1);
	img1.position(pv1.x, pv1.y);

	px0 = pv1.x;
	py0 = pv1.y;

	//console.log(document.querySelector("#img1").style.transform);
	//document.getElementById("img1").style.transformOrigin = "center center";
	//console.log(select("#img1").style("transform-origin"));

}

function draw() {
	if (mouseIsPressed) {

		//img1.position(mouseX+px0+250*cos(sd), mouseY+py0+250*sin(sd));
		img1.position(mouseX+px0, mouseY+py0);

		sz = 1.0+0.5*sin(sd);
		sd += 0.1;

		//sz = 1;
		//sd = 0;

		let a = sz * cos(sd);
		let b = sz * sin(sd);
		let c = sz * -sin(sd);
		let d = sz * cos(sd);
		let tx = -imgw / 2.0;
		let ty = -imgh / 2.0;
		console.log(tx+", "+ty);
		let mx = `matrix( ${a}, ${b}, ${c}, ${d}, ${tx}, ${ty} )`;
		img1.style("transform", mx);

        //-- 3個transform的指令同時操作,中間以空白字隔開即可
        let mx0 = `translate(-150px, -150px) rotate(${sd*10}deg) scale(${sz})`;
        img1.style("transform", mx0);

        //-- 設定transform 的基準點, p5的語法, 可以得到實際得座標數值
        img1.style("transform-origin", "center center");

        //-- p5的語法, 可以得到實際得座標數值
        console.log(img1.style("transform-origin"));

        //-- 設定transform 的基準點, DOM的語法
        //img1.elt.style.transformOrigin = "center center";
		//document.getElementById("#img1").style.transformOrigin = "center center";
		return false;
	}

}

function mouseDragged(e) {
	return false;
}
參考資料
CSS transform Property
https://www.w3schools.com/cssref/css3_pr_transform.asp
transform-origin
https://developer.mozilla.org/en-US/docs/Web/CSS/transform-origin
Style transformOrigin Property
https://www.w3schools.com/jsref/prop_style_transformorigin.asp