今天要接續上次所講解的Dagger2繼續延伸,而今天要介紹的是@Singleton單例的用法和@Scope的用法,下面我們講解完這兩個註解後,就來用一個簡單的抓資料存資料範例,而這個範例會使用之前講解的 Retrofit和SharedPreferences 合併!!
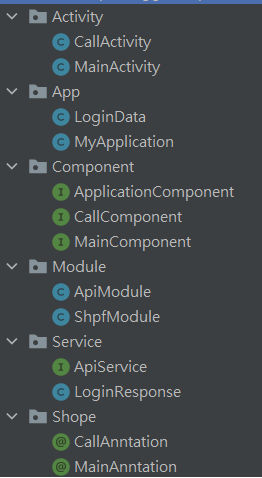
下面是範例建立的各個class和分類。
這邊我建立了兩個Scope分別是CallAnntation和MainAnntation。
看到下面的註解這三個是綁在一起的。
給CallActivity使用。
@Scope
@Documented
@Retention(RUNTIME)
public @interface CallAnntation {
}
給MainActivity使用。
@Scope
@Documented
@Retention(RUNTIME)
public @interface MainAnntation {
}
抓取資料的方法。
public interface ApiService {
    //登入Token資料
    @POST("auth/login")
    Call<LoginResponse> login(@Body LoginResponse loginResponse);
}
要抓取的資料。
public class LoginResponse {

    private String token;
    private String account;
    private String password;

    //這裡是要讓上方抓API時需要帳號密碼,所以這裡我建立一個方法把帳密包起來,讓上方可以用@Body拿取帳密。
    public  LoginResponse(String account,String password){
        this.account=account;
        this.password=password;
    }
    /**--------------get方法---------------------*/
    public String getToken() {
        return token;
    }
}
用來提供"建立Retrofit"的實例化,而且因為這裡使用單例的方法,所以自每次叫API都不會再build一次Retrofit。
public class APIModule {
    private ApiServise apiServise;
    private Retrofit retrofit;

    @Singleton
    @Provides
    ApiServise providesApiservise(Retrofit retrofit){
        return apiServise=retrofit.create(ApiServise.class);
    }
    @Singleton
    @Provides
    Retrofit providesClient(){
        return retrofit = new Retrofit.Builder()
                .baseUrl("https://jsonplaceholder.typicode.com")
                .addConverterFactory(GsonConverterFactory.create())
                .build();
    }
這一個Module是用來實例化"LoginData"這一個class。
@Module
public class ShpfModule {

    @Singleton
    @Provides
    LoginData provicesLoginData(){
        return new LoginData();
    }
}
這裡是讓Application和要使用的主件(Module)建立橋樑。
//加上單例
@Singleton
@Component(modules = {ApiModule.class, ShpfModule.class})
public interface ApplicationComponent {
    void inject(MyApplication application);
    /**等等會看到其他的Component想要dependencies這一個Component,
    並且它們想使用這個Component所連接的Module裡實例的方法時,就必
    須讓要使用的方法暴露出來。*/
    ApiService providesApiService();
    LoginData provicesLoginData();
}
用來連接 CallComponen和它要用的主件。
//這邊加入了先前設定的@Scope,代表這一個Component只給有註解@CallAnntation的頁面使用
@CallAnntation
//這裡用的就是dependencies不同於modules,是用來依賴於其他的Componen
@Component(dependencies =ApplicationComponent.class)
public interface CallComponent {
    void inject(CallActivity callActivity);
}
用來連接 MainComponent和它要用的主件。
//跟上面一樣,這一個Component只給有註解@MainAnntation的頁面使用
@MainAnntation
//一樣的是用來依賴於ApplicationComponent的
@Component(dependencies = {ApplicationComponent.class})
public interface MainComponent {
    void inject(MainActivity mainActivity);
}
這裡是實作SharedPreferences的地方,這裡之前講解過就快速帶過。
public class LoginData {
    private static String TOKEN="token";
    private SharedPreferences shpf;
    private Context context;
    /**MODE_PRIVATE 只允許該APP存取
     MODE_WORLD_READABLE 所有APP都能讀取
     MODE_WORLD_WRITEABLE 所有APP都能存取、寫入
     MODE_MULTI_PROCESS 允許多個process 同時存取*/
    public void getShpf(Context context){
        this.context=context;
        shpf=this.context.getSharedPreferences(String.valueOf(R.string.app_name), Context.MODE_PRIVATE);
    }
    //存取TOKEN
    public void setToken(String token){
        shpf.edit().putString(TOKEN,token).apply();
    }
    //拿取TOKEN
    public String getToken(){
        return shpf.getString(TOKEN,"");
    }
}
用來實現單例模式。
public class MyApplication extends Application {
    //單利模式
    private static MyApplication instance;
    private static ApplicationComponent apiService;
    private static ApplicationComponent loginData;

    @Override
    public void onCreate(){
        super.onCreate();
        instance=this;
        //builder出DaggerApplicationComponent,並注入到此。
        apiService =DaggerApplicationComponent.builder().apiModule(new ApiModule()).build();
        apiService.inject(this);
        //builder出DaggerApplicationComponent,並將注入到此。
        loginData=DaggerApplicationComponent.builder().shpfModule(new ShpfModule()).build();
        loginData.inject(this);
    }

    public static MyApplication getInstance(){
        // 第一次被呼叫的時候再建立物件
        if(instance==null)
            instance=new MyApplication();
        return instance;
    }
    //建立getApiService方法
    public ApplicationComponent getApiService(){
        return apiService;
    }
    //建立getLoginData方法
    public ApplicationComponent getLoginData(){
        return loginData;
    }
}
public class MainActivity extends AppCompatActivity {
    //設定context
    private Context context = this;
    ApiService apiService;
    //把依賴注入
    @Inject
    ApiService apiService;
    @Inject
    LoginData loginData;
    @Override
    protected void onCreate(Bundle savedInstanceState) {
        super.onCreate(savedInstanceState);
        setContentView(R.layout.activity_main);
        init();
    }
    public void init(){
        //
        DaggerMainComponent.builder()
                            .applicationComponent(MyApplication.getInstance().getApiService())
                            .build()
                            .inject(this);

        DaggerMainComponent.builder()
                            .applicationComponent(MyApplication.getInstance().getLoginData())
                            .build()
                            .inject(this);

        apiService=apiClient.getApiService();
        //把context傳入loginData。
        loginData.getShpf(context);
    }
    按下"Button"抓取API
    public void buttonClick(View view){
        //呼叫API,並把帳密傳入
        apiService.login(new LoginResponse("e1001","e1001"))
                .enqueue(new Callback<LoginResponse>() {
            @Override
            public void onResponse(Call<LoginResponse> call, Response<LoginResponse> response) {
                //把API存入SharedPreferences
                loginData.setToken(response.body().getToken());
                //判斷是否抓取成功
                if(response.body()!=null)
                    Toast.makeText(context,"抓取資料成功",Toast.LENGTH_SHORT);
            }
            @Override
            public void onFailure(Call<LoginResponse> call, Throwable t) {
            }
        });
    }
    //按下"Button"跳到CallActivity
    public void nextPage(View view){
        Intent intent = new Intent(MainActivity.this,CallActivity.class);
        startActivity(intent);
    }
}
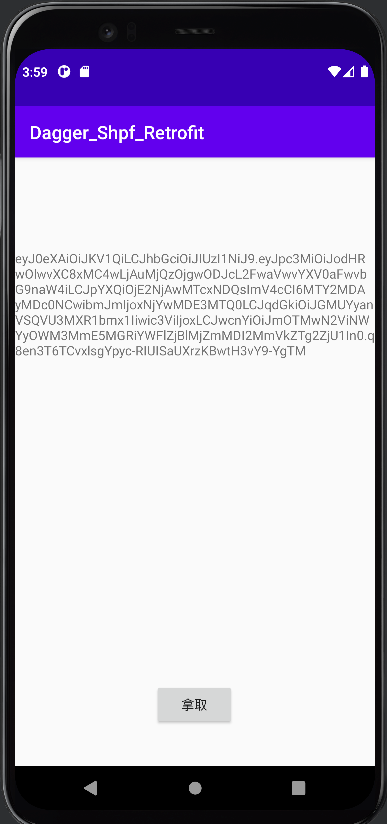
按下抓取資料 按下拿取資料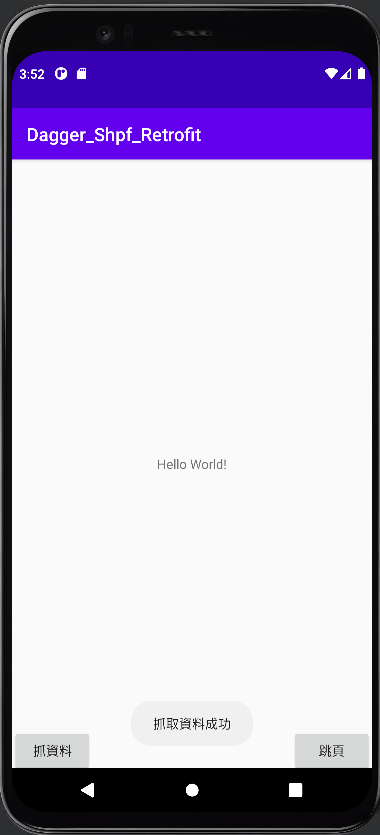


 iThome鐵人賽