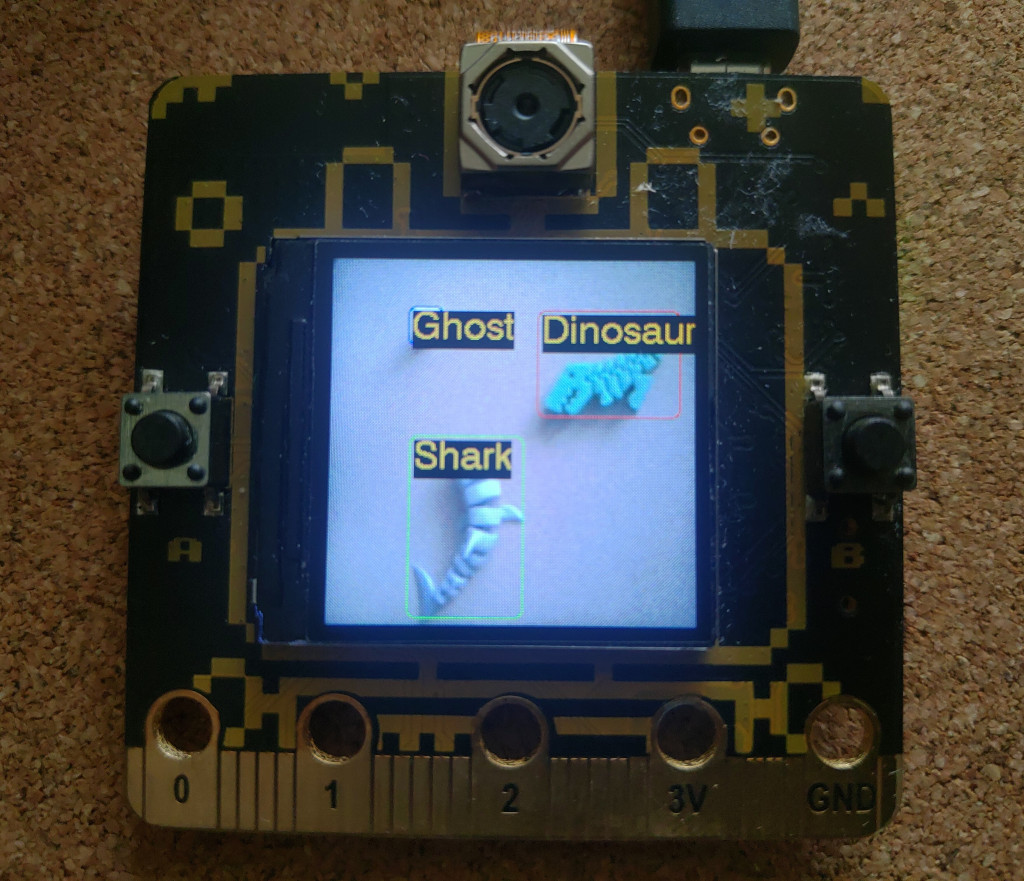
前兩天我們使用 Azure Custom Vision 雲端服務建立了 Classification、Object Detect 專案,並且用了線上了測試工具以及將專案發布,使用 REST API 測試了模型,確定可以順利運作,今天我們將使用 MCU PixelBit 整合其中的 Object Detect 專案,使用 500 萬畫素相機拍照後自動呼叫 REST API,並將回傳的 Bounding Box、名稱,加註寫在 TFT 上,就讓我們開始吧~。
開啟之前訓練好的 Object Detect Project,切換到 Preformance 也面點選 Prediction URL 查看你的資訊,對照下方格式更換範例程式碼檔 config.h 內的定義。
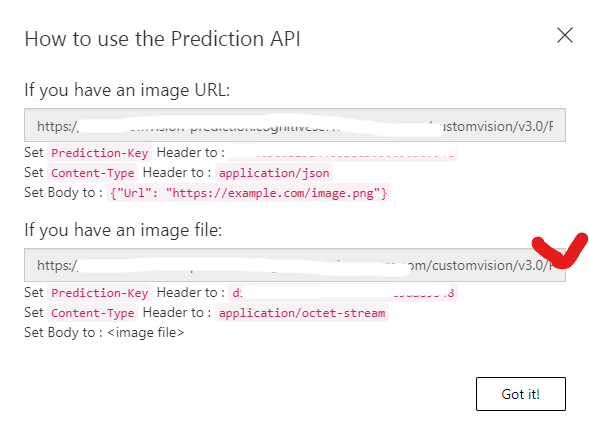
https://<API_HOST>/customvision/v3.0/Prediction/<Prediction_ID>/detect/iterations/<Iterations_ID>/image
// WiFi 名稱
#define WIFI_SSID "XXXXXXXX"
// WiFi 密碼
#define WIFI_PASS "XXXXXXXX"
// Azure Custom Vision Host
#define API_HOST "XXXXXXXX"
#define Prediction_ID "XXXXXXXX"
#define Iterations_ID "XXXXXXXX"
#define Prediction_Key "XXXXXXXX"
建立資料結構,存放雲端傳回的資料,API 回傳的 boundingBox 數值都介於 0~1,我們需要自行依照發送出去的照片解析度將此數值乘上解析度寬與高才可得到正確位置。
typedef struct {
    bool   valid;              // 此筆資料是否有效
    float  probability;        // 信心度
    String tagName;            // 標籤名稱
    struct boundingBox_t {     // boundingBox 左上座標、寬、高
        float left;
        float top;
        float width;
        float height;
    } boundingBox_t;
} Prediction_t;
建立呼叫 Azure Prediction API 方法,傳入圖片資料、圖片資料長度。
流程大致如下:
bool AzurePrediction(uint8_t *image_data, size_t image_sz)
{
    if (image_data == NULL || image_sz == 0)
        return false;
    if (WiFi.status() != WL_CONNECTED)
        return false;
#if DEBUG_TIMER
    uint32_t preMs = millis();
#endif
    // 連線到 Azure Custom Vision
    if (!_clientSecure.connect(API_HOST, 443)) {
        DEBUG_PRIMTLN("connection Azure Custom Vision failed");
        return false;
    }
    DEBUG_PRIMT_TIMER("Connect to Server: ");
    DEBUG_PRIMTLN_TIMER(millis() - preMs);

#if DEBUG_TIMER
    preMs = millis();
#endif
    bool Success_h = false;
    int  httpCode  = 404;

    size_t image_size = image_sz;
    String boundary   = "----Azure_Custom_Vision--";
    String body       = " \r\n";
    body.reserve(200);

    body += "--" + boundary + "\r\n";
    body += "Content-Disposition: form-data; name=\"imageFile\"; filename=\"image.jpg\"\r\n";
    body += "Content-Type: image/jpeg\r\n\r\n";

    String body_end    = "--" + boundary + "--\r\n";
    size_t body_length = body.length() + image_size + body_end.length();

    // Set HTTPS Header
    String header = "";
    header.reserve(400);
    header += "POST /customvision/v3.0/Prediction/" Prediction_ID "/detect/iterations/" Iterations_ID "/image HTTP/1.1\r\n";
    header += "Host: " API_HOST "\r\n";
    header += "Prediction-Key: " Prediction_Key "\r\n";
    header += "User-Agent: " + String(USER_AGENT) + "\r\n";
    header += "Connection: close\r\n";
    header += "Content-Length: " + String(body_length) + "\r\n";
    header += "Content-Type: multipart/form-data; boundary=" + boundary + "\r\n\r\n";

    // Write HTTP Header and body
    String packet = "";
    packet.reserve(600);
    packet = header + body;
    _clientSecure.print(packet);
    DEBUG_PRIMT_TIMER("send header and body packet: ");
    DEBUG_PRIMTLN_TIMER(millis() - preMs);

#if DEBUG_TIMER
    preMs = millis();
#endif
    // Write HTTP bin jpg image
    if (image_size > 0) {
        size_t BUF_SIZE = 1024;
        if (image_data != NULL) {
            uint8_t *p  = image_data;
            size_t   sz = image_size;
            while (p != NULL && sz) {
                if (sz >= BUF_SIZE) {
                    _clientSecure.write(p, BUF_SIZE);
                    p += BUF_SIZE;
                    sz -= BUF_SIZE;
                } else {
                    _clientSecure.write(p, sz);
                    p += sz;
                    sz = 0;
                }
            }
        }
    }
    // Write body end
    _clientSecure.print("\r\n" + body_end);
    DEBUG_PRIMT_TIMER("send image packet: ");
    DEBUG_PRIMTLN_TIMER(millis() - preMs);

#if DEBUG_TIMER
    preMs = millis();
#endif
    // Wait Server packet available
    while (_clientSecure.connected() && !_clientSecure.available())
        delay(10);

    DEBUG_PRIMT_TIMER("wait server response: ");
    DEBUG_PRIMTLN_TIMER(millis() - preMs);
    String resp = "";
    resp.reserve(500);

    // Read response
    if (_clientSecure.connected() && _clientSecure.available()) {
        // Check response code
        if (!findValueFromKey(readStringUntil('\n').c_str(), "HTTP/1.1", " ", " OK", httpCode))
            return false;
        Success_h = (httpCode == 200);
        if (!Success_h) {
            while (_clientSecure.available()) {
                char ch = _clientSecure.read();
                DEBUG_PRIMT(ch);
                DEBUG_PRIMTLN();
            }
            return false;
        }
#if DEBUG_TIMER
        preMs = millis();
#endif
        // _clientSecure.setTimeout(5);
        // skip response header
        while (_clientSecure.available()) {
            resp = readStringUntil('\n');
            if (resp == "\r") {
                break;
            }
        }
        DEBUG_PRIMT_TIMER("Read response header: ");
        DEBUG_PRIMTLN_TIMER(millis() - preMs);

        // while (_clientSecure.available()) {
        //     String ch = readStringUntil(',');
        //     DEBUG_PRIMT(ch);
        //     DEBUG_PRIMTLN();
        // }
#if DEBUG_TIMER
        preMs = millis();
#endif
        // Read response body
        while (_clientSecure.available()) {
            Prediction_t newp;
            if (findValueFromKey(readStringUntil(',').c_str(), "\"probability\"", ":", NULL, newp.probability)) {
                if (newp.probability < 0.75)
                    continue;
                readStringUntil(',');
                if (findValueFromKey(readStringUntil(',').c_str(), "\"tagName\"", ":\"", "\"", newp.tagName))
                    if (findValueFromKey(readStringUntil(',').c_str(), "\"left\"", ":", NULL, newp.boundingBox_t.left))
                        if (findValueFromKey(readStringUntil(',').c_str(), "\"top\"", ":", NULL, newp.boundingBox_t.top))
                            if (findValueFromKey(readStringUntil(',').c_str(), "\"width\"", ":", NULL, newp.boundingBox_t.width))
                                if (findValueFromKey(readStringUntil(',').c_str(), "\"height\"", ":", "}}", newp.boundingBox_t.height)) {
                                    newp.valid = true;
                                    // remove duplicates
                                    bool flag = false;
                                    for (int i = 0; i < prediction_idx; i++) {
                                        if (newp.tagName == predictions[i].tagName) {
                                            if (newp.probability > predictions[i].probability) {
                                                // reWrite date
                                                predictions[i].probability          = newp.probability;
                                                predictions[i].boundingBox_t.left   = newp.boundingBox_t.left;
                                                predictions[i].boundingBox_t.top    = newp.boundingBox_t.top;
                                                predictions[i].boundingBox_t.width  = newp.boundingBox_t.width;
                                                predictions[i].boundingBox_t.height = newp.boundingBox_t.height;
                                            }
                                            flag = true;
                                            break;
                                        }
                                    }
                                    if (flag) {
                                        break;
                                    } else {
                                        predictions[prediction_idx++] = newp;
                                    }
                                    if (prediction_idx >= Prediction_SIZE) {
                                        DEBUG_PRIMTLN("Out of Range");
                                        break;
                                    }
                                }
            }
        }
        DEBUG_PRIMT_TIMER("Read response buff: ");
        DEBUG_PRIMTLN_TIMER(millis() - preMs);
    }
    delay(10);
    _clientSecure.stop();
    return Success_h;
}
Arduino Loop Function
void loop()
{
    static uint8_t state = READY;
    uart.loop();

    switch (state) {
    case READY: {
        camera_fb_t *fb = NULL;
        fb              = esp_camera_fb_get();
        if (fb->format != PIXFORMAT_JPEG) {
            DEBUG_PRIMTLN("Non-JPEG data not implemented");
            break;
        }
        tft.startWrite();
        TJpgDec.drawJpg(0, 0, fb->buf, fb->len);
        tft.endWrite();

        if (btnA_state) {
            btnA_state = false;
            if (!fb) {
                DEBUG_PRIMTLN("Camera capture failed");
                break;
            }
            uint32_t pre_ms = millis();
            prediction_idx  = 0;

            // Prediction
            bool ret = AzurePrediction(fb->buf, fb->len);
            // Show ret
            DEBUG_PRIMTLN(ret ? "Success" : "Fail");
            DEBUG_PRIMTLN(prediction_idx);
            for (int i = 0; i < prediction_idx; i++) {
                Prediction_t *p = (predictions + i);
                DEBUG_PRIMT(p->tagName);
                DEBUG_PRIMT(" -> ");
                DEBUG_PRIMT(p->probability);
                DEBUG_PRIMT("[ ");
                DEBUG_PRIMT(p->boundingBox_t.left);
                DEBUG_PRIMT(" , ");
                DEBUG_PRIMT(p->boundingBox_t.top);
                DEBUG_PRIMT(" , ");
                DEBUG_PRIMT(p->boundingBox_t.width);
                DEBUG_PRIMT(" , ");
                DEBUG_PRIMT(p->boundingBox_t.height);
                DEBUG_PRIMT(" ] ");
                DEBUG_PRIMTLN();
                uint32_t color = TFT_CYAN;
                if (p->tagName == "Dinosaur")
                    color = TFT_RED;
                else if (p->tagName == "Ghost")
                    color = TFT_BLUE;
                else if (p->tagName == "Shark")
                    color = TFT_GREEN;
                tft.startWrite();
                tft.drawRoundRect(p->boundingBox_t.left * 240, p->boundingBox_t.top * 240, p->boundingBox_t.width * 240, p->boundingBox_t.height * 240, 4, color);
                tft.drawString(p->tagName, (p->boundingBox_t.left * 240) + 2, (p->boundingBox_t.top * 240) + 2, 4);
                tft.endWrite();
            }

            DEBUG_PRIMTLN();
            Serial.print(count++);
            Serial.print(" => Spend time: ");
            Serial.println(millis() - pre_ms);
            DEBUG_PRIMTLN();
            state = IDLE;
        }
        esp_camera_fb_return(fb);
    } break;
    case IDLE: {
        if (btnB_state) {
            btnB_state = false;
            state      = READY;
        }
    } break;
    default:
        break;
    }
}
預設相機影像串流到 TFT 顯示,按下 A 鍵將影像發送到 Azure Custom Vision 推論,並將回傳資料顯示繪製在 TFT 上,按下 B 鍵繼續串流影像到 TFT 顯示。
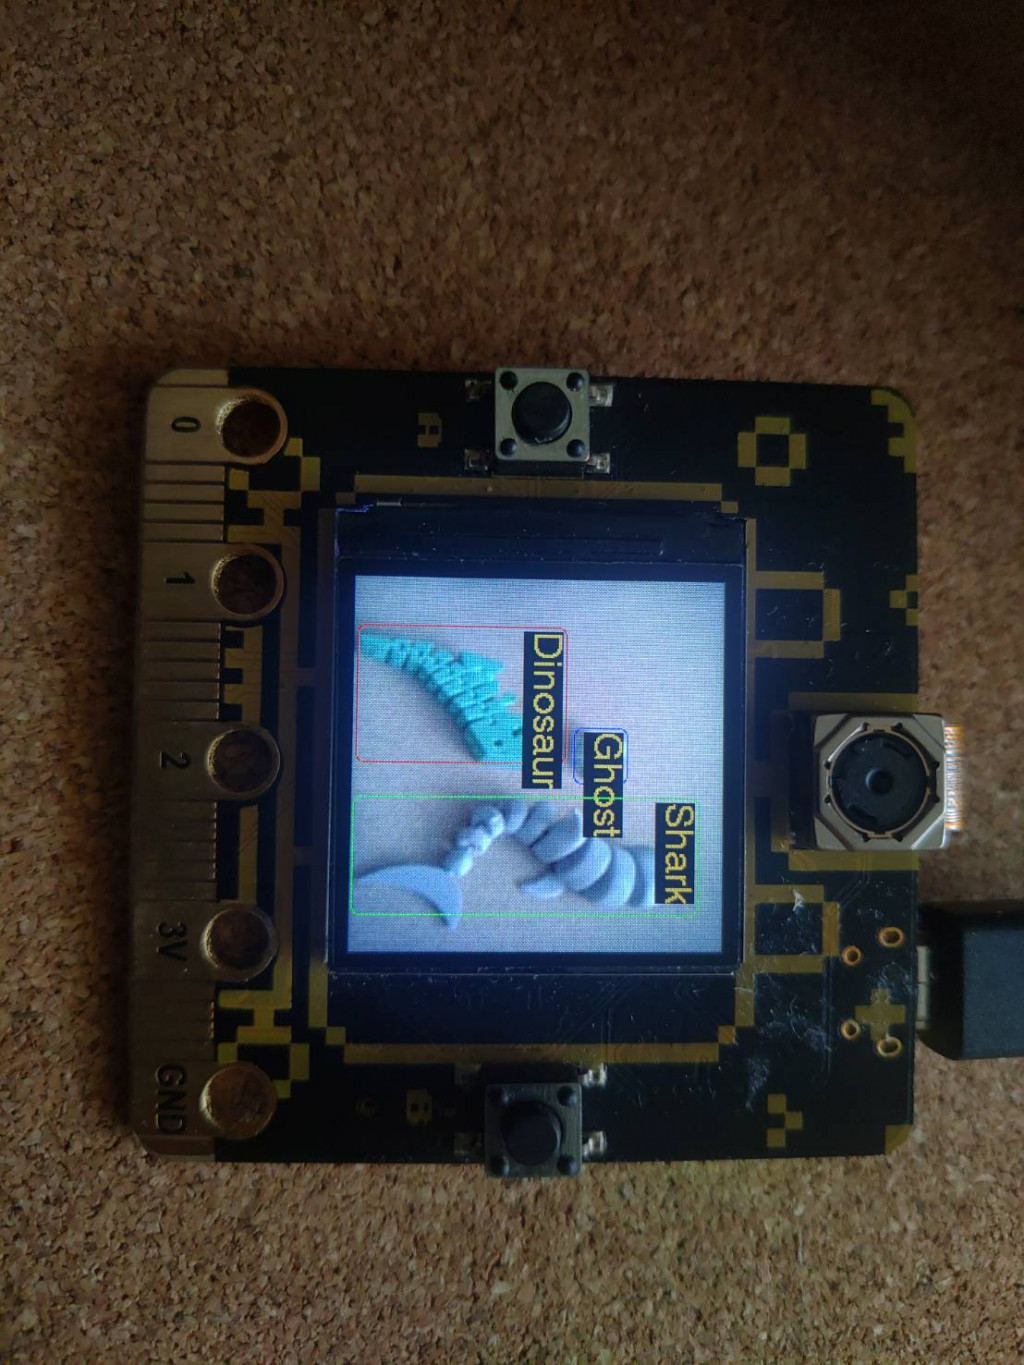
以上就是將 Azure Custom Vision 結合到 PixelBit 的過程,經過多次測試後平均單次發送到回傳時間為 2.7 秒,與昨天使用電腦 Postman 呼叫 API 比起來多了將近一倍的時間,2.7 s/FPS,想要做到時實辨識是不太有機會了,但是對於一些不需要即時辨識又想要實現物件辨識的場合還是蠻有用的。
範例程式碼有點雜亂(因為沒有時間 XD),有機會在將它重構。


 iThome鐵人賽