在本章節中,我們以Ubuntu 18.04的Linux版本發行的作業系統上設定與建置SSL安全憑證之資料庫連線。
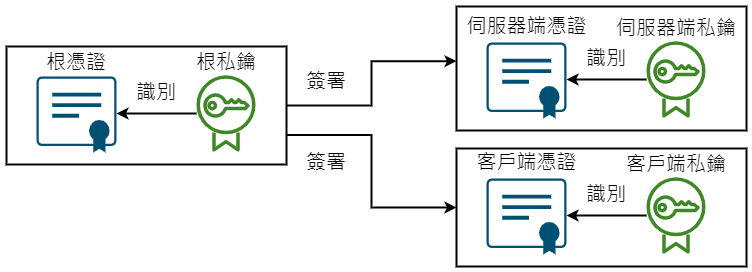
下面的圖示是我們在這章節中進行的SSL憑證示意圖,從下圖可以得知,根、伺服器與客戶端憑證之間的關係:

我們首先要注意的是,SSL使用者驗證支援TCP原生協定,即使用clickHouse-client等這類的指令。
理論上,合法憑證需要在ClickHouse之資料庫伺服器的設定上需要設定<verificationMode>strict</verificationMode>來達到連線安全的驗證。
在下面的範例中,我們使用自我簽署的方式來產生出憑證,對於生產的環境,建立出來的CSR並送到PKI金鑰基礎建設的組織或是憑證供應商來取得適當的憑證。
為避免在執行openssl指令時出現Can't load /home/peter/.rnd into RNG錯誤,可以先執行下列的指令:
openssl rand -writerand .rnd
為了要建立自己的根私鑰與憑證,須建立自己的設定檔案,相關設定檔案內容如下:
[ req ]
distinguished_name = req_distinguished_name
x509_extensions = v3_ca
prompt = no
[ req_distinguished_name ]
C = CN
ST = GD
O = YOUR_ORG
CN = root
[ v3_ca ]
basicConstraints = critical,CA:TRUE
subjectKeyIdentifier = hash
authorityKeyIdentifier = keyid:always,issuer:always
[ v3_req ]
keyUsage = keyEncipherment, dataEncipherment
extendedKeyUsage = serverAuth
subjectAltName = @alt_names
[ alt_names ]
IP.1 = YOUR_SERVER_IP
從上述的設定檔可以知道,YOUR_ORG可以設定單位的名稱,而YOUR_SERVER_IP則是設定伺服器端的IP位址,這邊設定分別填寫為Bytebase與127.0.0.1。
使用vim文字編輯器編輯並將編輯的內容印出:
peter@ubuntu-s-4vcpu-8gb-amd-sgp1-01:~$ vim req.conf
peter@ubuntu-s-4vcpu-8gb-amd-sgp1-01:~$ cat req.conf
[ req ]
distinguished_name = req_distinguished_name
x509_extensions = v3_ca
prompt = no
[ req_distinguished_name ]
C = CN
ST = GD
O = Bytebase
CN = root
[ v3_ca ]
basicConstraints = critical,CA:TRUE
subjectKeyIdentifier = hash
authorityKeyIdentifier = keyid:always,issuer:always
[ v3_req ]
keyUsage = keyEncipherment, dataEncipherment
extendedKeyUsage = serverAuth
subjectAltName = @alt_names
[ alt_names ]
IP.1 = 127.0.0.1
執行下列的指令產生根私鑰(Root CA Key):
openssl genrsa -out ca.key 2048
執行上述的指令與輸出的訊息如下:
peter@ubuntu-s-4vcpu-8gb-amd-sgp1-01:~$ openssl genrsa -out ca.key 2048
Generating RSA private key, 2048 bit long modulus (2 primes)
...........................................+++++
...................+++++
e is 65537 (0x010001)
peter@ubuntu-s-4vcpu-8gb-amd-sgp1-01:~$
執行下列的指令將根憑證(Root CA Certficicate)產生:
openssl req -x509 -new -key ca.key -sha256 -days 36500 -out ca.pem -extensions 'v3_ca' -config req.conf
執行上述的指令與輸出的訊息如下:
peter@ubuntu-s-4vcpu-8gb-amd-sgp1-01:~$ openssl req -x509 -new -key ca.key -sha256 -days 36500 -out ca.pem -extensions 'v3_ca' -config req.conf
peter@ubuntu-s-4vcpu-8gb-amd-sgp1-01:~$ ls ca.key ca.pem
ca.key  ca.pem
執行下列的指令建立伺服器端的私鑰:
openssl genrsa -out server.key 2048
執行上述的指令與輸出的訊息如下:
peter@ubuntu-s-4vcpu-8gb-amd-sgp1-01:~$ openssl genrsa -out server.key 2048
Generating RSA private key, 2048 bit long modulus (2 primes)
....+++++
..+++++
e is 65537 (0x010001)
執行下列的指令建立伺服器端的憑證:
openssl req -new -sha256 -key server.key -out server.csr -subj "/C=CN/ST=GD/O=YOUR_ORG/CN=YOUR_SERVER_IP"
openssl x509 -req -days 365 -sha256 -extensions v3_req -CA ca.pem -CAkey ca.key -CAcreateserial -in server.csr -out server.pem
從上述的指令可以知道,第一行指令是拿伺服器端的私鑰建立伺服器端的簽署憑證請求檔案,並設定摘要為:/C=CN/ST=GD/O=YOUR_ORG/CN=YOUR_SERVER_IP。
在上述設定的摘要中,YOUR_ORG可以設定單位的名稱,而YOUR_SERVER_IP則是設定伺服器端的IP位址,這邊設定分別填寫為Bytebase與127.0.0.1。
在第二行指令中,利用先前產生的CA私鑰與憑證對伺服器端的簽署憑證檔案進自我簽署,並輸出伺服器的憑證檔,即server.pem檔。
執行上述的指令所輸出的訊息如下:
peter@ubuntu-s-4vcpu-8gb-amd-sgp1-01:~$ openssl req -new -sha256 -key server.key -out server.csr -subj "/C=CN/ST=GD/O=Bytebase/CN=127.0.0.1"
peter@ubuntu-s-4vcpu-8gb-amd-sgp1-01:~$ openssl x509 -req -days 365 -sha256 -extensions v3_req -CA ca.pem -CAkey ca.key -CAcreateserial -in server.csr -out server.pem
Signature ok
subject=C = CN, ST = GD, O = Bytebase, CN = 127.0.0.1
Getting CA Private Key
執行下列的指令產生客戶端的私鑰:
openssl genrsa -out client.key 2048
執行上述的指令與輸出的訊息如下:
peter@ubuntu-s-4vcpu-8gb-amd-sgp1-01:~$ openssl genrsa -out client.key 2048
Generating RSA private key, 2048 bit long modulus (2 primes)
.............................................+++++
.............................................+++++
e is 65537 (0x010001)
執行下列的指令產生客戶端的簽署憑證請求檔案:
openssl req -new -sha256 -key client.key -out client.csr -subj "/C=CN/ST=GD/O=YOUR_ORG/CN=YOUR_SERVER_IP"
在上述設定的摘要中,YOUR_ORG可以設定單位的名稱,而YOUR_SERVER_IP則是設定伺服器端的IP位址,這邊設定分別填寫為Bytebase與127.0.0.1。
執行上述的指令所輸出的訊息如下:
peter@ubuntu-s-4vcpu-8gb-amd-sgp1-01:~$ openssl req -new -sha256 -key client.key -out client.csr -subj "/C=CN/ST=GD/O=Bytebase/CN=127.0.0.1"
peter@ubuntu-s-4vcpu-8gb-amd-sgp1-01:~$
執行下列的指令用先前產生的CA私鑰與憑證來簽署客戶端的憑證簽署檔案來產生客戶端的憑證:
openssl x509 -req -days 36500 -sha256 -extensions v3_req -CA ca.pem -CAkey ca.key -CAcreateserial -in client.csr -out client.pem
執行上述的指令所輸出的訊息如下:
peter@ubuntu-s-4vcpu-8gb-amd-sgp1-01:~$ openssl x509 -req -days 36500 -sha256 -extensions v3_req -CA ca.pem -CAkey ca.key -CAcreateserial -in client.csr -out client.pem
Signature ok
subject=C = CN, ST = GD, O = Bytebase, CN = 127.0.0.1
Getting CA Private Key
從上面產生的憑證可以看到,不論是伺服器端還是客戶端的,有效期限為36500天。
若沒有/etc/clickhouse-server/certs目錄的話,新增此目錄,相關執行指令與輸出的訊息如下:
peter@ubuntu-s-4vcpu-8gb-amd-sgp1-01:~$ sudo mkdir /etc/clickhouse-server/certs
[sudo] password for peter:
peter@ubuntu-s-4vcpu-8gb-amd-sgp1-01:~$
我們分別將ca.pem、server.crt以及server.key複製到/etc/clickhouse-server/certs目錄裡,相關執行指令與輸出的訊息如下:
peter@ubuntu-s-4vcpu-8gb-amd-sgp1-01:~$ sudo cp ca.pem server.pem server.key /etc/clickhouse-server/certs/
peter@ubuntu-s-4vcpu-8gb-amd-sgp1-01:~$
接著使用chown指令將上述建立的目錄改成clickhouse使用者,相關執行指令與輸出的訊息如下:
peter@ubuntu-s-4vcpu-8gb-amd-sgp1-01:~$ sudo chown -R clickhouse:clickhouse /etc/clickhouse-server/certs
peter@ubuntu-s-4vcpu-8gb-amd-sgp1-01:~$
設定資料庫之前,需要執行下列指令產生Diffie-Hellman參數檔案:
sudo openssl dhparam -out /etc/clickhouse-server/dhparam.pem 4096
執行上述指令所輸出的訊息如下:
peter@ubuntu-s-4vcpu-8gb-amd-sgp1-01:~$ sudo openssl dhparam -out /etc/clickhouse-server/dhparam.pem 4096
Generating DH parameters, 4096 bit long safe prime, generator 2
This is going to take a long time
......+................................................................................................+......................................................................++*++*++*.......................
......+................................................................................................+......................................................................++*++*++*
peter@ubuntu-s-4vcpu-8gb-amd-sgp1-01:~$
編輯/etc/clickhouse-server/config.d/cert.xml檔案並新增下列的設定:
<clickhouse>
   <tcp_port_secure>9440</tcp_port_secure>
   <openSSL>
        <server>
           <dhParamsFile>/etc/clickhouse-server/dhparam.pem</dhParamsFile>
           <caConfig>/etc/clickhouse-server/certs/ca.pem</caConfig>
           <certificateFile>/etc/clickhouse-server/certs/server.pem</certificateFile>
           <privateKeyFile>/etc/clickhouse-server/certs/server.key</privateKeyFile>
           <verificationMode>none</verificationMode>
       </server>
   </openSSL>
</clickhouse>
上述的設定<verificationMode>none</verificationMode>是針對自我簽署的憑證所使用的。
設定完成之後,重新啟動clickhouse-server之背景服務,相關執行指令與輸出的訊息如下:
peter@ubuntu-s-4vcpu-8gb-amd-sgp1-01:~$ sudo systemctl restart clickhouse-server.service
peter@ubuntu-s-4vcpu-8gb-amd-sgp1-01:~$ sudo systemctl status clickhouse-server.service
● clickhouse-server.service - ClickHouse Server (analytic DBMS for big data)
   Loaded: loaded (/lib/systemd/system/clickhouse-server.service; enabled; vendor preset: enabled)
   Active: active (running) since Fri 2022-10-07 06:21:36 UTC; 5min ago
 Main PID: 13950 (clckhouse-watch)
    Tasks: 212 (limit: 4915)
   CGroup: /system.slice/clickhouse-server.service
           ├─13950 clickhouse-watchdog --config=/etc/clickhouse-server/config.xml --pid-file=/run/clickhouse-server/clickhouse-server.pid
           └─13967 /usr/bin/clickhouse-server --config=/etc/clickhouse-server/config.xml --pid-file=/run/clickhouse-server/clickhouse-server.pid

Oct 07 06:21:36 ubuntu-s-4vcpu-8gb-amd-sgp1-01 clickhouse-server[13950]: Logging errors to /var/log/clickhouse-server/clickhouse-server.err.log
Oct 07 06:21:37 ubuntu-s-4vcpu-8gb-amd-sgp1-01 clickhouse-server[13950]: Processing configuration file '/etc/clickhouse-server/config.xml'.
Oct 07 06:21:37 ubuntu-s-4vcpu-8gb-amd-sgp1-01 clickhouse-server[13950]: Merging configuration file '/etc/clickhouse-server/config.d/cert.xml'.
Oct 07 06:21:37 ubuntu-s-4vcpu-8gb-amd-sgp1-01 clickhouse-server[13950]: Merging configuration file '/etc/clickhouse-server/config.d/grpc.xml'.
Oct 07 06:21:37 ubuntu-s-4vcpu-8gb-amd-sgp1-01 clickhouse-server[13950]: Merging configuration file '/etc/clickhouse-server/config.d/mysql_port.xml'.
Oct 07 06:21:37 ubuntu-s-4vcpu-8gb-amd-sgp1-01 clickhouse-server[13950]: Merging configuration file '/etc/clickhouse-server/config.d/psql_port.xml'.
Oct 07 06:21:37 ubuntu-s-4vcpu-8gb-amd-sgp1-01 clickhouse-server[13950]: Saved preprocessed configuration to '/var/lib/clickhouse/preprocessed_configs/config.xml'.
Oct 07 06:21:37 ubuntu-s-4vcpu-8gb-amd-sgp1-01 clickhouse-server[13950]: Processing configuration file '/etc/clickhouse-server/users.xml'.
Oct 07 06:21:37 ubuntu-s-4vcpu-8gb-amd-sgp1-01 clickhouse-server[13950]: Merging configuration file '/etc/clickhouse-server/users.d/default-password.xml'.
Oct 07 06:21:37 ubuntu-s-4vcpu-8gb-amd-sgp1-01 clickhouse-server[13950]: Saved preprocessed configuration to '/var/lib/clickhouse/preprocessed_configs/users.xml'.
接著我們將先前所產生好的ca.pem、client.pem以及client.key檔案放到/etc/ssl/certs的目錄中,相關執行指令與輸出的訊息如下:
peter@ubuntu-s-4vcpu-8gb-amd-sgp1-01:~$ sudo cp ca.pem client.pem client.key /etc/ssl/certs/
peter@ubuntu-s-4vcpu-8gb-amd-sgp1-01:~$
使用下列的設定檔內容設定資料庫客戶端連線設定:
<config>
    <user>default</user>
    <password>YOUR_PASSWORD</password>
    <host>YOUR_CLICKHOUSE_SERVER_IP</host>
    <secure>true</secure>
    <openSSL>
        <client>
            <caConfig>/etc/ssl/certs/ca.pem</caConfig>
            <certificateFile>/etc/ssl/certs/client.pem</certificateFile>
            <privateKey>/etc/ssl/certs/client.key</privateKey>
        </client>
    </openSSL>
</config>
從上述的設定可以知道,YOUR_PASSWORD就是替換成default使用者的密碼,YOUR_CLICKHOUSE_SERVER_IP則是替換成資料庫伺服器的IP位址,以及設定連線時候用到的CA憑證、客戶端的憑證與私鑰。
將上述的設定檔存成clickhouse-client-ssl.xml檔案之後,執行下列的指令使用clickhouse-client進行安全的連線:
clickhouse-client --config=clickhouse-client-ssl.xml
執行上述的指令所輸出的訊息如下:
peter@ubuntu-s-4vcpu-8gb-amd-sgp1-01:~$ clickhouse-client --config=clickhouse-client-ssl.xml
ClickHouse client version 22.8.4.7 (official build).
Connecting to 127.0.0.1:9440 as user default.
Connected to ClickHouse server version 22.8.4 revision 54460.

Warnings:
 * Linux is not using a fast TSC clock source. Performance can be degraded. Check /sys/devices/system/clocksource/clocksource0/current_clocksource

ubuntu-s-4vcpu-8gb-amd-sgp1-01 :)
從上述的指令所輸出的訊息可以知道,這樣就完成了利用TCP協定進行憑證驗證的資料庫連線方式了。
當<mysql_port>9004</mysql_port>設定有啟用的時候,我們可以使用下列的指令來透過MySQL客戶端協定介面進行資料庫的連線:
mysql -u default -p -h 127.0.0.1 -P 9004 --ssl-ca=ca.pem --ssl-cert=client.pem --ssl-key=client.key --execute="STATUS"
執行上述指令所輸出的訊息如下:
peter@ubuntu-s-4vcpu-8gb-amd-sgp1-01:~$ mysql -u default -p -h 127.0.0.1 -P 9004 --ssl-ca=ca.pem --ssl-cert=client.pem --ssl-key=client.key --execute="STATUS"
Enter password:
--------------
mysql  Ver 14.14 Distrib 5.7.39, for Linux (x86_64) using  EditLine wrapper

Connection id:          1
Current database:       default
Current user:           default
SSL:                    Cipher in use is ECDHE-RSA-AES128-GCM-SHA256
Current pager:          stdout
Using outfile:          ''
Using delimiter:        ;
Server version:         22.8.4.7-ClickHouse
Protocol version:       10
Connection:             127.0.0.1 via TCP/IP
Server characterset:    0
Db     characterset:    0
Client characterset:    0
Conn.  characterset:    0
TCP port:               9004
--------------
最後,我們回顧一下這個章節中做了什麼事情:
