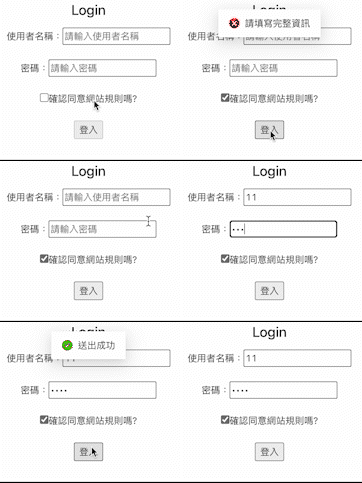
今天來介紹 Login 後點擊 onSubmit 時,該如何進行測試!
Login 元件於 onSubmit 時新增功能,如下:

接著來看範例程式碼:
Login.js
在送出時會執行 handleSubmit ,會呼叫 checkNotEmptyString 判斷是否非空字串:
import React, { useState } from "react";
import { message } from "antd";

export const checkNotEmptyString = (value) => {
  return value.trim() !== "";
};

const Login = () => {
  const [loginData, setLoginData] = useState({
    username: "",
    password: "",
  });
  const [isChecked, setIsChecked] = useState(false);

  const handleChange = (e) => {
    setLoginData({
      ...loginData,
      [e.target.name]: e.target.value,
    });
  };

  const handleSubmit = () => {
    if (
      checkNotEmptyString(loginData.username) &&
      checkNotEmptyString(loginData.password)
    ) {
      message.success("送出成功");
    } else {
      message.error("請填寫完整資訊");
    }
  };

  return (
    <>
      <h2>Login</h2>
      <form>
        <label htmlFor="username">
          使用者名稱:
          <input
            type="text"
            id="username"
            name="username"
            placeholder="請輸入使用者名稱"
            value={loginData.username}
            onChange={handleChange}
          />
        </label>
        <br />
        <label htmlFor="password">
          密碼:
          <input
            type="password"
            id="password"
            name="password"
            placeholder="請輸入密碼"
            value={loginData.password}
            onChange={handleChange}
          />
        </label>
        <br />
        <label htmlFor="agreeRules">
          <input
            type="checkbox"
            id="agreeRules"
            onChange={(e) => setIsChecked(e.target.checked)}
          />
          確認同意網站規則嗎?
        </label>
        <br />
        <button disabled={!isChecked} type="button" onClick={handleSubmit}>
          登入
        </button>
      </form>
    </>
  );
};
在進行測試之前想先介紹私有函式的概念,首先私有函式可以想成 spyOn 也無法找到,透過默認匯出時只包裝在該元件內的函式,例如 handleChange 、 handleSubmit ,如果嘗試透過 spyOn 模擬會得到:
test("spyOn onSubmit", async () => {
  const spyOnFn = jest.spyOn(Login, "onSubmit");
});

在這種情況下想要進行測試,可以透過以下幾種方式:
將原本的匯出方式從默認匯出改成具名匯出,並將要測試的函式 export 出來,這邊透過 checkNotEmptyString 來解釋(但這種情況要按照需求,如果是原本就在元件內的 handleSubmit 並不建議為了測試特別提出來。)
Login.js
export const checkNotEmptyString = (value) => {
  return value.trim() !== "";
};
// 從默認匯出改成具名匯出
export const Login = () => {
	 // 下略 ...
};
Login.test.js
// 匯入方式修改
import * as Login from "./Login";
// 能成功模擬
test("spyOn onSubmit", async () => {
  const spyOnFn = jest.spyOn(Login, "handleSubmit");
});
能成功的原因是因為透過者種方式已經幫我們改成透過物件的方式匯入,spyOn 能順利取值。

也可以改為透過 props 傳入 onSubmit 函式在進行 Mock 測試是否有呼叫:
Login.js
const Login = ({ handleSubmit }) => {
  const [loginData, setLoginData] = useState({
    username: "",
    password: "",
  });
  const [isChecked, setIsChecked] = useState(false);

  const handleChange = (e) => {
    setLoginData({
      ...loginData,
      [e.target.name]: e.target.value,
    });
  };

  // const handleSubmit = () => {
  //   if (
  //     checkNotEmptyString(loginData.username) &&
  //     checkNotEmptyString(loginData.password)
  //   ) {
  //     message.success("送出成功");
  //   } else {
  //     message.error("請填寫完整資訊");
  //   }
  // };

  return (
    <>
      <h2>Login</h2>
      <form>
        <label htmlFor="username">
          使用者名稱:
          <input
            type="text"
            id="username"
            name="username"
            placeholder="請輸入使用者名稱"
            value={loginData.username}
            onChange={handleChange}
          />
        </label>
        <br />
        <label htmlFor="password">
          密碼:
          <input
            type="password"
            id="password"
            name="password"
            placeholder="請輸入密碼"
            value={loginData.password}
            onChange={handleChange}
          />
        </label>
        <br />
        <label htmlFor="agreeRules">
          <input
            type="checkbox"
            id="agreeRules"
            onChange={(e) => setIsChecked(e.target.checked)}
          />
          確認同意網站規則嗎?
        </label>
        <br />
        <button disabled={!isChecked} type="button" onClick={handleSubmit}>
          登入
        </button>
      </form>
    </>
  );
};

export default Login;
Login.test.js
test("mock handleSubmit prop", async () => {
  const handleSubmit = jest.fn();
  // 進行一堆操作後
  await waitFor(() => {
    expect(handleSubmit).toHaveBeenCalled();
  });
});
雖然有上述幾種方法,但並非每次都會是透過 props 的方式將函式傳入元件內,所以也可以針對該函式會產生什麼行為去做測試!
這也是今天的測試目標:
此次測試須留意要透過 waitFor 等待彈出視窗出現後在進行斷言:
import React from "react";
import userEvent from "@testing-library/user-event";
import { screen, render, waitFor } from "@testing-library/react";
import Login from "./Login";

describe("The correct message is displayed when the send button is clicked", () => {
  test("All fields are filled to show that the sending is successful", async () => {
    render(<Login />);
    const nameInputNode = screen.getByLabelText("使用者名稱:");
    const passwordInputNode = screen.getByLabelText("密碼:");
    const checkbox = screen.getByRole("checkbox");
    const loginButton = screen.getByRole("button", { name: "登入" });

    userEvent.type(nameInputNode, "艾草");
    userEvent.type(passwordInputNode, "a12345678");
    userEvent.click(checkbox);
    userEvent.click(loginButton);

    await waitFor(() => {
      expect(screen.getByText("送出成功")).toBeInTheDocument();
    });
  });
  test("Missing field shows error message", async () => {
    render(<Login />);

    const nameInputNode = screen.getByLabelText("使用者名稱:");
    const checkbox = screen.getByRole("checkbox");
    const loginButton = screen.getByRole("button", { name: "登入" });

    userEvent.type(nameInputNode, "艾草");
    userEvent.click(checkbox);
    userEvent.click(loginButton);

    await waitFor(() => {
      expect(screen.getByText("請填寫完整資訊")).toBeInTheDocument();
    });
  });
});
接下來可以看到測試覆蓋率有 100% ,雖然沒有單獨對該函式進行測試,但針對行為進行測試也能提升覆蓋率:

今天的文章,算是自己剛好產生了測試私有函式的疑問,各種參考別人的問題及解答統整出來的,希望能給剛好也有疑惑的人提供一些幫助。
明天要接著進行導入 MSW 框架模擬 API 的測試。
https://stackoverflow.com/questions/54245654/how-to-spy-on-a-default-exported-function-with-jest
https://stackoverflow.com/questions/55657174/how-can-i-test-that-a-private-function-was-called-on-a-click-event
https://stackoverflow.com/questions/55270163/testing-a-login-component-with-jest
