今天要來實際利用vite套件來建立vue專案
延續參考vue官網上Quick Start的說明
https://vuejs.org/guide/quick-start.html
其中 Creating a Vue Application 的說明
列出依序要執行的命令
先來建立一個vue的學習目錄 vue_study
然後開啟終端機
切換到 vue_study 目錄
cd vue_study
接著執行以下命令建立專案檔
npm create vue@latest
然後會出現一些提問,如下所示
✔ Project name: … <your-project-name>
✔ Add TypeScript? … No / Yes  --> No
✔ Add JSX Support? … No / Yes  --> No
✔ Add Vue Router for Single Page Application development? … No / Yes  --> No
✔ Add Pinia for state management? … No / Yes  --> No
✔ Add Vitest for Unit testing? … No / Yes  --> No
✔ Add an End-to-End Testing Solution? … No / Cypress / Playwright  --> No
✔ Add ESLint for code quality? … No / Yes  --> No
✔ Add Prettier for code formatting? … No / Yes  --> No

Scaffolding project in ./<your-project-name>...
Done.
其中 <your-project-name> 是指輸入你要建立的專案名稱,例如:vue01
在提問中如果不知道要選什麼,都先以No回答
完成後,就會看到一個 vue01 的專案檔目錄就建立好了
路徑是 vue_study/vue01
執行操作畫面如下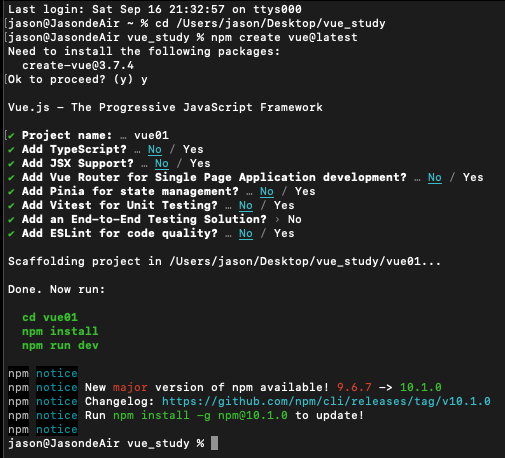
然後要切換到 vue01目錄下
執行
cd vue01
npm install
npm run dev
npm install --> 安裝所需的vue套件
npm run dev --> 啟動一個可以執行vue專案的小網站
接著在終端機看到網站主控台的畫面
VITE v4.4.9  ready in 247 ms

  ➜  Local:   http://localhost:5173/
  ➜  Network: use --host to expose
  ➜  press h to show help
在瀏覽器中開啟網址 http://localhost:5173/
就可以看到這個基本的vue專案的畫面
執行結果畫面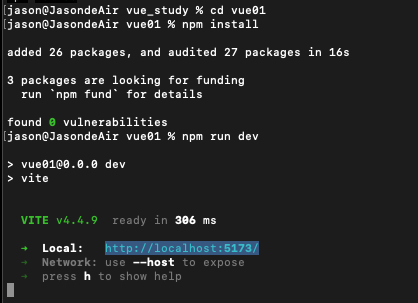
如果要產生可以上傳到實際上線的網站的網頁檔案的話,
要接著執行
npm run build
這時會在vue01目錄下產生一個dist的目錄,這個目錄的檔案就是可以上傳到網站上的檔案
如果要執行dist的網頁內容的話,就要以dist為根目錄來啟動小網站,
可以利用 php -S 127.0.0.1:8080 的命令來啟動小網站
執行如下
cd dist
php -S 127.0.0.1:8080
執行結果畫面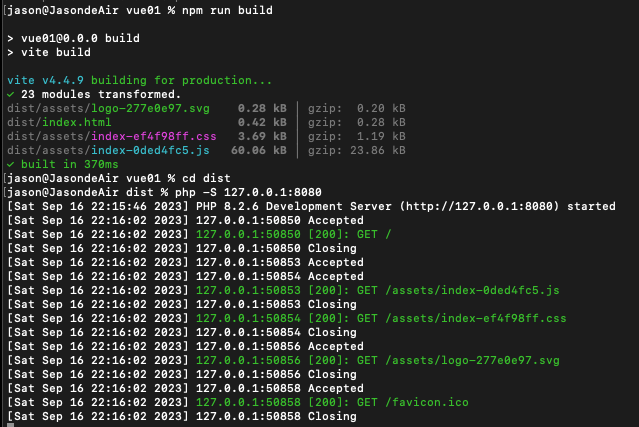
為了可以使用php,可以先下載安裝php
下載網址
https://www.php.net/downloads.php
啟動php小網站後
網址是 http://localhost:8080/index.html
//------------------------
MAC的使用者,可以用命令列的方式安裝 php
不過要先安裝Mac的套件管理工具 Homebrew
Homebrew的官網
https://brew.sh/index_zh-tw
安裝 Homebrew 的命令是
/bin/bash -c "$(curl -fsSL https://raw.githubusercontent.com/Homebrew/install/HEAD/install.sh)"
其中又看到 curl 是一個命令處理工具
從 curl的官網 https://curl.se/ 可以看到介紹
curl is a command line tool and library for transferring data with URLs
bash是一個mac的命令處理器 bash shell,就是在終端機看到的,等待輸入命令的介面,
就是命令處理器,在mac上有不同的命令處理器 像是 bash,zsh等。
所以整個像是一直追朔到源頭似的
bash -> curl -> homebrew -> php
最後的命令整理
安裝 Homebrew
/bin/bash -c "$(curl -fsSL https://raw.githubusercontent.com/Homebrew/install/HEAD/install.sh)"

安裝 php
brew install shivammathur/php/php@8.1

檢查php版本
php -v
有時候,套件,工具常常是一個關聯另一個
存在一種相依的關係。
//---------
也可以安裝 xampp 軟體
這個是XAMPP的下載網址
https://www.apachefriends.org/zh_tw/download.html
在 /htdocs 的目錄下新增一個 vue01目錄
將 dist下的檔案 複製到 /htdocs/vue_web的目錄下
啟動 xampp 的apache server
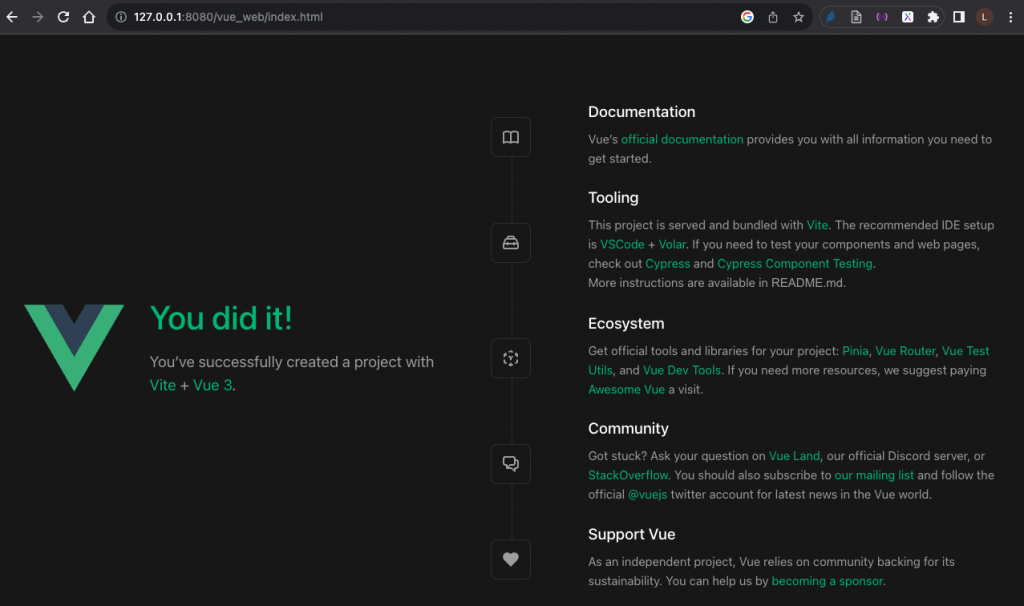
然後 網址是 http://localhost/vue_web/index.html
//----------------
其中有一點要注意是,因為網站目錄是 /vue_web , 並不是根目錄
所以如果輸入網址是 http://localhost/vue_web/index.html 會無法正確顯示網頁內容
要解決這個問題,要修改 vite.config.js 的設定
設定如下
import { fileURLToPath, URL } from 'node:url'

import { defineConfig } from 'vite'
import vue from '@vitejs/plugin-vue'

// https://vitejs.dev/config/
export default defineConfig({
  plugins: [
    vue(),
  ],
  resolve: {
    alias: {
      '@': fileURLToPath(new URL('./src', import.meta.url))
    }
  },
  base: '/vue_web',
  build: {
    outDir: './vue_web',
    emptyOutDir: true
  }

})
其中 base: '/vue_web', 是指設定網站的根目錄在 /vue_web 目錄
若沒有設定,預設值是 Default: /
可參考vite的 Shared Options 說明
https://vitejs.dev/config/shared-options.html
另外
build: {
  outDir: './vue_web',
  emptyOutDir: true
}
outDir: './vue_web' 是指將原始檔build到 vue_web 目錄
若沒有設定outDir,預設值是 ./dist
emptyOutDir: true 是指在build的時候,先清空 vue_web 資料夾
可參考vite的 Build Options 說明
https://vitejs.dev/config/build-options.html
當沒有設定base時,預設值是 Default: /
但是build的檔案 copy 到 網站的 vue_web 的子目錄時
輸入 http://localhost/vue_web/index.html 會有問題
是因為 base 設定的關係
在 index.html 中,會設定成
<script type="module" crossorigin src="/assets/index-393e57c5.js"></script>
會形成讀不到檔案,
正確應該是
<script type="module" crossorigin src="/vue_web/assets/index-393e57c5.js"></script>
才對
所以 加上 base: '/vue_web' 設定後
在 index.html 中,就可以正確設定成
<script type="module" crossorigin src="/vue_web/assets/index-393e57c5.js"></script>
當然產出的目錄 outDir 也要設定成 vue_web
另外在參考vite 的vite.config.js說明時,
看到 base 的說明是
base
  Type: string
  Default: /
看到 outDir 的說明是
build.outDir
  Type: string
  Default: dist
代表在 vite.config.js 的設定格式是
export default defineConfig({
  base: '/vue_web',
  build: {
    outDir: './vue_web',
    emptyOutDir: true
  }

})
base ->
  base: '/vue_web'

build.outDir ->
  build: {
    outDir: './vue_web'
  }

build.outDir, build.emptyOutDir ->
  build: {
    outDir: './vue_web',
    emptyOutDir: true
  }
以下是build產出的index.html的原始碼
<!DOCTYPE html>
<html lang="en">
  <head>
    <meta charset="UTF-8">
    <link rel="icon" href="/vue_web/favicon.ico">
    <meta name="viewport" content="width=device-width, initial-scale=1.0">
    <title>Vite App</title>
    <script type="module" crossorigin src="/vue_web/assets/index-8271b7e5.js"></script>
    <link rel="stylesheet" href="/vue_web/assets/index-ef4f98ff.css">
  </head>
  <body>
    <div id="app"></div>

  </body>
</html>
//-------
接著來看一下所產生的專案檔內容
主要要看的是 src 的目錄
以下是匯入VSCode的畫面
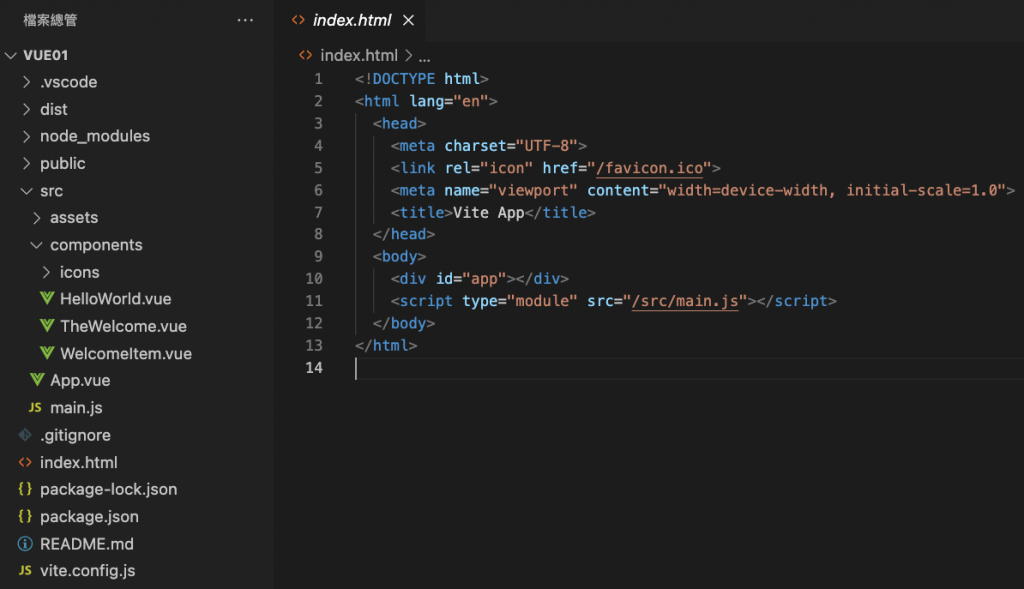
要來探索的話,就從index.html往下追蹤
index.html -> main.js -> App.vue -> HelloWorld.vue, TheWelcome.vue
TheWelcome.vue ->
WelcomeItem.vue, IconDocumentation.vue, IconTooling.vue,
IconEcosystem.vue, conCommunity.vue, IconSupport.vue
前面3個檔案幾乎是固定的 index.html -> main.js -> App.vue
App.vue是最上層的元件,也是從這裡開始進行網頁內容的設計
也是更多的SFC的元件的設計
每個vue元件中,都有 <script setup> <template> <style scoped> 3個主要的組成
在App.vue中,又再引入HelloWorld.vue, TheWelcome.vue元件
可以用 <HelloWorld msg="You did it!" /> 及 <TheWelcome /> 呈現
其中 TheWelcome 又再引入 5個元件,這樣整個網頁的內容就被拆解成多個vue的元件
最後就是進到vue元件的設計了
以上就是一個vue的專案的建立過程,了解完之後,就要進入vue本身的框架探索了


 iThome鐵人賽