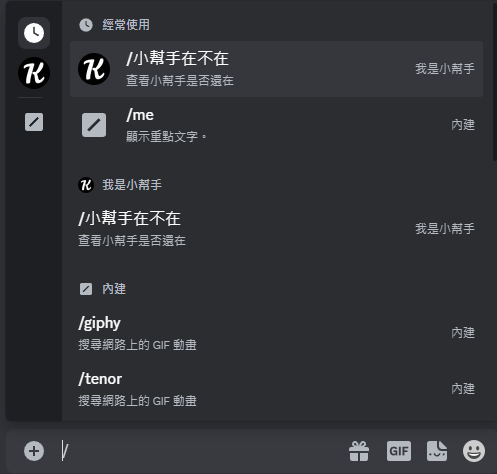
使用"/"輸入命令的功能,以下為官方範例圖,最廣泛機器人最常見的指令功能。
而使用slash commands功能我個人是習慣使用py-cord的方式,
但其實discord.py本身就可以使用了,
以下為我在網路找到的方式
首先引入:
import discord
from discord import app_commands
在一開始宣告intents 與client 的方式時,
再加入一個tree
intents = discord.Intents.default()
client = discord.Client(intents=intents)
tree = app_commands.CommandTree(client)
應用程序命令定義方式:
@bot.slash_command(name="first_slash", guild_ids=[...])
async def first_slash(ctx):
    await ctx.respond("You executed the slash command!")
並且在client.run執行前還需要加下列內容,並填入"特定的伺服器Id"
@client.event
async def on_ready():
    await tree.sync(guild=discord.Object(id=Your guild id))
    print("Ready!")
client.run(TOKEN)
先下載套件
pip install py-cord
引入套件
import discord
from discord.ext import commands
這裡的clinet 定義與原本的內容跟先前不一樣,需要修改原本的client 建立方式:
# before 原本的
client = discord.Client(intents=intents)
# after 改為
client = commands.Bot(intents=intents)
定義命令:
# name 命令名稱
# description 命令簡介
@client.slash_command(name="first_slash", guild_ids=[...])
async def first_slash(ctx):
    await ctx.respond("You executed the slash command!")

client.run(TOKEN)
目錄
├ main.py
└ src ┬ init.py (無內容)
└ discordBot ┬ init.py
├ eventMgr.py
├ commandMgr.py
└ commands ─ hello.py
from src.discordBot import DiscordBot

dcBot = DiscordBot()
dcBot.start()
# 導入 套件
import os
import discord
from discord.ext import commands
from dotenv import load_dotenv
import src.discordBot.eventMgr as EventMgr
import src.discordBot.commandMgr as CommandMgr

# 取得環境設定
load_dotenv()
DISCORD_TOKEN = os.getenv("DISCORD_TOKEN")
# intents
intents = discord.Intents.default()
intents.message_content = True
# client
client = commands.Bot(intents=intents)

class DiscordBot():
  def __init__(self) -> None:
    EventMgr._init(client)
    CommandMgr._init(client)
    pass

  def start(self):
    client.run(DISCORD_TOKEN)
import os
import importlib

def _init(Bot):
	print(Bot)
	path = os.path.join(os.getcwd() + "/src/discordBot/commands")
	dirs = os.listdir(path)

	for file in dirs:
		if (file.endswith(".py")):
			fileName = file.replace(".py", "")
			module  = importlib.import_module("src.discordBot.commands."+fileName)
			module.main(Bot)
def main(Bot):
  name = "小幫手在不在"
  print(f"{name} 註冊成功")

  @Bot.slash_command(name=name, description="查看小幫手是否還在")
  async def ping(ctx):
    await ctx.respond("我還在~")
執行結果:
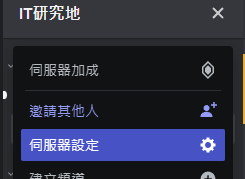
點開伺服器設定,並在左邊的選單選擇 應用程式>整合

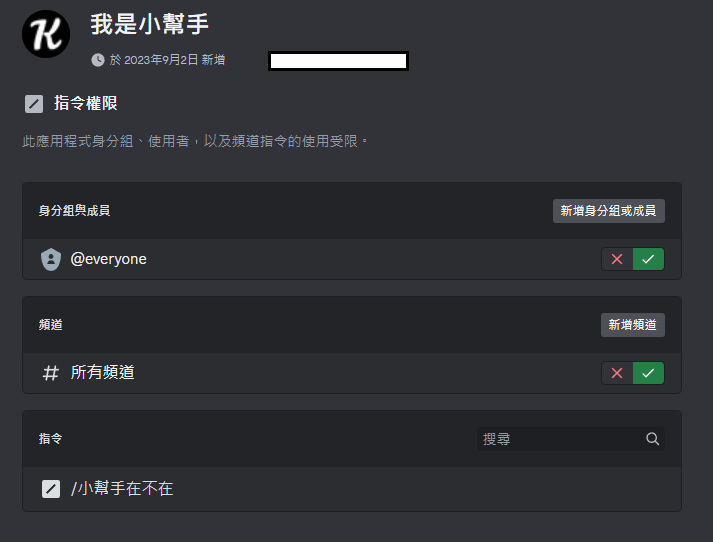
機器人和應用程式就會有你的機器人,請點進去管理,你將會看到指令權限有你創建的內容:

在訊息頻道打上"/",就會出現指令相關內容,它的左邊是可以依機器人分類他的指令

