大家好,今天我要來簡單說明實作一支RESTFUL API,首先第一步我們要先從Controllers建立一個控制器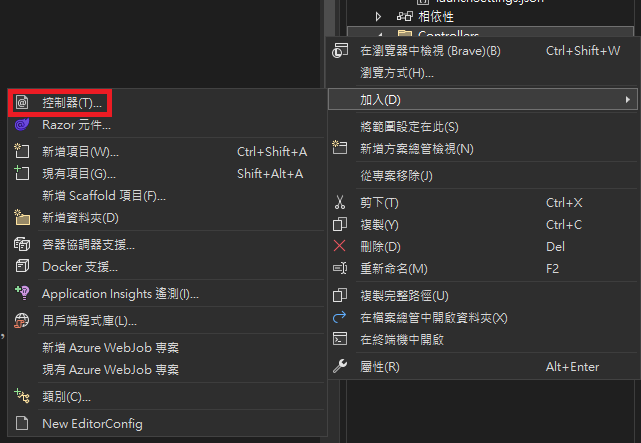
我選擇空白的,其他的也可以,根據你的需求選擇你要的模板,空白就是啥都沒有,你需要自己寫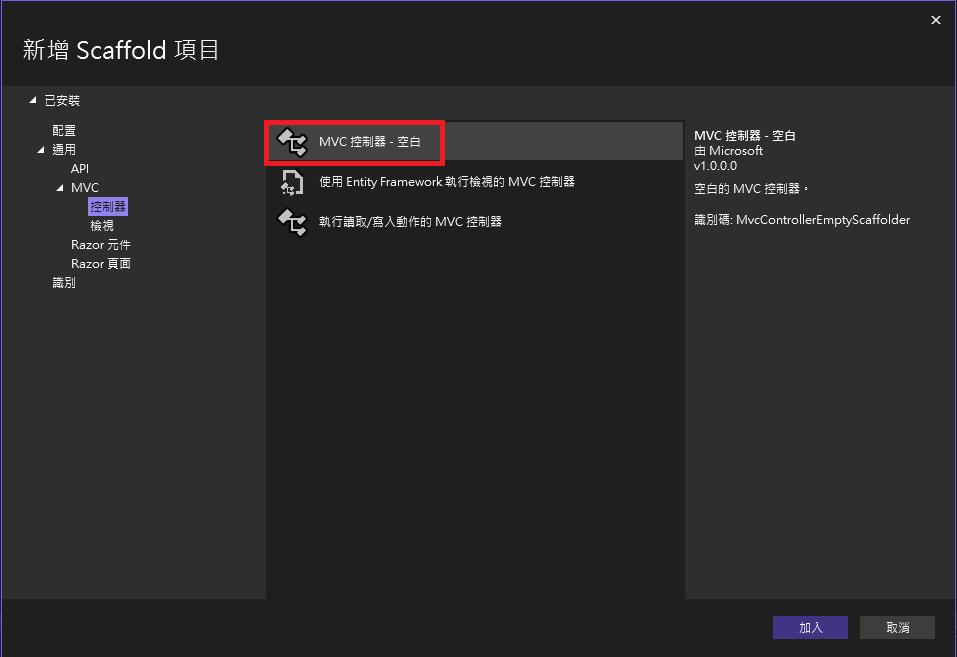
廢話不多說,我們直接進入程式碼的部分
using Microsoft.AspNetCore.Authorization;
using Microsoft.AspNetCore.Mvc;
using WebApplication3.Models;

namespace WebApplication3.Controllers
{
    [Route("api/")]
    [ApiController]
    public class IThome : Controller
    {
        private readonly testContext _context;
        public IThome(testContext context)
        {
            _context = context;
        }

        [AllowAnonymous]
        [HttpPost]
        [Route("register")]
        public async Task<ActionResult> Register(RegisterViewModel request)
        {
            try
            {
                if (request != null)
                {
                    if (!_context.UserProfile.Any(UserProfile => UserProfile.Account == request.Account || UserProfile.Email == request.Email || UserProfile.Phone == request.Phone))
                    {
                        // 生成邀請碼,回頭研究IEnumerable & IEnumerator(LINQ)
                        Random random = new Random();
                        int length = 6;
                        const string chars = "ABCDEFGHIJKLMNOPQRSTUVWXYZ0123456789";

                        // 帳號唯一辨識碼
                        string uuid = Guid.NewGuid().ToString();
                        // 帳號註冊時間
                        DateTime now = DateTime.Now;

                        UserProfile userprofile = new UserProfile
                        {
                            Uuid = uuid,
                            Account = request.Account,
                            Password = request.Password,
                            Email = request.Email,
                            Phone = request.Phone,
                            CreateAt = now
                        };
                        _context.UserProfile.Add(userprofile);
                        await _context.SaveChangesAsync();
                        return new JsonResult(new { status = "0", message = "註冊成功" });
                    }
                    return new JsonResult(new { status = "1", ErrorMessage = "帳號重複註冊" });
                }
                return new JsonResult(new { status = "1", ErrorMessage = "輸入為空" });
            }
            catch (Exception ex)
            {
                return new JsonResult(new { status = "1", ErrorMessage = ex.InnerException.Message });
            }
        }
    }
}
[Route("api/")]:將控制器基本路徑設定為 "/api/" 的請求。public class IThome : Controller:宣告一個IThome類別繼承Controller類別。private readonly testContext _context;:宣告了一個私有欄位 _context,類型為 testContext,這個實例,主要是用來與Model做溝通。public IThome(testContext context):這是 IThome 類別的建構子,傳入一個 testContext 類型的參數。[AllowAnonymous]:這個動作方法可以由未經身份驗證的使用者訪問,這對於註冊操作通常是必要的,因為使用者還沒登入。[HttpPost]: 表示HTTP Method,這裡是HTTP POST 請求。
[Route("register")]:指定該api的路由。因此這支api url路徑會長成這樣"/api/register"。
public async Task<ActionResult> Register(RegisterViewModel request):這邊宣告一個非同步任務,API的輸入格式 會透過RegisterViewModel傳入,這個後面會再加以說明。
if (!_context.UserProfile.Any(UserProfile => UserProfile.Account == request.Account || UserProfile.Email == request.Email || UserProfile.Phone == request.Phone)):檢查 _context.UserProfile 中是否已經存在具有相同帳號、電子郵件或手機號碼的使用者檔案。
如果不存在相同的使用者,就會根據傳入的資料,新建一個新的 UserProfile 對象,並將其保存到資料庫中。否則,返回相應的錯誤訊息。
在成功註冊一個新使用者時,它回傳一個 JSON 結果,其中 status 為 "0" 代表成功,並提供 "註冊成功" 的訊息。如果帳號已經存在,則返回 status 為 "1" 的錯誤訊息,指出帳號已經重複註冊。如果輸入為空或出現其他例外情況,也會返回相應的錯誤訊息。
再來是我會在Model底下新增一個類別檔,將API傳入資料的規格都寫在這個檔案內,那因為這個檔案不是For資料庫用,所以我不會加入到<db_name>Context.cs這個檔案內。
using System.ComponentModel.DataAnnotations;
using System.ComponentModel;

namespace WebApplication3.Models
{
    public class RegisterViewModel
    {
        [Display(Name = "account")]
        [DefaultValue("test1")]
        public string Account { get; set; }
        [Required]
        [Display(Name = "password")]
        public string Password { get; set; }
        [Required]
        [Phone]
        [Display(Name = "phone")]
        public string Phone { get; set; }
        [Required]
        [EmailAddress]
        [Display(Name = "email")]
        public string Email { get; set; }
    }
}
這邊我定義了Account、Password、Phone、Email
寫完之後我們就可以啟動服務,用Swagger來驗證我們的API,有兩種可以啟動
第一種 可以直接點Visual Studio上的按鈕,點下去之後,正常網頁會自動開啟
第二種 執行dotnet run可以透過log查看不同協定開啟哪個port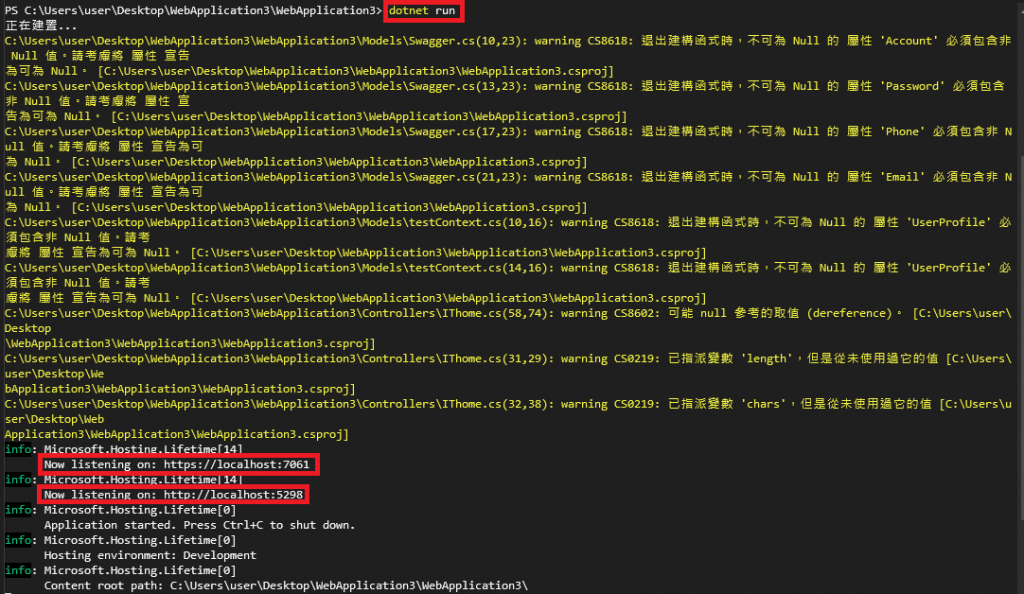
以我來舉例,執行之後可以到https://localhost:7061/swagger/index.html
接著輸入你要註冊的帳號密碼與手機、信箱,按下【Execute】進行測試。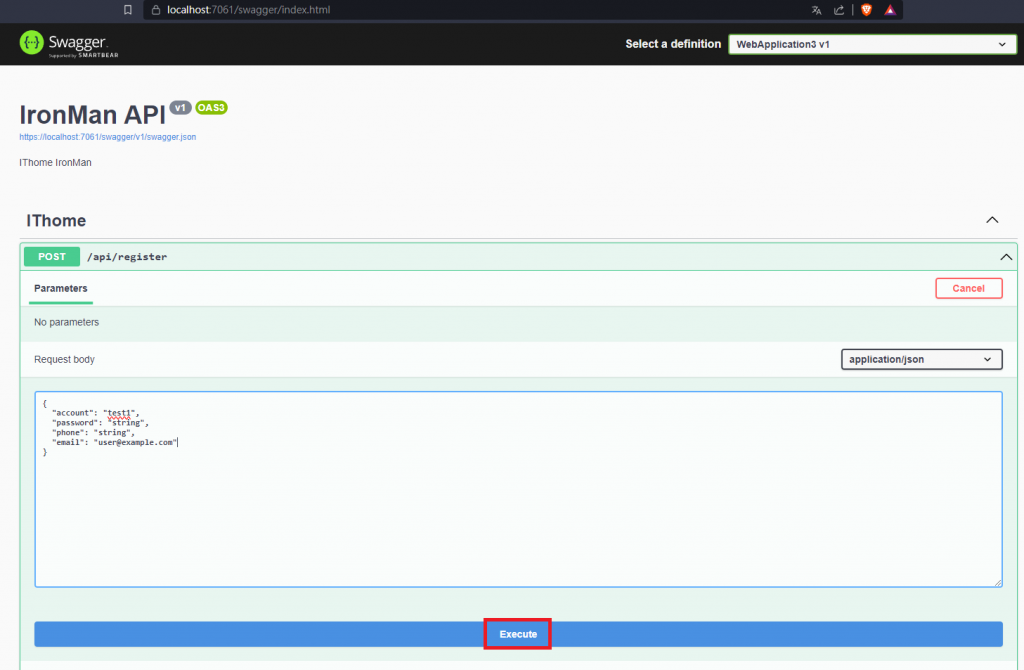
如果成功的話,會在底下出現像截圖一樣的回應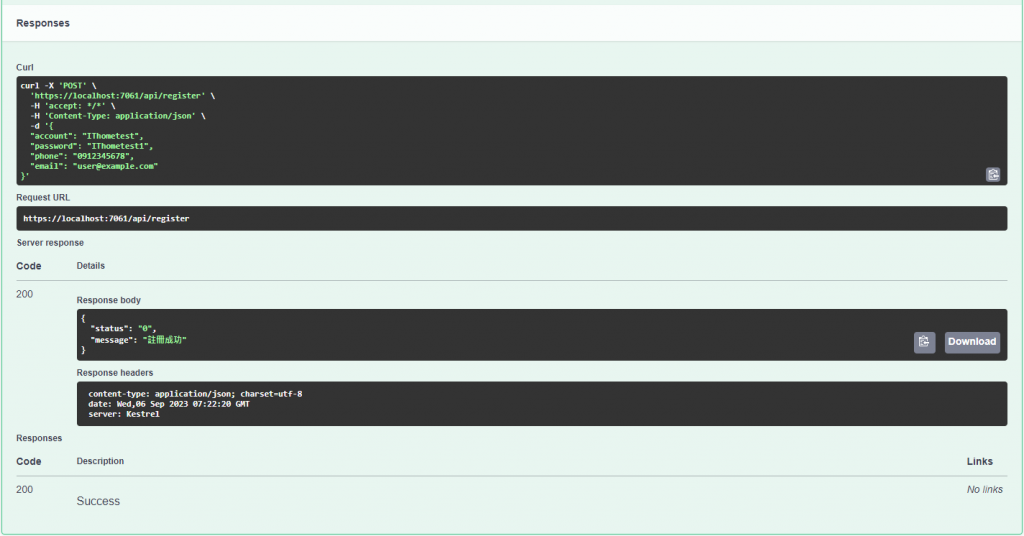
你以為這樣就結束了嗎? 不,只要對資料做任何操作後,我們都要去資料庫檢查看看~
我們可以從檢視 > SQL Server 物件總管,選擇要檢查的資料庫、資料表,點選檢視資料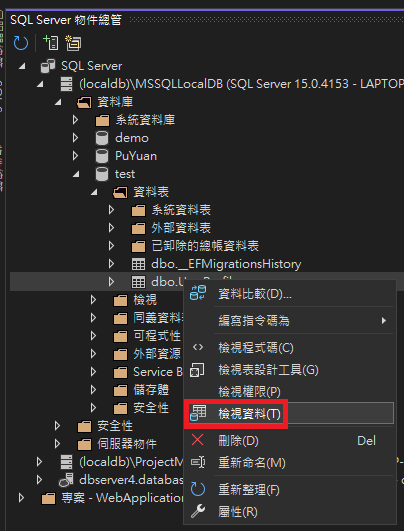
點進去之後,我們可以看到我們剛剛測試的資料,有新增到本地資料庫了,那就代表成功啦(灑花
接著明天我要來介紹Docker,用Docker將服務打包成容器。
參考資料:
微軟-教學課程:使用 ASP.NET Core 建立 Web API
微軟-使用 ASP.NET MVC 4 中的非同步方法
微軟-Swashbuckle 與 ASP.NET Core 使用者入門
