嗨~大家好我是 Eric ~ 今天我們要討論的主題是「Web Animation API」又稱作「WAAPI」,你可以把它當做 JS 中 Animation,它與CSS 的 Animation 的設定方式一樣,另外它除了能做到 CSS 無法做到的用戶交互之外,還保留效率極高的特性,那我們就來看看這個「Web Animation API」是什麼來頭吧~
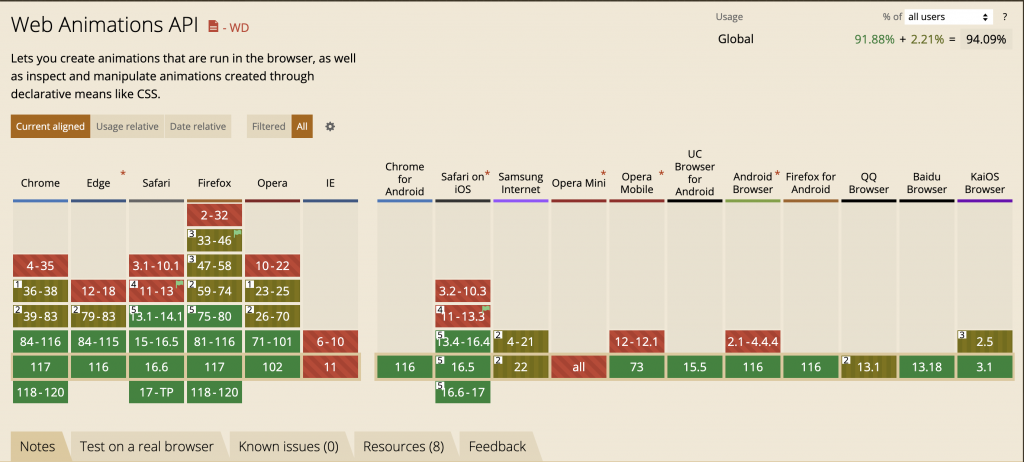
就支援度來說,主流瀏覽器 Chrome、Edge、Firefox、Safari等都有支援(除了IE... XDDDD)
const animation = element.animate(keyframes, options);
每一個關鍵影格都可以額外設定 offset 與 easing ,offset 即是他所佔的動畫時間(以小數表示百分比),easing 則是這一段動畫所使用的 Easing function,設定的方式與CSS 的 animation-timing-function 相同。
options 參數允許你設定動畫的持續時間、方向、次數等多種屬性。
在這個案例中,我們有一個網頁上的小球。我們希望當用戶點擊某個位置時,小球能平滑地飛到那個位置。
HTML:
<!-- 省略頭部信息 -->
<style>
  /* 省略其他樣式 */
  .ball {
    /* 定義小球的基本樣式 */
  }
</style>
<body>
  <div class="container">
    <div class="ball"></div>
  </div>
  <script src="/index.js"></script>
</body>
JS:
// 取得 ball 元素
const ball = document.querySelector('.ball');

// 小球的初始位置(x, y),這裡我們先設定在畫面中央
function init() {
    const x = window.innerWidth / 2;
    const y = window.innerHeight / 2;
    ball.style.transform = `translate(${x}px, ${y}px)`;
}
init();

// 監聽滑鼠點擊事件
window.addEventListener('click', (e) => {
    // 取得滑鼠點擊的位置
    const x = e.clientX;
    const y = e.clientY;
    move(x, y); // 呼叫 move() 函式,並將滑鼠點擊的位置帶入
});

function move(x, y) {
    // getBoundingClientRect 可以取得元素的位置、寬高等資訊
    const ballRect = ball.getBoundingClientRect();

    // 小球的初始位置(每次點擊後都會更新初始化位置)
    const initX = ballRect.left + ballRect.width / 2;
    const initY = ballRect.top + ballRect.height / 2;
    const rad = Math.atan2(y - initY, x - initX); // 計算小球旋轉的角度,我們等一下讓小球移動前都會先旋轉到這個角度
    const deg = (rad * 180) / Math.PI; // 將弧度轉為角度

    // 開啟新的動畫前,先取消之前的動畫,避免動畫疊加
    ball.getAnimations().forEach((animation) => animation.cancel());

    // 開始移動小球
    ball.animate([
        {
            // 將計算好的初始位置帶入
            transform: `translate(${initX}px, ${initY}px) rotate(${deg}deg)`,

            // 動畫的速度變化
            easing: 'ease-out',
        },
        {
            transform: `translate(${initX}px, ${initY}px) rotate(${deg}deg) scaleX(1.5)`,

            // 這裡的 offset 代表的是時間軸的百分比,0.5 代表 50%,也就是動畫執行到一半的時候
            offset: 0.5,
        },
        {
            transform: `translate(${x}px, ${y}px) rotate(${deg}deg) scaleX(1.5)`,

            // 這裡的 offset 代表的是時間軸的80%
            offset: 0.8,

            // 動畫的速度變化
            easing: 'ease-in',
        },
        {
            transform: `translate(${x}px, ${y}px) rotate(${deg}deg)`,
        }
    ],
    {
        duration: 1000, // 動畫的持續時間
        fill: 'forwards', // 動畫結束後保留最後的狀態,不會回到初始狀態(小球最後的停留位置為點擊的位置)
    }
    );
}
WAAPI 提供了一個非常靈活和強大的方式來創建網頁動畫,雖然這個 API 還在實驗階段,但它的支援度基本除了 IE 外都可以使用(請安心服用XD),以上就是今天的分享,希望你們喜歡!如果你有任何問題或建議,歡迎留言,我們明天見~


 iThome鐵人賽