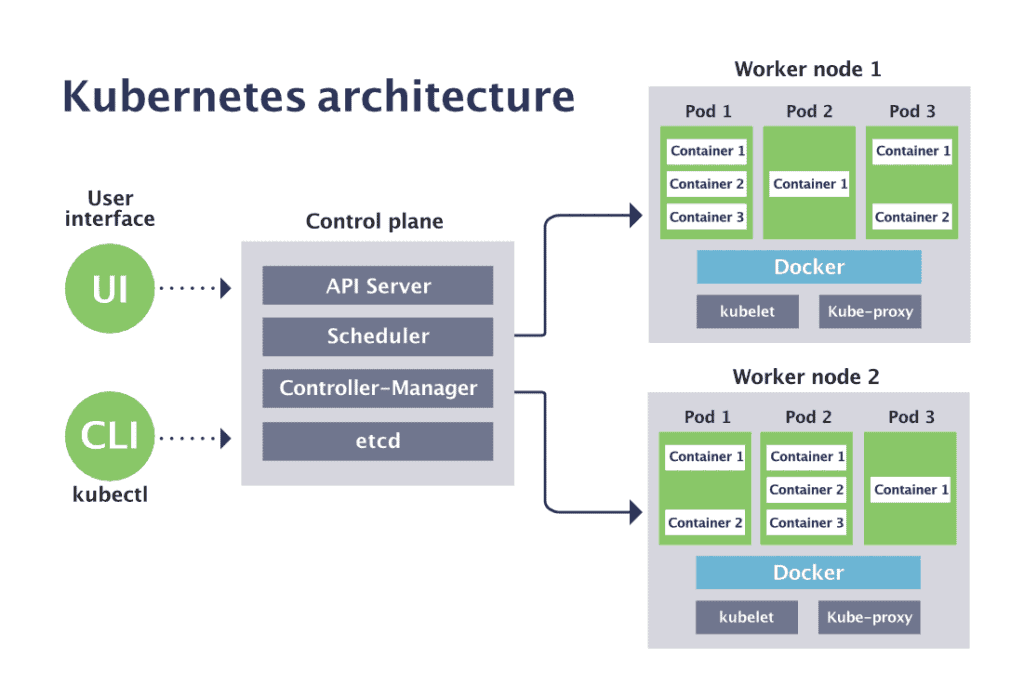
昨天已經使用 kind 再本地環境建置了 Kubernetes 環境,並能使用 kubectl 對其進行操作,今天我們就來嘗試部署應用軟體上去。
在 Kubernetes 中,Pod 是最小的可部署單位。它是容器的抽象,用於在 Kubernetes 集群中運行應用程序的基本組件。Pod 可以包含一個或多個 Container,這些容器共享相同的網絡命名空間、存儲卷和其他資源。

從上面 Kubernetes 的架構圖,我們能看到 Kubernetes 由 Master Node(Control plane) 與 Worker Node 組成,而 Pod 運行於 Worker Node 的 Host 主機,每個 Pod 依據你的需求運行至少一個 Container。
當數個 Container 運行於同個 Pod 時,這些 Container 共享網路、存儲卷(目錄或檔案)、生命週期,代表再同個 Pod 中的 Container 能互相透過 localhost 溝通,從同個目錄下共享檔案,並一起啟動或一起停止。
這些特性讓我們更好管理或應用,有強烈的依賴關係的 container,我們通常會希望他們能共生或共滅,不需要額外的人為操作。
例如 nginx 與 nginx-prometheus-exporter 部署在同個 Pod 時
nginx: 是個提供 Web 與 反向代理的伺服器軟體
nginx-prometheus-exporter: 用於收集 nginx 伺服器的性能指標或統計資訊,並將數據已 prometheus 格式提供讓外部收集。
nginx-prometheus-exporter 能輕易地透過 localhost 取得 nginx 的資訊,而當 nginx container 關閉或崩潰時,nginx-prometheus-exporter 也能一起被關閉,當 nginx container 再度啟動時,nginx-prometheus-exporter 也能一併被開啟。
Kubernetes 中的元件都能透過 yaml(建議) 或 json 來描述,所以我們先來看看 pod 的 yaml 中,有哪些最常用的屬性。
首先我們透過 kubectl 快速生成一個 pod yaml 的模板
# 透過 `--dry-run=client` 與 `-o yaml` 生成 pod yaml 並導出到當前目錄 my-pod.yaml
kubectl run my-pod --image=nginx:1.25 --port=80 --dry-run=client -o yaml > my-pod.yaml
會得到一個 my-pod.yaml 的檔案,且內容如下
apiVersion: v1
kind: Pod
metadata:
  creationTimestamp: null
  labels:
    run: my-pod
  name: my-pod
spec:
  containers:
  - image: nginx:1.25
    name: my-pod
    ports:
    - containerPort: 80
    resources: {}
  dnsPolicy: ClusterFirst
  restartPolicy: Always
status: {}
逐步介紹幾個重要的屬性
v1,若描述其他元件時,可能會使用不同版本號我們使用這個 my-pod.yaml 這個檔案來運行一個服務試試
# 要求 Kubernetes 依據 my-pod.yaml 的內容,建立 Pod
kubectl apply -f my-pod.yaml

# 查詢 Pod 是否存在 與 狀態
kubectl get pod
預期能查到 NAME 為 my-pod 的 Pod resource 且 STATUS 為 Running
NAME     READY   STATUS    RESTARTS   AGE     LABELS
my-pod   1/1     Running   0          2m41s   run=my-pod
我們在進一步透過 kubectl describe 檢查該 Pod 的資訊
kubectl describe pod my-pod
能看到
Name:             my-pod
Namespace:        default
Priority:         0
Service Account:  default
Node:             my-cluster-worker/172.18.0.2
Start Time:       Wed, 06 Sep 2023 15:24:14 +0800
Labels:           run=my-pod
Annotations:      <none>
Status:           Running
IP:               10.244.1.4
IPs:
  IP:  10.244.1.4
Containers:
  my-pod:
    Container ID:   containerd://45220b112b73a5db61c992e7f535f995dc6562bcd682900b784f706d4d42d2cd
    Image:          nginx:1.25
    Image ID:       docker.io/library/nginx@sha256:104c7c5c54f2685f0f46f3be607ce60da7085da3eaa5ad22d3d9f01594295e9c
    Port:           80/TCP
    Host Port:      0/TCP
    State:          Running
      Started:      Wed, 06 Sep 2023 15:24:25 +0800
    Ready:          True
    Restart Count:  0
    Environment:    <none>
    Mounts:
      /var/run/secrets/kubernetes.io/serviceaccount from kube-api-access-gfhvv (ro)
Conditions:
  Type              Status
  Initialized       True
  Ready             True
  ContainersReady   True
  PodScheduled      True
Volumes:
  kube-api-access-gfhvv:
    Type:                    Projected (a volume that contains injected data from multiple sources)
    TokenExpirationSeconds:  3607
    ConfigMapName:           kube-root-ca.crt
    ConfigMapOptional:       <nil>
    DownwardAPI:             true
QoS Class:                   BestEffort
Node-Selectors:              <none>
Tolerations:                 node.kubernetes.io/not-ready:NoExecute op=Exists for 300s
                             node.kubernetes.io/unreachable:NoExecute op=Exists for 300s
Events:
  Type    Reason     Age    From               Message
  ----    ------     ----   ----               -------
  Normal  Scheduled  5m31s  default-scheduler  Successfully assigned default/my-pod to my-cluster-worker
  Normal  Pulling    5m30s  kubelet            Pulling image "nginx:1.25"
  Normal  Pulled     5m20s  kubelet            Successfully pulled image "nginx:1.25" in 10.674652171s (10.674658505s including waiting)
  Normal  Created    5m20s  kubelet            Created container my-pod
  Normal  Started    5m20s  kubelet            Started container my-pod
從中幾個比較常關注的屬性
常見的測試方式有幾個,我們選擇其一即可
kubectl exec 進入 pod 內部後,透過 localhost 進行本地訪問kubectl exec my-pod -it -- /bin/sh
# curl localhost:80
<!DOCTYPE html>
<html>
<head>
<title>Welcome to nginx!</title>
<style>
html { color-scheme: light dark; }
body { width: 35em; margin: 0 auto;
font-family: Tahoma, Verdana, Arial, sans-serif; }
</style>
</head>
<body>
<h1>Welcome to nginx!</h1>
<p>If you see this page, the nginx web server is successfully installed and
working. Further configuration is required.</p>
<p>For online documentation and support please refer to
<a href="http://nginx.org/">nginx.org</a>.<br/>
Commercial support is available at
<a href="http://nginx.com/">nginx.com</a>.</p>
<p><em>Thank you for using nginx.</em></p>
</body>
</html>
kubectl port-forward 將 Pod 指定的 Port 與本地主幾進行映射。kubectl port-forward my-pod 8080:80
Forwarding from 127.0.0.1:8080 -> 80
Forwarding from [::1]:8080 -> 80
Handling connection for 8080

Note: 以上兩個方式的使用時機,主要為 測試 或 Debug,也不是拿來提供外部系統之間調用的,也不建議在生產環境使用。
後面會介紹 Service 元件,該元件能穩定的入口,提供讓其他 Pod 的方式,並支援負載均衡
今天我們理解了 Pod 是 Kubernetes 中運行服務的最小單位,Pod 可包含一個或多個 Container,且初步探討了解為什麼要使用 Pod 而不是 Container,並透過 kubectl 來建立/檢視 Pod。
