今天來實做做個簡易的聯絡表單。
聯絡表單是網站的重要元素之一,它使訪問者能夠輕鬆地與網站管理者或網站擁有者取得聯繫。
透過這個表單,訪問者可以提供他們的名字、電子郵件地址、手機號碼以及訊息,這對於商業網站來說尤其重要,因為它讓客戶能夠提問問題、提供反饋或請求更多信息。
完成後畫面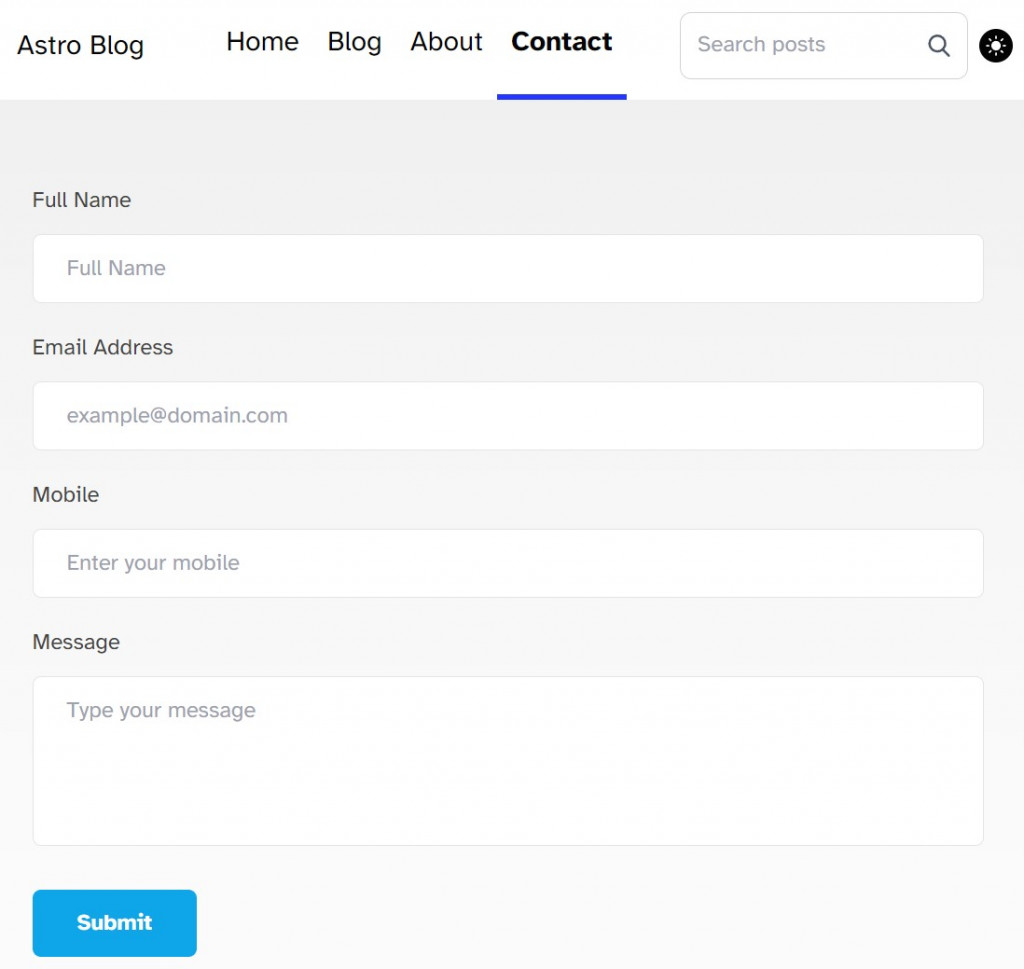
在 Tailwind Components form選用這個樣版來套用。
接下來再 src/pages 建立 contact.astro,將剛剛的版程式碼貼到 astro 裡,並根據我們的需求要進行調整。
以下是 contact.astro 文件的程式碼:
---
import MainLayout from '../layouts/MainLayout.astro';
---

<MainLayout>
  <main>
    <form id="form">
      <div class="mb-5">
        <label
          for="name"
          class="mb-3 block text-base font-medium text-default"
        >
          Full Name
        </label>
        <input
          type="text"
          name="name"
          id="name"
          placeholder="Full Name"
          class="w-full rounded-md border border-neutral-200 bg-white py-3 px-6 text-base font-medium text-neutral-700 outline-none focus:border-skybg-sky-500 focus:shadow-md"
        />
      </div>
      <div class="mb-5">
        <label
          for="email"
          class="mb-3 block text-base font-medium text-default"
        >
          Email Address
        </label>
        <input
          type="email"
          name="email"
          id="email"
          placeholder="example@domain.com"
          class="w-full rounded-md border border-neutral-200 bg-white py-3 px-6 text-base font-medium text-neutral-700 outline-none focus:border-skybg-sky-500 focus:shadow-md"
        />
      </div>
      <div class="mb-5">
        <label
          for="mobile"
          class="mb-3 block text-base font-medium text-default"
        >
          Mobile
        </label>
        <input
          type="text"
          name="mobile"
          id="mobile"
          placeholder="Enter your mobile"
          class="w-full rounded-md border border-neutral-200 bg-white py-3 px-6 text-base font-medium text-neutral-700 outline-none focus:border-skybg-sky-500 focus:shadow-md"
        />
      </div>
      <div class="mb-5">
        <label
          for="message"
          class="mb-3 block text-base font-medium text-default"
        >
          Message
        </label>
        <textarea
          rows="4"
          name="message"
          id="message"
          placeholder="Type your message"
          class="w-full resize-none rounded-md border border-neutral-200 bg-white py-3 px-6 text-base font-medium text-neutral-700 outline-none focus:border-skybg-sky-500 focus:shadow-md"
        ></textarea>
      </div>
      <div>
        <button
          class="hover:shadow-form rounded-md bg-sky-500 py-3 px-8 text-base font-semibold text-white outline-none"
        >
          Submit
        </button>
      </div>
    </form>
  </main>
</MainLayout>
現在,我們需要將聯絡表單提交的數據存儲到一個 Google 試算表中。
建立方式如下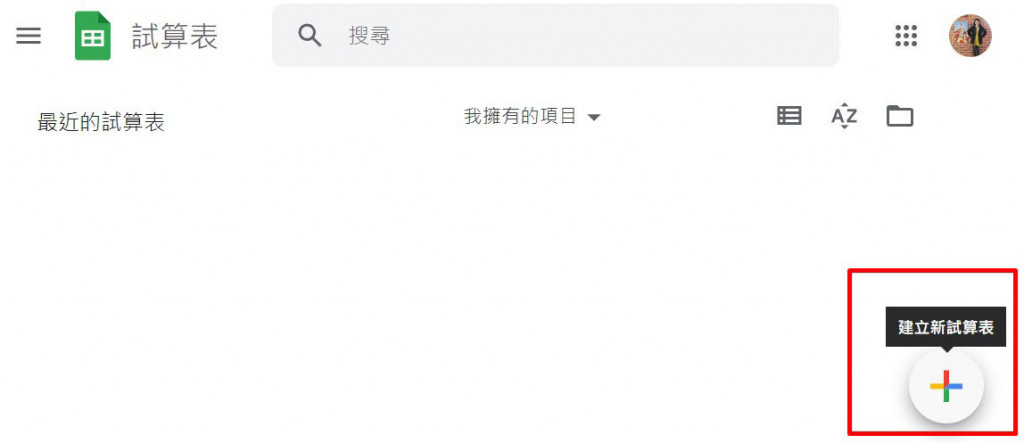
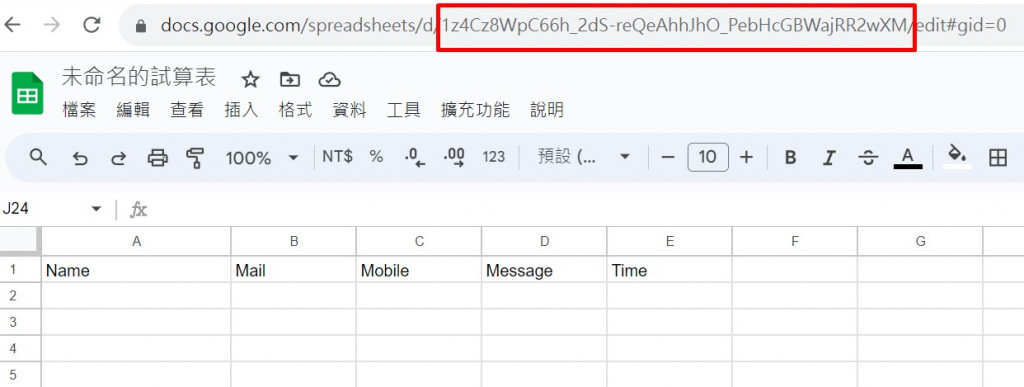
紅色框選的部份為 Google試算表的ID
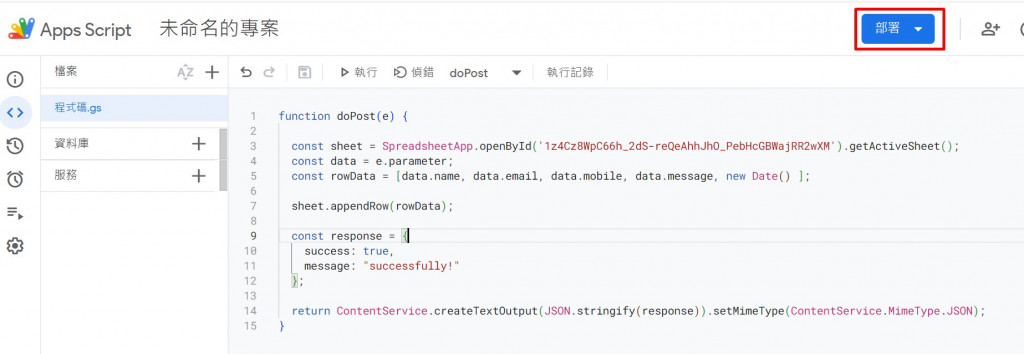
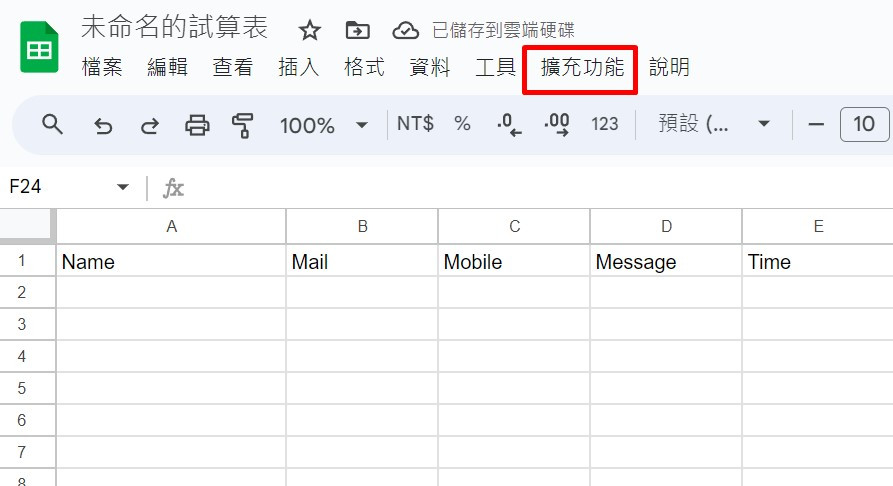
點選擴充功能 > 選 Apps Script 會導到 google apps script 裡
使用 Google Apps Script 來處理聯絡表單的提交。在 Google Apps Script 中,我們將使用 doPost 函數,這個函數會接收表單送出的資料,然後將這些資料寫入我們建立的 Google 試算表中。
function doPost(e) {
  const sheet =
    SpreadsheetApp.openById("輸入你的Google試算表ID").getActiveSheet();
  const data = e.parameter;
  const rowData = [
    data.name,
    data.email,
    data.mobile,
    data.message,
    new Date(),
  ];

  sheet.appendRow(rowData);

  const response = {
    success: true,
    message: "successfully!",
  };

  return ContentService.createTextOutput(JSON.stringify(response)).setMimeType(
    ContentService.MimeType.JSON
  );
}
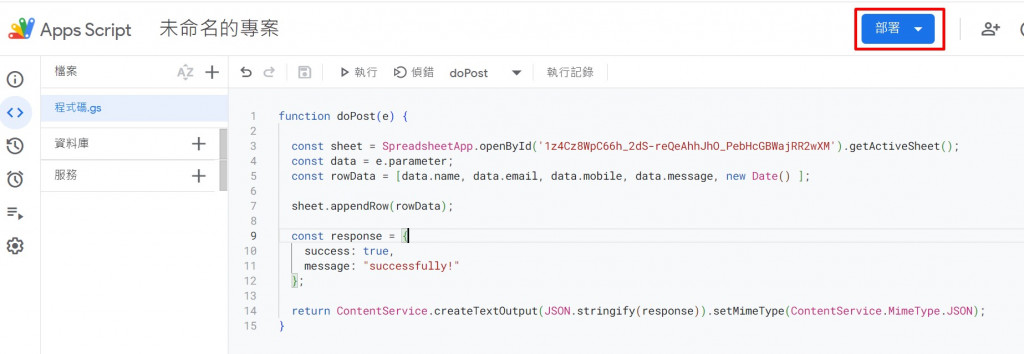
將程式部署
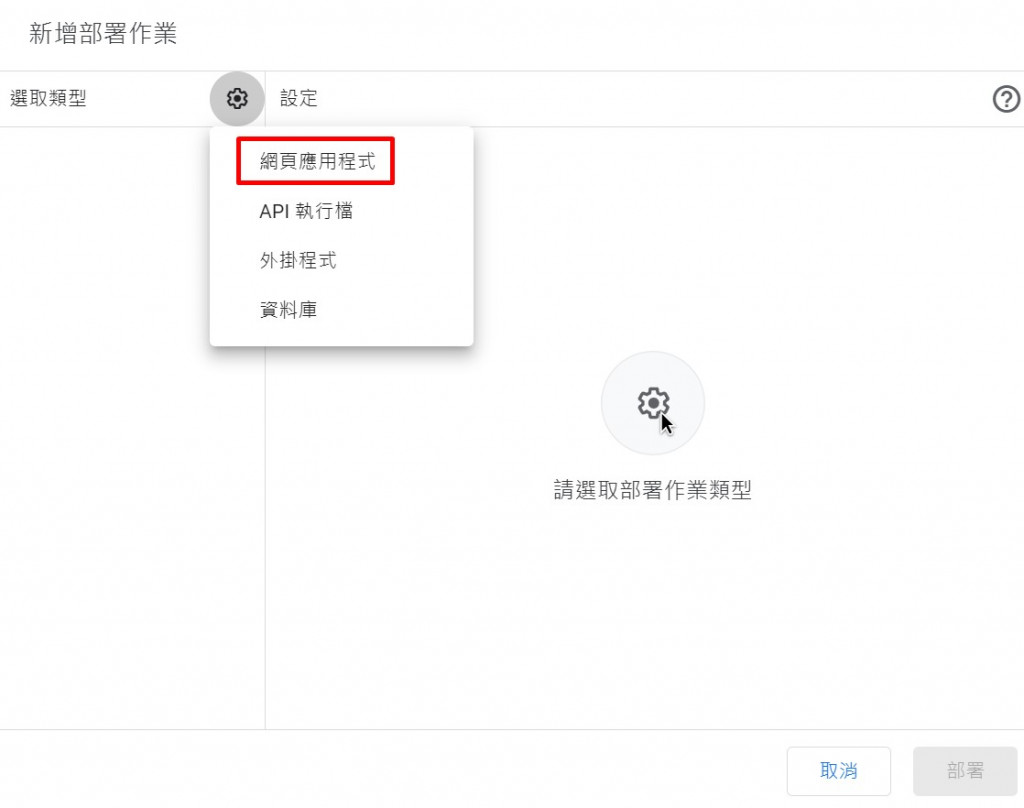
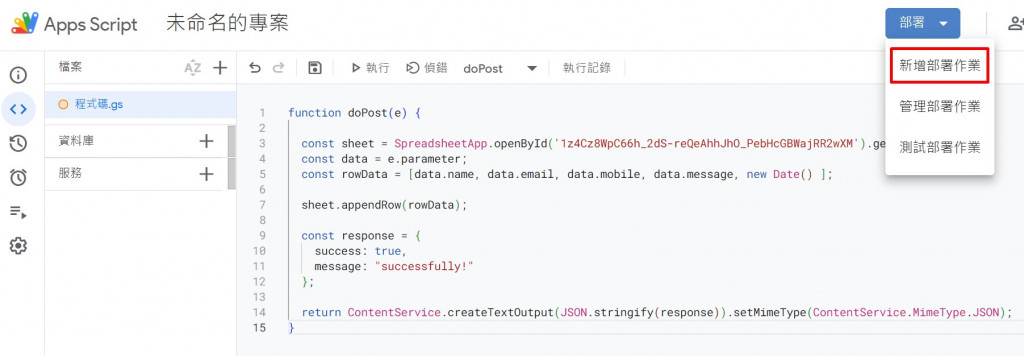
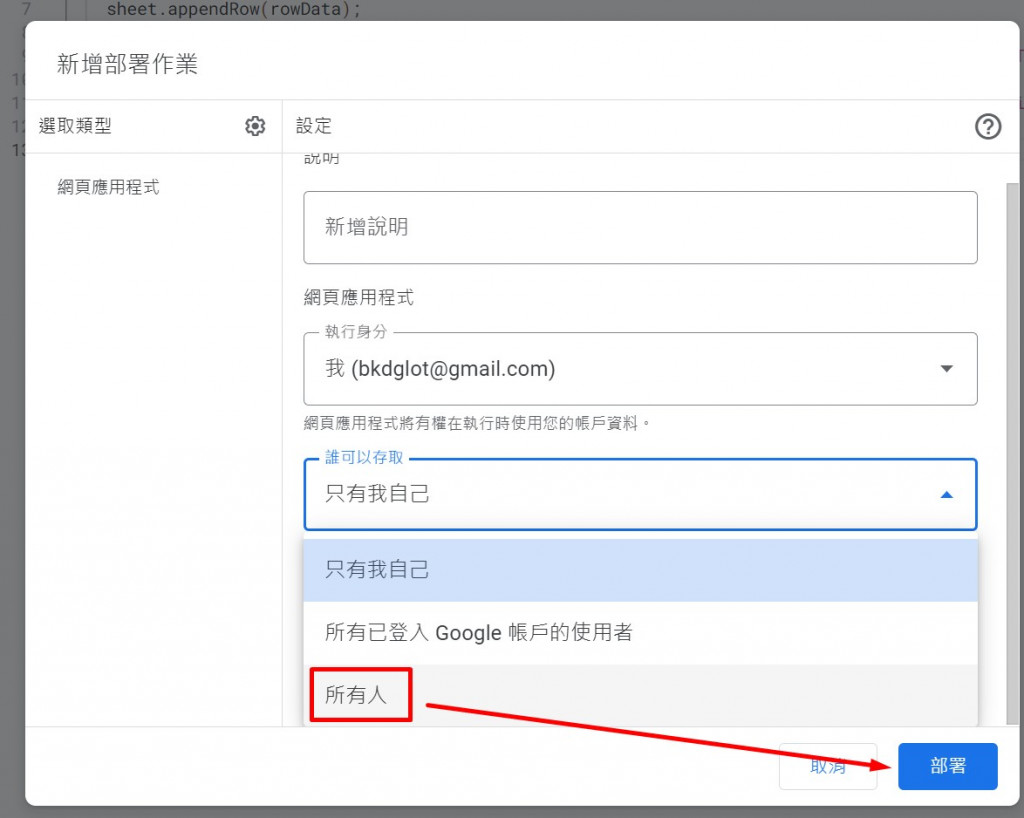
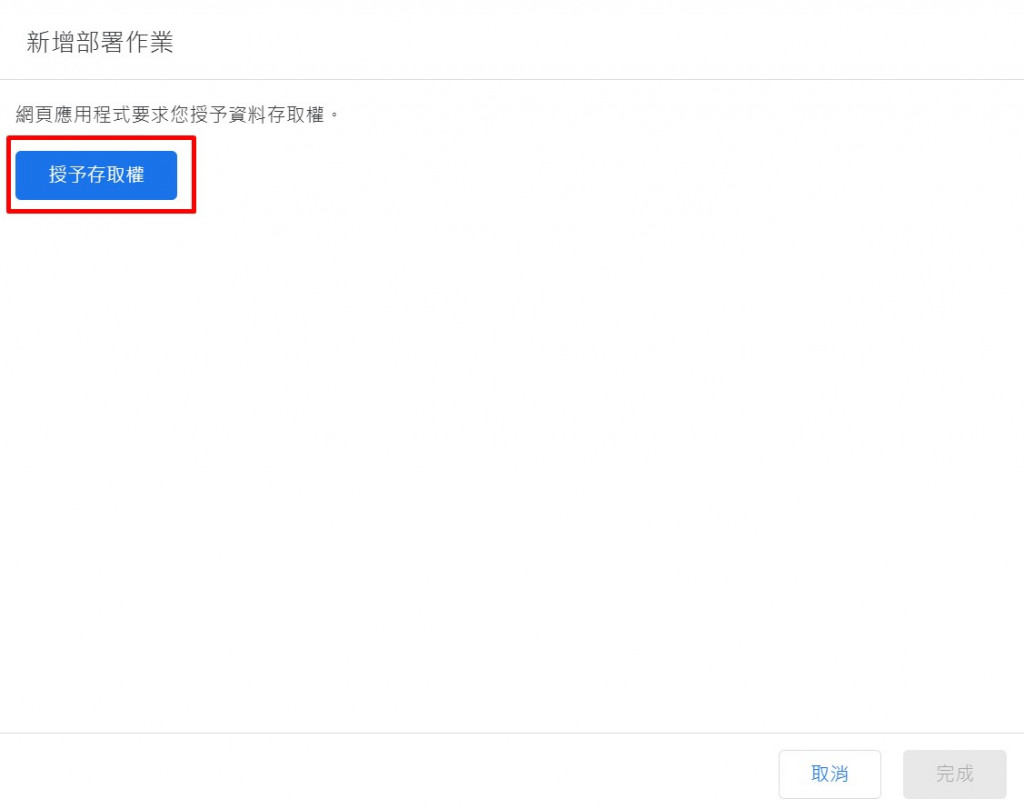
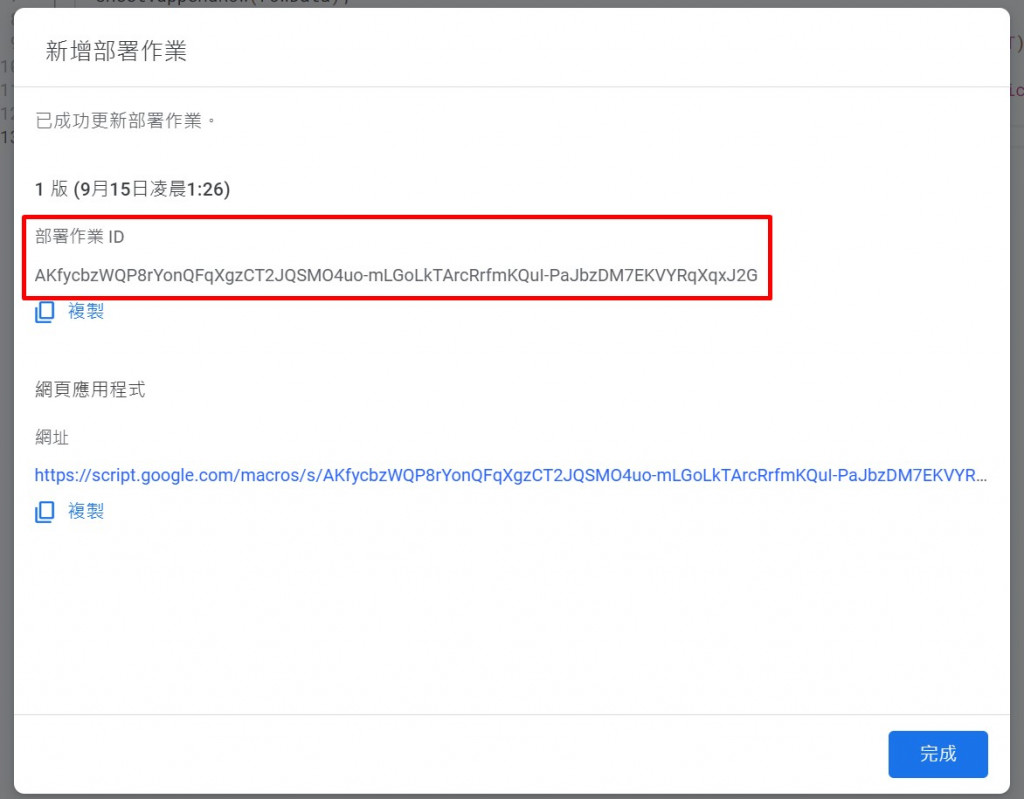
部署後會取得一組 ID。這組 ID 將用於後面的程式碼中。
現在,將聯絡表單與 Google Apps Script 串連起來,以便提交表單資料。
使用 JavaScript 來處理。
<script>
  const form = document.getElementById("form") as HTMLFormElement;

  form.addEventListener("submit", async (event) => {
    event.preventDefault();

    const formData = new FormData(form);

    const scriptID = "剛剛部署後取得的ID";
    const apiUrl = `https://script.google.com/macros/s/${scriptID}/exec`;


    await fetch(apiUrl, {
      method: "POST",
      body: formData,
    })
      .then((res) => {

        return res.json();
      })
      .then((data) => {
        alert('您的訊息已經收到囉:)');
        form.reset();
      })
      .catch((error) => {
        console.error("發送請求時出現錯誤:", error);
      });
  });
</script>
今天。我們學到了:
Astro 應用程式中使用 JavaScript 與 Fetch API 來處理表單的提交。Google Apps Script 處理表單的提交並將資料存儲在 Google 試算表中。範例連結:https://stackblitz.com/edit/withastro-astro-ffm4gn
