前言
程式碼範例
func uploadData() async throws {
    let dataString = "Example file contents"
    let data = Data(dataString.utf8)
    let uploadTask = Amplify.Storage.uploadData(
        key: "ExampleKey",
        data: data
    )
    Task {
        for await progress in await uploadTask.progress {
            print("Progress: \(progress)")
        }
    }
    let value = try await uploadTask.value
    print("Completed: \(value)")
}
- 從第 1 行可以看出是個 async function 並且會做 catch throws
- 第 2 ~ 3 行湊出一個文字檔案;然而我們的相片檔案,會從 FileManager 去拿,所以參考下面另外一段程式碼來改寫
- 第 4 ~ 7 行,呼叫上傳的函式,給的 key 和 data 分別對應到 S3 的 file key 和檔案本身
- 第 8 ~ 12 從另外一條執行序來觀察上傳進度
- 第 13 行則是避免上傳失敗的 try + await, 若失敗則會拋出例外
let dataString = "My Data"
let fileNameKey = "myFile.txt"
guard let filename = FileManager.default.urls(
    for: .documentDirectory,
    in: .userDomainMask
).first?.appendingPathComponent(fileNameKey)
else { return }

try dataString.write(
    to: filename,
    atomically: true,
    encoding: .utf8
)

let uploadTask = Amplify.Storage.uploadFile(
    key: fileNameKey,
    local: filename
)

Task {
    for await progress in await uploadTask.progress {
        print("Progress: \(progress)")
    }
}
let data = try await uploadTask.value
print("Completed: \(data)")
- AWS Amplify 的文件直接去頭去尾,讚讚,沒有函式宣告...
- 從第 1 ~ 2 、 9 ~ 13 行都是在生文字檔案,我是去抓圖片,所以可以直接不理會範例中的這部分
- 第 3 ~ 6 行:使用 FileManager 去預設目錄下,透過 filename 給的檔名,去湊出一個 NSURL
- 第 15 ~ 18 行,呼叫上傳的函式,給的 key 和 local 分別對應到 S3 的 file key 和手機端的檔案來源
- 第 20 ~ 24 從另外一條執行序來觀察上傳進度
- 第 25 行則是避免上傳失敗的 try + await, 若失敗則會拋出例外
程式概念
- 所以,我需要做的開發是,每當呼叫同步函式的時候,行為如下
- 先盤點哪些是新建立的檔案,盤點出來,寫進陣列;盤點有兩種
- 其一是當地端拍照寫檔時,就用一個陣列來記錄。想法很簡單直覺,但是要避免有人同時在雲上砍資料。現在還不會踩到雲上有人在刪資料的狀況。
- 另一種做法是去看一下雲端儲存空間裡面已經存在哪些檔案了。可以避免有人在雲上刪掉舊圖檔,以至於後面同步檔案的時候以為已經在雲上有一份就跳過的邏輯錯誤。然後只從檔名來比較的話,可能無法識別同名檔案是否被修改內容。
- 兩種做法我會先走第一種。
- 透過 FileManager 找出要被上傳檔案的路徑
- 呼叫上傳函式,填入必要資訊
- 觀察進度
- 例外處理
程式碼實作
struct StampAlbumView: View {
    @State private var stamps = stampsData
    @State private var addStampAlertIsPresented: Bool = false
    @State private var addStampName: String = ""
    @State private var photoSource: PhotoSource?
    @State private var newStampPhoto: UIImage = UIImage()
    @State private var uploadFilenameQueue: [URL] = []

    private let adaptiveColumns = [
        GridItem(.adaptive(minimum: 130))
    ]

    var body: some View {
        NavigationView{
            ZStack(alignment: .center) {
                ScrollView{
                    LazyVGrid(columns: adaptiveColumns, spacing: 10) {
                        ForEach(Array(zip(stamps.indices, stamps)), id: \.0) { index, stamp in
                            ZStack{
                                // Stamp here
                                FishStampView(
                                    imgName: stamp.imgName, fishName: stamp.fishName,
                                    catched: stamp.catched, counted: stamp.counted, number: index+1
                                )
                            }
                        }
                        //StampSync()
                    }
                } // end of scroll view
                .navigationBarTitle("集郵冊")
                .navigationBarItems(
                    trailing:
                        HStack {
                            Button(action: {
                                Task {
                                    await uploadStamp()
                                }
                            }) {
                                Label("Sync", systemImage: "arrow.up.right.and.arrow.down.left.rectangle.fill")
                                //Text("Sync")
                            }
                            Button(action: createStamp) {
                                Label("", systemImage: "plus.rectangle.on.folder.fill")
                                .onTapGesture {
                                    self.addStampAlertIsPresented.toggle()
                                }
                            }
                        }
                )
                // The box for insert new stamp
                AddStampAlert(alertIsPresented: $addStampAlertIsPresented,
                              newStampName: $addStampName,
                              newStampPhoto: $newStampPhoto,
                              wholeStamps: $stamps,
                              fileQueue: $uploadFilenameQueue
                )
            } // end of zstack

        }
    }

    func uploadStamp() async {
        print("Sync local pic -> Amplify S3")
        //print(uploadFilenameQueue)
        for picUrl in uploadFilenameQueue {
            let fileNameKey = picUrl.lastPathComponent
            print("Upload -- \(fileNameKey)")
            let uploadTask = Amplify.Storage.uploadFile(
                key: fileNameKey,
                local: picUrl
            )
            //Task {
            //    for await progress in await uploadTask.progress {
            //        print("Progress: \(progress)")
            //    }
            //}
            do {
                let data = try await uploadTask.value
                print("Completed: \(data)")
            } catch {
                print("Couldn't upload file: \(picUrl)")
            }
        }
        print("Clean queue")
        uploadFilenameQueue.removeAll()
    }
}
- 今天在這個 StampAlbumView 中,有兩個重點
- 弄了一個 Sync 按鈕,按下去之後觸發上傳圖片函式;然後這個函式是非同步執行的。
- 在上傳函式裡,讀取一個 待上傳圖檔的路徑,因為看完上傳範例後,知道要弄出 S3 裡的檔名啦,所以我用 lastPathComponent 來取得檔名。傳完之後,要記得清空隊伍。
實驗
- 在手機裡面新增兩張照片測試看看.....最近因為都被工作綁架,沒有去釣魚,暫時拿昨天的晚餐來貼貼看
- 蒸蛋...真的完蛋、十貫握壽司...這個是在輔大校門口對面 魚多甜 的握壽司
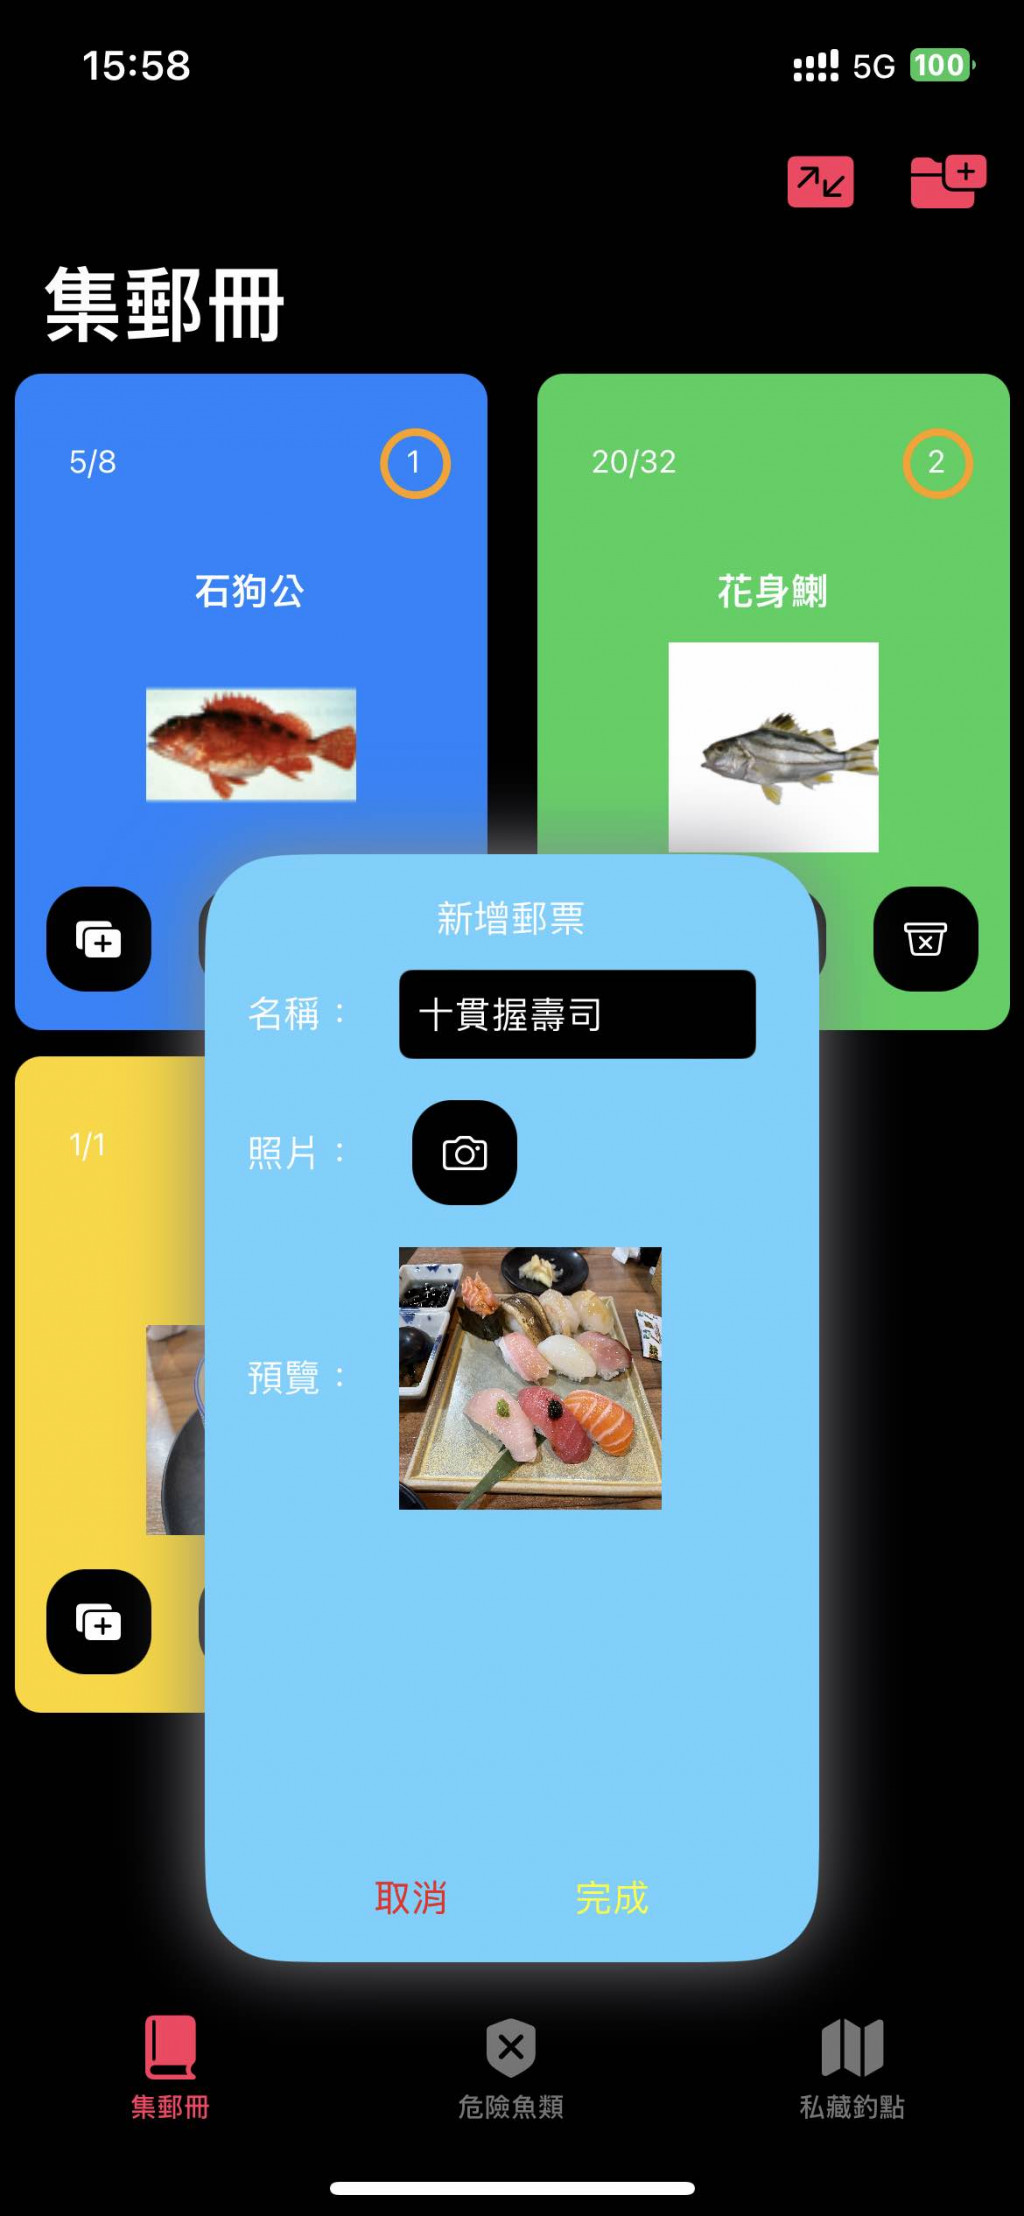
- 按下同步按鈕!!
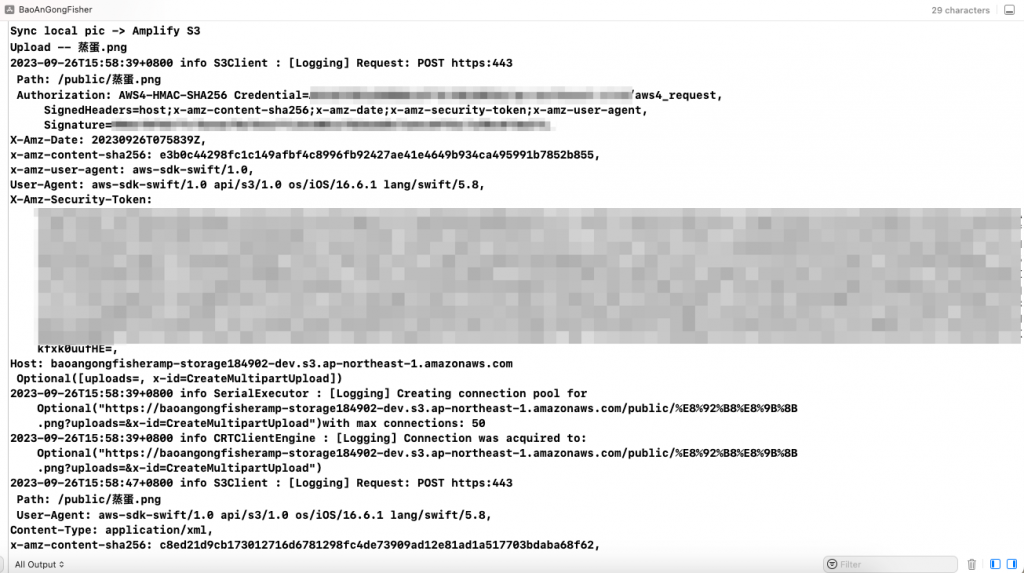
- 看看 Log,正在上傳呢
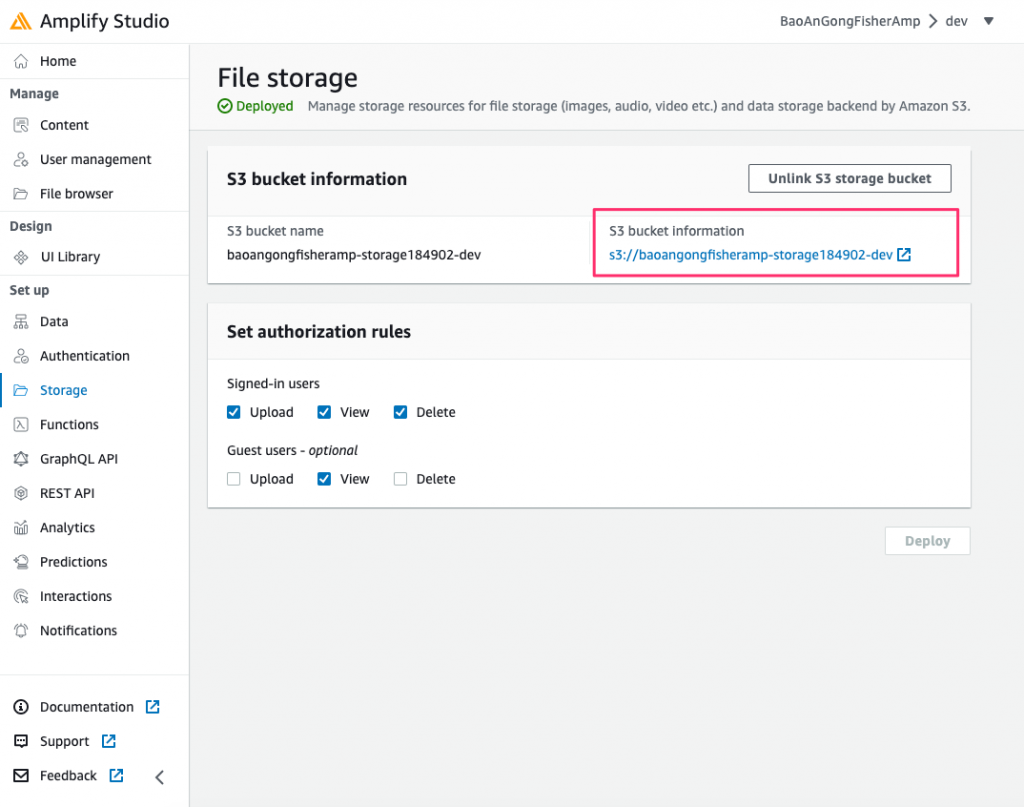
- 從 Amplify Studio 的 Storage 裡面去看看檔案被扔到哪個 S3 Bucket 裡
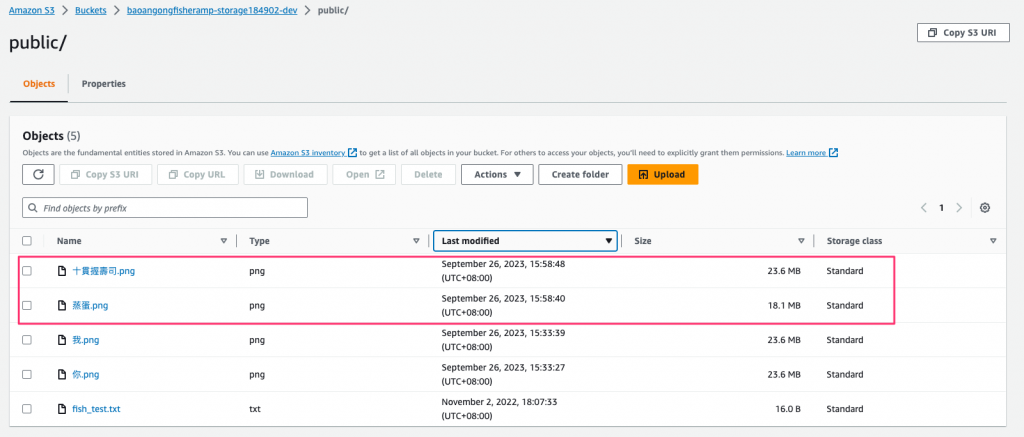
- 檔案確實有被扔進來
結論
- 今天成功將圖檔丟進 S3
- 不過,從 S3 擺放資料的方式可以直接看出一個問題:「如果不同使用者,都上傳了 蒸蛋.png ,那我的蒸蛋不就被蓋掉了嗎?!」
- 另外,同一個使用者,也可能會上傳好幾張 黑格.png⋯⋯
- 所以要用其他管道來區隔**「不同使用者」** 和 「同名不同隻魚」
備註
- 使用 Assets
- 寫:製作程式時,放入 Assets.xcassets (只能在製作程式的時候放進去,程式不能寫資料進來)
- 讀:直接由 Image("圖檔名字") 取用
- 相片五部曲
- 拍照或讀取照相簿 ImagePicker 至 UIImage
-
UIImage 至 離線 PNG 檔案
-
離線 PNG 檔案 至 Image
-
離線 PNG 檔案 至 S3
-
S3 至 離線 PNG 檔案