接著從 Try the Tutorial 網頁來開始學習
網址為 https://vuejs.org/tutorial
接續上一篇,接下來是
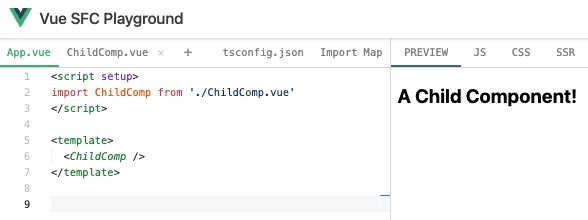
<script setup>
import ChildComp from './ChildComp.vue'
</script>

<template>
  <ChildComp />
</template>
ChildComp.vue
<template>
  <h2>A Child Component!</h2>
</template>
接下來的幾篇發文會來學習多個vue物件之間的操作,
原本只有一個 App.vue 算是一個 vue 的 Component
在這個範例中,再增加一個 ChildComp.vue 的 Component
這邊有一個名詞上的問題,常常是英文表示很清楚,但是中文表示就有點分不清了
像是
object,component,element,tag,物件,元件,元素,標籤
function,method,函數,函式,功能,方法
parameter,attribute,property,key,value,變數, 參數,屬性,特性,鍵值,數值
在學習上要特別注意真正說的是哪一個部份
在ChildComp.vue中,有一個<template>
在 App.vue 中 透過 import ChildComp from './ChildComp.vue'
將 ChildComp.vue 匯入,並命名為 ChildComp
這時 在 <template> 中,就可以用 <ChildComp /> 將ChildComp.vue中的<template>內容引入進來
這樣的寫法也算是一種將ChildComp.vue變成<ChildComp />模組的概念
這裡就形成了透過對<ChildComp />的操作達到與 ChildComp.vue 連結的方式,
接下來的學習都會圍繞著這的概念

//--------------
12. Props
App.vue
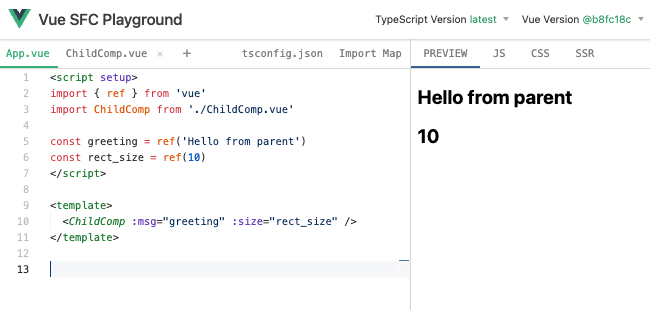
<script setup>
import { ref } from 'vue'
import ChildComp from './ChildComp.vue'

const greeting = ref('Hello from parent')
</script>

<template>
  <ChildComp :msg="greeting" />
</template>
ChildComp.vue
<script setup>
const props = defineProps({
  msg: String
})
</script>

<template>
  <h2>{{ msg || 'No props passed yet' }}</h2>
</template>
Props是子元件接收父元件訊息的方法,
在ChildComp.vue中,宣告一個變數 props,透過defineProps() 建立一個與父元件接收資料的類型。
這個概念也是一種建立關連的方式,
const props = defineProps({
  msg: String
})
建立一個 props 其資料類型是 { msg: String }
若是要接收多個資料的話,可以寫成
const props = defineProps({
  msg: String,
  size: Number
})
也可以寫成陣列型式
const props = defineProps([
  'msg',
  'size'
])
在ChildComp.vue的<template>中,用{{ msg || 'No props passed yet' }} 將從父元件接收的資料顯示出來
再來是App.vue端的部份
import ChildComp from './ChildComp.vue' 將ChildComp.vue匯入,並命名為ChildComp
所以 <ChildComp />就是與ChildComp.vue的關連的介面<ChildComp :msg="greeting" />
在<ChildComp> 加入 msg屬性,並進行綁定:msg, 綁定的ref物件是greeting,初值是 'Hello from parent1'
就是 const greeting = ref('Hello from parent1')
也可以再加入一個 size屬性,並進行綁定:size, 綁定的ref物件是rect_size,初值是 10const rect_size = ref(10) <ChildComp />就變成<ChildComp :msg="greeting" :size="rect_size" />
整理一下流程
App.vue端
1.宣告綁定的ref物件 greeting,rect_size
const greeting = ref('Hello from parent')
const rect_size = ref(10)
2.加入綁定的屬性<ChildComp :msg="greeting" :size="rect_size" />
ChildComp.vue端
3.宣告接收用的props
const props = defineProps({
  msg: String,
  size: Number
})
4.顯示接收的資料
<h2>{{ msg || 'No props passed yet' }}</h2>
<h2>{{ size || 'No props passed yet' }}</h2>
另外補充
defineProps() 是vue.js 內建的功能
props 是剛好命名是 props
也可以有不同的命名,經console.log(props)查看,
是一個Proxy的物件
Proxy(Object) {msg: 'Hello from parent', size: 10}
Proxy本身就是一個中介物件的特性
還有defineProps()在一個vue物件中,只能呼叫一次
如果寫成這樣,變成重覆defineProps()了
const props1 = defineProps({
  msg: String
})

const props2 = defineProps({
  size: Number
})
是錯誤的

//--------------
13. Emits
App.vue
<script setup>
import { ref } from 'vue'
import ChildComp from './ChildComp.vue'

const childMsg = ref('No child msg yet')
</script>

<template>
  <ChildComp @response="(msg) => childMsg = msg" />
  <p>{{ childMsg }}</p>
</template>
ChildComp.vue
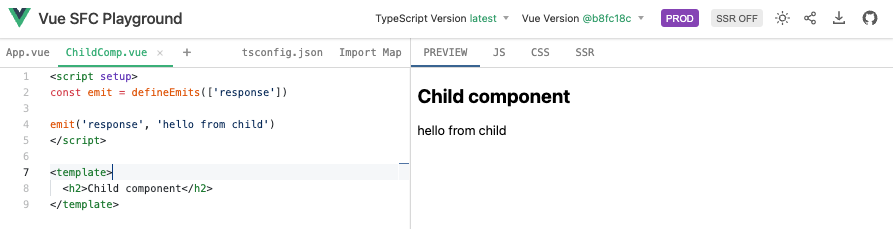
<script setup>
const emit = defineEmits(['response'])

emit('response', 'hello from child')
</script>

<template>
  <h2>Child component</h2>
</template>
Emits是由子元件向父元件發送事件的用法
先看 ChildComp.vue 的部份
先宣告一個變數 emit,透過 defineEmits(['response']) 設定'response'為事件的連動或是綁定
當需要觸發事件給父元件時,就執行 emit('response', 'hello from child')'response' 是觸發的事件,'hello from child'是事件傳送的資料
接著是App.vue的部份
const childMsg = ref('No child msg yet') 是宣告 childMsg 為一個ref的物件,初值為 'No child msg yet',接著 在 <ChildComp @response="(msg) => childMsg = msg" /> 加入事件綁定 @response,
所以當 子元件發出 emit('response', 'hello from child') 時,父元件的 <ChildComp> 的 @response 就會被觸發,接著執行 (msg) => childMsg = msg,(msg) 是事件傳入的數值,childMsg = msg 是將 msg 傳給 childMsg,childMsg再連動到 <p> 的內容 {{ childMsg }}
看到這邊若要將 Props 及 Emits 整合在一起,
宣告都是在子元件端
const props = defineProps(['msg_get'])  // 接收資料
<p>{{ msg_get }}</p>

greeting -> msg_get

const emit = defineEmits(['response'])
emit('response', 'hello from child') // 發送資料

'hello from child' -> msg_send -> childMsg
在父元件端則是
<ChildComp :msg_get="greeting" @response="(msg_send) => childMsg = msg_send" />
<p>{{ childMsg }}</p>
學習到這邊,可以看到vue元件之間的資料傳送,也是使用 綁定,連動,監看的特性
是一致的概念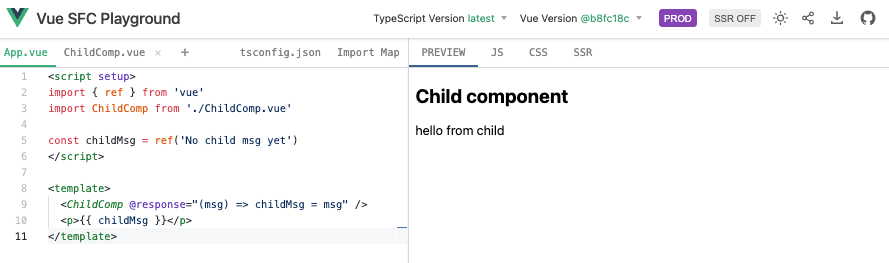
//--------------
14. Slots
最後是 Slots 的用法
App.vue
<script setup>
import { ref } from 'vue'
import ChildComp from './ChildComp.vue'

const msg = ref('from parent')
</script>

<template>
  <ChildComp>Message: {{ msg }}</ChildComp>
</template>
ChildComp.vue
<template>
  <slot>Fallback content</slot>
</template>
Slots的概念是一個簡化流程的用法
原本的流程是 從父元件傳資料到子元件,在子元件透過props接收資料,並產生的<template>內容,再透過<ChildComp>回到父元件的<template>
App.vue
<script setup>
import { ref } from 'vue'
import ChildComp from './ChildComp.vue'

const msg1 = ref('from parent')
</script>

<template>
  <ChildComp :msg="msg1" />
</template>
ChildComp.vue
<script setup>
const props = defineProps({
  msg: String
})
</script>

<template>
  <h2>{{ msg }}</h2>
</template>
實際的流程有點繞圈圈
現在只要在 子元件的<template>中加入<slot>,就可以在父元件的<ChildComp>加入內容
在父元件中 <ChildComp>Message: {{ msg }}</ChildComp> 中的內容,Message: {{ msg }} 會傳到子元件的 <slot>Fallback content</slot>中,
原本的 Fallback content 會被代換成 Message: {{ msg }},然後再將內容回傳到父元件的 <ChildComp>中
整體的效果就像是只要在子元件加入 <slot>就好了,剩下的就只要在父元件的<ChildComp>設定內容就可以了,
雖然好像<slot>是多此一舉,像是直覺的在<ChildComp></ChildComp>中加入內容,但是不加<slot>,在<ChildComp></ChildComp>的內容就不會出現了
<ChildComp>Message: {{ msg }}</ChildComp>
以上連續4篇的發文是從Vue.js的官網的說明,採用的是 Composition API 及 Single-File Components 的模式
往後的發文就要進入官網上提到的一些案例的學習,其實順著這幾篇看下來,已經可以了解到 Vue所帶來的一些特點。

 iThome鐵人賽