
經過這兩天的介紹,相信大家對於多節點的叢集有更深的認識
對於yml檔中的一些參數設定也不會覺得那麼陌生
今天主要的目標就是架設多節點的叢集以及相關的知識介紹
會分成幾個部分:
xpack是Elastic Stack對於資安與監控,甚至機器學習上的擴展應用
雖然說要使用完整的功能是需要付費的,但是免費的部分其實如果是一般生產環境甚至也是夠用的
並且在8.0版本後,不用做任何額外xpack的設定
ES都會預設幫忙處理好基本basic security部分
我們在使用ES時可能有幾點事項需要考慮:
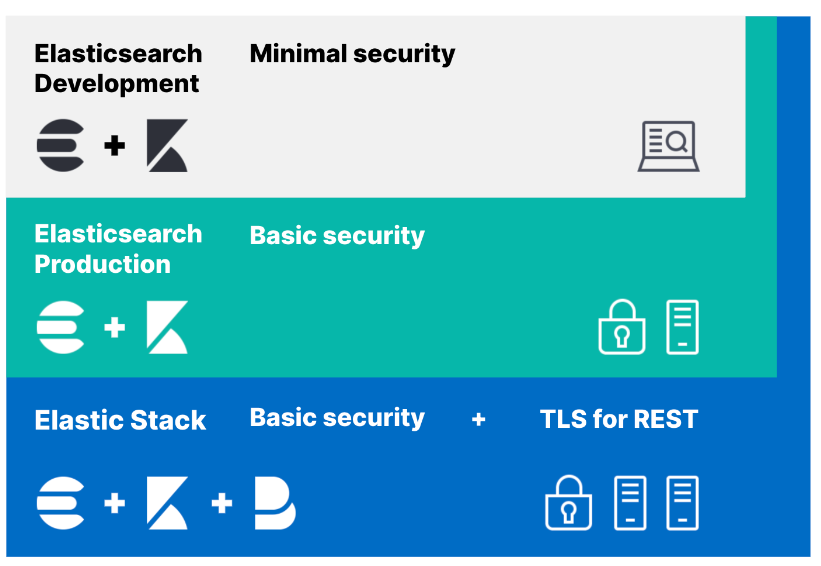
在通訊的安全與身份驗證的部分,我們今天介紹如何利用xpack做實現
主要可以分成三個層級
我們開始之前先做一些步驟:
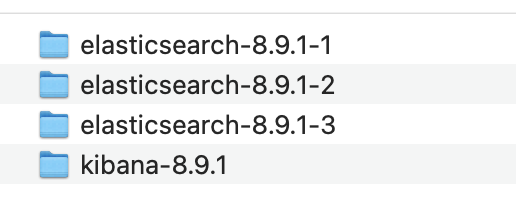
vim config/elasticsearch.yml
// node-1
cluster.name: test_xpack
node.name: test_node01
discovery.seed_hosts:
  - localhost:9300
  - localhost:9301
  - localhost:9302
cluster.initial_master_nodes:
  - test_node01
  - test_node02
  - test_node03
xpack.security.enabled: false
network.host: localhost
http.port: 9200
transport.port: 9300

// node-2
cluster.name: test_xpack
node.name: test_node02
discovery.seed_hosts:
  - localhost:9300
  - localhost:9301
  - localhost:9302
cluster.initial_master_nodes:
  - test_node01
  - test_node02
  - test_node03
xpack.security.enabled: false
network.host: localhost
http.port: 9201
transport.port: 9301

// node-3
cluster.name: test_xpack
node.name: test_node03
discovery.seed_hosts:
  - localhost:9300
  - localhost:9301
  - localhost:9302
cluster.initial_master_nodes:
  - test_node01
  - test_node02
  - test_node03
xpack.security.enabled: false
network.host: localhost
http.port: 9202
transport.port: 9302
elasticsearch.hosts: ["http://localhost:9200"]
elasticsearch.username: "kibana_system"
接下來我們就對這三層來一一做示範
這部分我們要為ES設定用戶的密碼
xpack.security.enabled: true
./bin/elasticsearch
[2023-09-27T17:09:40,413][INFO ][o.e.x.s.Security ] [test_node02] Security is enabled
{
	"error":{
		"root_cause":[
			{
				"type":"security_exception",
				"reason":"missing authentication credentials for REST request [/]",
				"header":{
				"WWW-Authenticate":[
				"Basic realm=\"security\" charset=\"UTF-8\"",
				"ApiKey"
					]
				}
			}
		],
		"type":"security_exception",
		"reason":"missing authentication credentials for REST request [/]",
		"header":{
			"WWW-Authenticate":[
				"Basic realm=\"security\" charset=\"UTF-8\"",
				"ApiKey"
			]
		}
	},
	"status":401
}

{
  "name" : "test_node02",
  "cluster_name" : "test_xpack",
  "cluster_uuid" : "ugg-hSz_Rz6_Y7X6PjOMcw",
  "version" : {
    "number" : "8.9.1",
    "build_flavor" : "default",
    "build_type" : "tar",
    "build_hash" : "a813d015ef1826148d9d389bd1c0d781c6e349f0",
    "build_date" : "2023-08-10T05:02:32.517455352Z",
    "build_snapshot" : false,
    "lucene_version" : "9.7.0",
    "minimum_wire_compatibility_version" : "7.17.0",
    "minimum_index_compatibility_version" : "7.0.0"
  },
  "tagline" : "You Know, for Search"
}
// 先create出新的keystore檔
./bin/kibana-keystore create

// add 設定的參數名稱
./bin/kibana-keystore add elasticsearch.password
bin/kibana
在這部分我們要為node的節點溝通時能夠加密與驗證
既然需要憑證,我們也需要能發放憑證的Certificate Authority(CA)
所以步驟大致上為:
./bin/elasticsearch-certutil ca

By default the 'ca' mode produces a single PKCS#12 output file which holds:
    * The CA certificate
    * The CA's private key

2. 接著用ca來建立憑證
- 用cert表示我們要建立x.509的憑證與密鑰
- 後面 —ca則指定要用什麼ca
./bin/elasticsearch-certutil cert --ca elastic-stack-ca.p12

xpack.security.transport.ssl.enabled: true
xpack.security.transport.ssl.verification_mode: certificate
xpack.security.transport.ssl.client_authentication: required
xpack.security.transport.ssl.keystore.path: elastic-certificates.p12
xpack.security.transport.ssl.truststore.path: elastic-certificates.p12
這一部分我們要建立對外的HTTP layer也能用TLS加密
./bin/elasticsearch-certutil http
1. Generate a CSR? [y/N]
如果想要自己簽署憑證就選n

2. Use an existing CA?
輸入y,我們剛剛有做CA了

3. CA Path:
輸入elastic-stack-ca.p12所在路徑

4. Password for elastic-stack-ca.p12:
輸入enter

5. For how long should your certificate be valid? [5y]
輸入enter

6. Generate a certificate per node? [y/N]
我們沒有要每個node特製,所以輸入n

7. Enter all the hostnames that you need, one per line.
When you are done, press <ENTER> once more to move on to the next step.
我們輸入localhost

8. Is this correct [Y/n]
輸入y

9. Enter all the IP addresses that you need, one per line.
When you are done, press <ENTER> once more to move on to the next step.
因為是本地,輸入127.0.0.1

10. Do you wish to change any of these options? [y/N]
輸入n

11. If you wish to use a blank password, simply press <enter> at the prompt below.
Provide a password for the "http.p12" file:  [<ENTER> for none]
輸入enter

12. What filename should be used for the output zip file? [/Users/nb050/Downloads/elasticsearch-8.9.1-1/elasticsearch-ssl-http.zip]
不做修改,輸入enter

最後在當前路徑會看到elasticsearch-ssl-http.zip
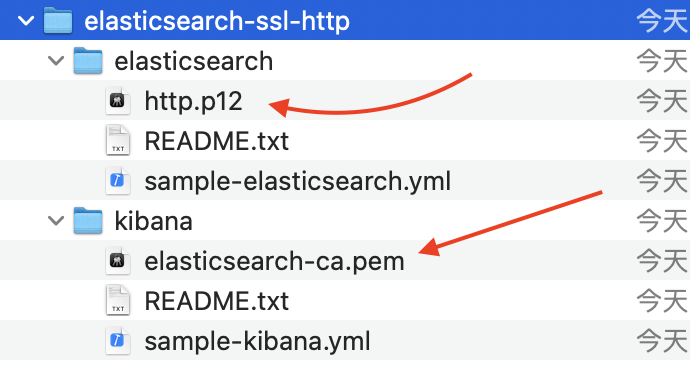
解壓縮後有兩個檔案
xpack.security.http.ssl.enabled: true
xpack.security.http.ssl.keystore.path: http.p12
elasticsearch.hosts: ["https://localhost:9200"]
elasticsearch.ssl.certificate: /path/to/your/client.crt
當然現在直接下載ES跟kibana後,我們直接啟動的話,就能夠直接透用xpack這些設定了,不用自己手動
接著我們參考官方的文檔來使用docker compose架設ES
ELASTIC_PASSWORD=
// 給預設elastic帳號的密碼

KIBANA_PASSWORD=
// 給預設kibana_system帳號的密碼

STACK_VERSION={version}
// ES要使用的版本

CLUSTER_NAME=docker-cluster
// 要取的cluster name

LICENSE=basic
// 我們在license是用basic版本

ES_PORT=127.0.0.1:9200
// 對外連接,我們也可以寫完整,確保不是隨便的host也可以

KIBANA_PORT=5601
// 我們要連到kibana的port

MEM_LIMIT=1073741824
// 針對自己的機器去設定記憶體大小
想看完整的:https://github.com/elastic/elasticsearch/blob/8.10/docs/reference/setup/install/docker/docker-compose.yml
我這邊就提幾個點:
bin/elasticsearch-certutil ca
添加node到一個exiting cluster:
bin\elasticsearch-create-enrollment-token -s node
bin\elasticsearch --enrollment-token <enrollment-token>
removing master-eligible nodes:
實際操作:
POST /_cluster/voting_config_exclusions?node_names=node_name&timeout=1m
// timeout預設30秒
DELETE /_cluster/voting_config_exclusions
GET /_cluster/state?filter_path=metadata.cluster_coordination.voting_config_exclusions
今天的內容有點多,這邊做個總結
參考資料
elastic stack security layer:
https://www.elastic.co/guide/en/elasticsearch/reference/7.17/configuring-stack-security.html
keystore:
https://www.elastic.co/guide/en/elasticsearch/reference/current/elasticsearch-keystore.html#add-string-to-keystore
minimal security:
https://www.elastic.co/guide/en/elasticsearch/reference/7.17/security-minimal-setup.html
basic security:
https://www.elastic.co/guide/en/elasticsearch/reference/7.17/security-basic-setup.html
https:
https://www.elastic.co/guide/en/elasticsearch/reference/7.17/security-basic-setup-https.html
docker安裝ES:
https://www.elastic.co/guide/en/elasticsearch/reference/current/docker.html
添加或刪除node:
https://www.elastic.co/guide/en/elasticsearch/reference/current/add-elasticsearch-nodes.html#modules-discovery-removing-nodes

 iThome鐵人賽