接下來學習 Fetching_Data 的範例
網址如下
https://vuejs.org/examples/#fetching-data
這個範例只有一個App.vue
<!--
This example fetches latest Vue.js commits data from GitHub’s API and displays them as a list.
You can switch between the two branches.
-->
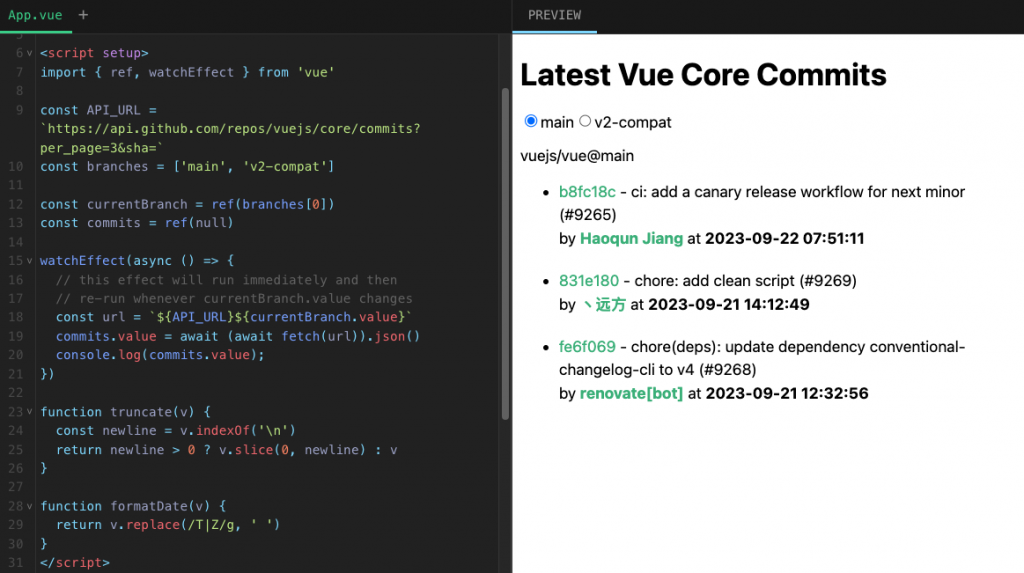
<script setup>
import { ref, watchEffect } from 'vue'
const API_URL = `https://api.github.com/repos/vuejs/core/commits?per_page=3&sha=`
const branches = ['main', 'v2-compat']
const currentBranch = ref(branches[0])
const commits = ref(null)
watchEffect(async () => {
// this effect will run immediately and then
// re-run whenever currentBranch.value changes
const url = `${API_URL}${currentBranch.value}`
commits.value = await (await fetch(url)).json()
})
function truncate(v) {
const newline = v.indexOf('\n')
return newline > 0 ? v.slice(0, newline) : v
}
function formatDate(v) {
return v.replace(/T|Z/g, ' ')
}
</script>
<template>
<h1>Latest Vue Core Commits</h1>
<template v-for="branch in branches">
<input type="radio"
:id="branch"
:value="branch"
name="branch"
v-model="currentBranch">
<label :for="branch">{{ branch }}</label>
</template>
<p>vuejs/vue@{{ currentBranch }}</p>
<ul>
<li v-for="{ html_url, sha, author, commit } in commits">
<a :href="html_url" target="_blank" class="commit">{{ sha.slice(0, 7) }}</a>
- <span class="message">{{ truncate(commit.message) }}</span><br>
by <span class="author">
<a :href="author.html_url" target="_blank">{{ commit.author.name }}</a>
</span>
at <span class="date">{{ formatDate(commit.author.date) }}</span>
</li>
</ul>
</template>
<style>
a {
text-decoration: none;
color: #42b883;
}
li {
line-height: 1.5em;
margin-bottom: 20px;
}
.author,
.date {
font-weight: bold;
}
</style>
這個範例來學習從網器讀取資料列示出來的方法
同樣先從 <template> 看起
這裡有看到 有2層的<template> <template v-for="branch in branches">
先看一下官網上有關 <template> 的說明
網址如下
https://vuejs.org/api/built-in-special-elements.html#template
The <template> tag is used as a placeholder when we want to use a built-in directive without rendering an element in the DOM.

The special handling for <template> is only triggered if it is used with one of these directives:

. v-if, v-else-if, or v-else
. v-for
. v-slot

If none of those directives are present then it will be rendered as a native <template> element instead.

A <template> with a v-for can also have a key attribute. All other attributes and directives will be discarded, as they aren't meaningful without a corresponding element.
由以上的說明可知最上層的 <template> 是用來呈現整個網頁的內容<template>裡面的 另一個 <template v-for="branch in branches"> 則是用來搭配 v-if, v-else-if, or v-else,v-for,v-slot所使用,<template>本身只是像是一個 placeholder,就是協助 條件式 v-if,迴圈v-for,內容區塊v-slot的執行,<template>本身不會染渲成DOM的元件,好像一種虛的標籤。
不過,v-if類的指示,除了用在 <template>,也可以用在 其他DOM元件上,像是<div>,
有時候文件上沒有說明到的部份,就要自行調整範例內容,看看結果是否跟自己理解的相同
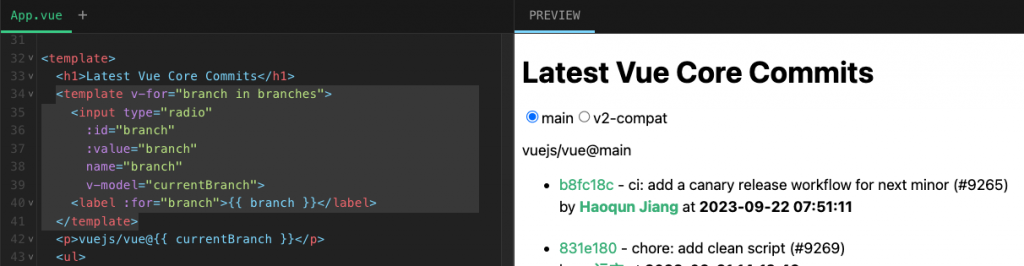
原本理解是只有一層 <template> ,但是 <template><template v-for="branch in branches"><input type="radio"></template></template>
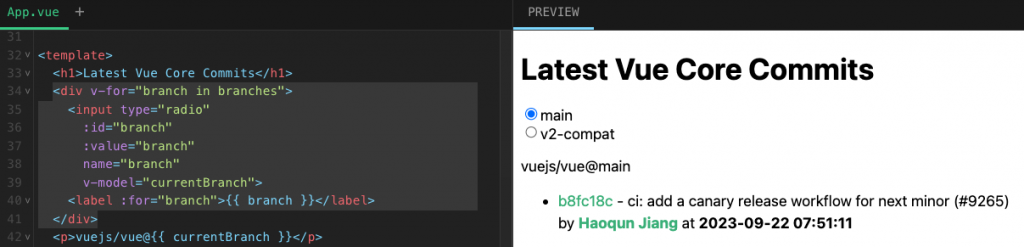
跟 <template><div v-for="branch in branches"><input type="radio"></div></template> 的差別是什麼,只能從測試中來發現差異了
發現因為<template v-for="branch in branches"> 本身不會渲染出來,所以<input type="radio">的排列,會以inline的方式橫向排列
<div v-for="branch in branches"><input type="radio"></div>的方式,因為<div v-for="branch in branches">本身會渲染出來,
所以 <input type="radio">的排列,會以block的方式縱向排列
再來是
<template v-for="branch in branches">
  <input type="radio"
    :id="branch"
    :value="branch"
    name="branch"
    v-model="currentBranch">
  <label :for="branch">{{ branch }}</label>
</template>
branches 是 const branches = ['main', 'v2-compat'] 是一個陣列v-for="branch in branches" 是 for 迴圈
每個讀取的元素為 branch
每個 <input> 的屬性 id 及 value都被綁定到 branch
其中 name="branch" 只是 name屬性是 'branch' 並沒有被綁定
v-model="currentBranch" 則是被綁定監看 currentBranch<label> 的屬性for也被綁定到 branch
因為 branches陣列有2個元素,所以會產生2個<input>元件
在此有一個地方要確認一下,原本是
<template v-for="branch in branches">
  <input type="radio"
    :id="branch"
    :value="branch"
    name="branch"
    v-model="currentBranch">
  <label :for="branch">{{ branch }}</label>
</template>
以下這3種都是錯誤的
//-- 第1種 ---
<template v-for="branch in branches">
  <input type="radio"
    :id="branch"
    :value="branch"
    name="branch"
    v-model="branch">
  <label :for="branch">{{ branch }}</label>
</template>

//-- 第2種 ---
<template v-for="branch in branches">
  <input type="radio"
    :id="branch"
    name="branch"
    v-model="branch">
  <label :for="branch">{{ branch }}</label>
</template>

//-- 第3種 ---
<template v-for="branch in branches">
  <input type="radio"
    :id="branch"
    :value="currentBranch"
    name="branch"
    v-model="currentBranch">
  <label :for="branch">{{ branch }}</label>
</template>
在第1, 2種中
在v-for 或 v-slot中的變數,不能做為綁定的變數
因為v-model="branch"的 branch變數,不能寫回 <input>的value
所以用 currentBranch 作為綁定的變數
因為 <input type="radio">是單選的
所以任一個 <input type="radio"> 狀態改變currentBranch.value 就會變成該 <input>的value值了
這代表 v-model="currentBranch" 只有執行將 <input>的value值 傳回 currentBranch
在第3種中
變成每個<input> 的value都是 currentBranch的數值了,
就是都是相同的 'main'
因為 const currentBranch = ref(branches[0]) ,currentBranch的初值是 'main'
再澄清一下觀念
若是不在 v-for 或 v-slot中的話
以下這2種寫法是否相同
<input :value="text" v-model="text">
<input v-model="text">
回到最初的用法
<input :value="text" @input="onInput">
function onInput(e) {
  text.value = e.target.value
}
當<input>輸入變動時,觸發 @input="onInput",執行onInput(e)
其中 e.target.value是輸入的數值,再傳給綁定value屬性的變數 text 的數值 text.value
為了簡化這的過程,變成<input v-model="text">
可以理解成,一旦 <input> 的輸入變動時,就會連動改變變數 text 的數值 text.value
同時 改變 <input> 的value屬性的數值,
感覺好像是輸入的value值,又寫回自己的value,
不過,過程就會是這個結果
那麼有沒有可能是這種寫法
<input :value="text" v-model="text">
或
<input :value="text" v-model="text1">
這會產生錯誤,表示 :value="text" 是多餘的
即使:value與v-model的變數不同,也是不行的
有v-model,就不能有 :value
整理一下
<input :value="text" @input="(e) => { text = e.target.value }">
簡化為
<input v-model="text">
若是特殊狀況,就要回到原本的 :value="text" 及 @input 模式
<input :value="text" @input="changeText">
script的部份
const text = ref('123');
let n = 0;

function changeText(e){
  console.log(e.target.value);
  setTimeout(()=>{
    text.value = n;
    n++;
    console.log(text.value);
  }, 1000);

}
這種寫法會是,當輸入時,<input>的value會先變成實際輸入的value值
然後觸發執行 changeText(e), 經過setTimeout(), 1秒後,執行text.value = n; 及 n++; ,這時 <input>的value又會變成n的數值了。
什麼時候會有這種需求呢?
像是在輸入重要資料時,如身分證號碼,信用卡卡號,
在輸入1秒後,會將原本輸入的內容變成*字號,做為隱藏保護
//---------------------------------------
接著看到 watchEffect()的使用
之前有提到 watch() 的使用,可以好好對照學習一下
有時候,經過實際的測試,觀察語法與結果的關係,往往更能快速的理解與澄清用法的差異
例如有2個input的文字輸入
<input type="text" v-model="k1">
<input type="text" v-model="k2">
同時宣告
const k1 = ref('abc');
const k2 = ref('123');
此時加上
watch(k1, () => {
  const w1 = k1.value
  console.log("w1: "+w1)
})

watch(k2, () => {
  const w2 = k2.value
  console.log("w2: "+w2)
})
代表k1, k2受到監看
若k1有變動,就會執行
const w1 = k1.value
console.log("w1: "+w1)
若k2有變動,就會執行
const w2 = k2.value
console.log("w2: "+w2)
若改寫成
watch([k1, k2], () => {
  const w1 = k1.value
  console.log("w1: "+w1)

  const w2 = k2.value
  console.log("w2: "+w2)
})
則只要k1, k2任一個有變動,就會執行
const w1 = k1.value
console.log("w1: "+w1)

const w2 = k2.value
console.log("w2: "+w2)
接著對照到 watchEffect() 就變成
watchEffect(() => {
  const w1 = k1.value
  console.log(w1)

  const w2 = k2.value
  console.log(w2)

})
同樣是 只要k1, k2任一個有變動,就會執行
const w1 = k1.value
console.log(w1)

const w2 = k2.value
console.log(w2)
同樣如果是以下寫法
watchEffect(() => {
  const w1 = k1.value
  console.log(w1)

})

watchEffect(() => {
  const w2 = k2.value
  console.log(w2)

})
就變成k1, k2分別監看變動及執行
回頭來看一下範們的程式
watchEffect(async () => {
  const url = `${API_URL}${currentBranch.value}`
  commits.value = await (await fetch(url)).json()
})
要找的是有被v-model綁定的變數,
在<template>中
<input type="radio"
      :id="branch"
      :value="branch"
      name="branch"
      v-model="currentBranch">
其中 v-model="currentBranch",所以watchEffect要監看的就是 currentBranch.value
一旦 currentBranch.value 變動,就會執行
async () => {
  const url = `${API_URL}${currentBranch.value}`
  commits.value = await (await fetch(url)).json()
}
在此還有使用到非同步的語法
首先 await fetch(url) 讀取網路資料,等到資料讀完,才會接著執行 await (await fetch(url)).json()
然後再傳給 commits.value
const url = `${API_URL}${currentBranch.value}`
使用到樣版字串
//----------------------
再來是
<ul>
  <li v-for="{ html_url, sha, author, commit } in commits">
    <a :href="html_url" target="_blank" class="commit">{{ sha.slice(0, 7) }}</a>
    - <span class="message">{{ truncate(commit.message) }}</span><br>
    by <span class="author">
      <a :href="author.html_url" target="_blank">{{ commit.author.name }}</a>
    </span>
    at <span class="date">{{ formatDate(commit.author.date) }}</span>
  </li>
</ul>
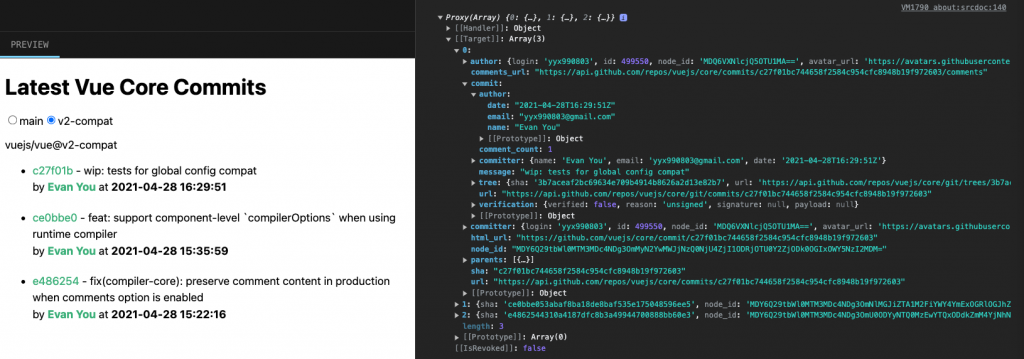
在 commits.value = await (await fetch(url)).json() 讀完資料後,commits.value 的資料格式是json格式,包含了不同的參數屬性{ html_url, sha, author, commit } in commits 指的是
從commits中挑選這幾個屬性 html_url, sha, author, commit
要關注的是有綁定的這幾項 <a :href="html_url">, <a :href="author.html_url">
這2個超連結分別綁定 html_url 及 author.html_url
另外 內容的部份,分別有這4個,作為資料的呈現
{{ sha.slice(0, 7) }}
{{ truncate(commit.message) }}
{{ commit.author.name }}
{{ formatDate(commit.author.date) }}
這些資料都有另外做了不同的處理sha.slice(0, 7) 是指 回傳 sha字串中,第0個字元開始數起的7個字元
例如: sha = "c27f01bc744658f2584c954cfc8948b19f972603";
第0個字元 是 c, 開始數起的7個字元 "c27f01b"
所以 sha.slice(0, 7) 回傳 "c27f01b"
truncate(commit.message) 是執行
function truncate(v) {
  const newline = v.indexOf('\n')
  return newline > 0 ? v.slice(0, newline) : v
}
commit.message 是 "wip: tests for global config compat"v.indexOf('\n') 是檢查字串中是否有 '\n' 換行符號
若有的話,newline值會 大於等於 0, 代表'\n'字元出現等index索引位置,第1個索引位置是0
如果沒有的話,newline值回傳 -1,
所以當 newline > 0 時,執行 回傳 v.slice(0, newline) 否則回傳v,也就是 commit.messagev.slice(0, newline) 是指 v字串中,第0個字元開始數起的 newline 個字元
例如 v = "wip: tests \nfor global config compat"newline = 11;v.slice(0, newline) = v.slice(0, 11) = "wip: tests "
truncate(commit.message) 回傳 "wip: tests "
//-----commit.author.name 代表 commit 的子屬性 author,再下一層屬性 name的數值
//----formatDate(commit.author.date) 用到formatDate()的功能
function formatDate(v) {
  return v.replace(/T|Z/g, ' ')
}
commit.author.date 是 "2021-04-28T16:29:51Z"v.replace(/T|Z/g, ' ') 使用了 正規表示式(Regular Expression)的語法
有關正規表示式(Regular Expression)可以參考MDN官網的說明
https://developer.mozilla.org/en-US/docs/Web/JavaScript/Guide/Regular_expressions
在此 /T|Z/g , /T|Z指的是有出現'T'字元或'Z'字元, /g指的是全都查看,v.replace(/T|Z/g, ' ') 就是 將v字串中,所有 'T'字元或'Z'字元 都代換成 ' '空白字元
v字串 是 "2021-04-28T16:29:51Z"
所以 v.replace(/T|Z/g, ' ') 回傳 "2021-04-28 16:29:51 "
最後整理一下
從<input type="radio">點選不同的項目,觸發 watchEffect(),讀取網路資料 commit,
然後 用 <li v-for> 列示出來


 iThome鐵人賽