

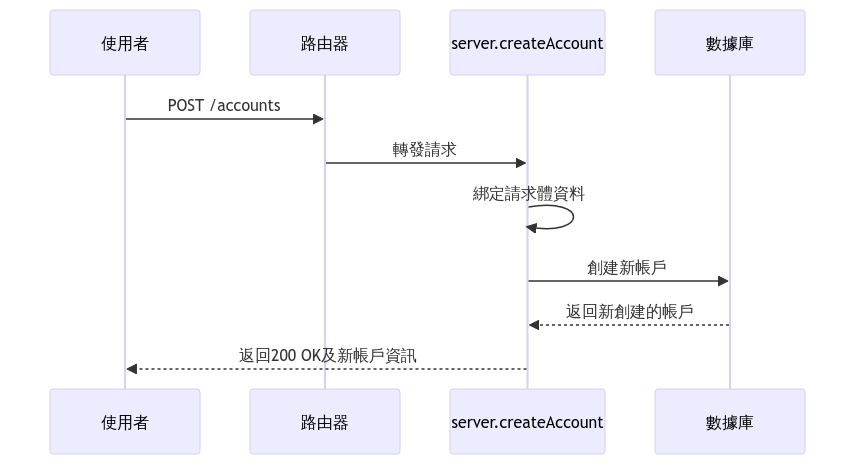
在server.go 的NewServer中加入 createAccount 的router
server.go

func NewServer(store *db.Store) *Server {
	server := &Server{store: store}
	router := gin.Default()

	// TODO: add routes
	router.POST("/accounts", server.createAccount)

	server.router = router
	return server
}
在 api 資料夾內的新檔案 account.go 中實作 server.createAccount API,其func name為 createAccount,並將 gin.Context 物件作為input
gin.Context 有一個 .Request 字段,它的類型是 **http.Request**專為 Gin 的 HTTP 請求/響應處理而設計。
參考account.sql.go 宣告過CreateAccountParams來設定createAccountRequest,其中Account 初始的Balance 為0,所以我們可以移除Balance欄位。
驗證輸入數據: 每當我們從客戶端獲取輸入數據時,最好進行驗證。為此,這裡使用*go validator*綁定tag到Owner和Currency欄位。目前我們的銀行只支援三種貨幣:USD 、 EUR和CAD (使用oneof進行驗證)。
errorResponse() 函數,將錯誤(error)轉換成一個 gin.H (key-value object), 這樣可以輕鬆地將其序列化為JSON並返回給Client。
server.go
func errorResponse(err error) gin.H {
    return gin.H{"error": err.Error()}
}
createAccount 函數的實作: 如果Client提供的數據無效,我們應該向Client發送400 Bad Request響應,而無法在Database建立Account時則向Client發送500 Internal Server Error ,反正成功建立為200 OK 。
package api

import (
	"net/http"

	db "github.com/Kcih4518/simpleBank_2023/db/sqlc"
	"github.com/gin-gonic/gin"
)

// Server serves HTTP requests for our banking service.
// Using go validator to validate the request body
type createAccountRequest struct {
	Owner    string `json:"owner" binding:"required"`
	Currency string `json:"currency" binding:"required,oneof=USD EUR CAD"`
}

// errorResponse is a helper to format error message
// Using ShouldBindJSON to bind the request body to the request struct
func (server *Server) createAccount(ctx *gin.Context) {
	var req createAccountRequest
	if err := ctx.ShouldBindJSON(&req); err != nil {
		ctx.JSON(http.StatusBadRequest, errorResponse(err))
		return
	}
	arg := db.CreateAccountParams{
		Owner:    req.Owner,
		Balance:  0,
		Currency: req.Currency,
	}
	account, err := server.store.CreateAccount(ctx, arg)

	if err != nil {
		ctx.JSON(http.StatusInternalServerError, errorResponse(err))
		return
	}
	ctx.JSON(http.StatusOK, account)
}
ctx *gin.Context 和 ctx context.Context是什麼? 有和不同呢? 又該怎麼選擇呢?
ctx context.Context:
context.Context 是 Go 標準庫的一個型別,用於在API邊界和進程之間傳遞截止日期、取消信號和其他請求範疇的值。它在 Go 中被普遍用於跨函數邊界傳遞上下文信息,尤其是用於超時和取消信號。ctx gin.Context:
gin.Context 是 Gin web 框架提供的特定型別。它代表一個特定的 HTTP 請求的上下文,並提供與請求和響應互動的方法,例如讀取請求參數、設置響應頭等。context.Context),但它更專為 Gin 框架的 HTTP 請求/響應處理而設計。gin.Context 還帶有關於當前路由、中間件等的信息。差異性: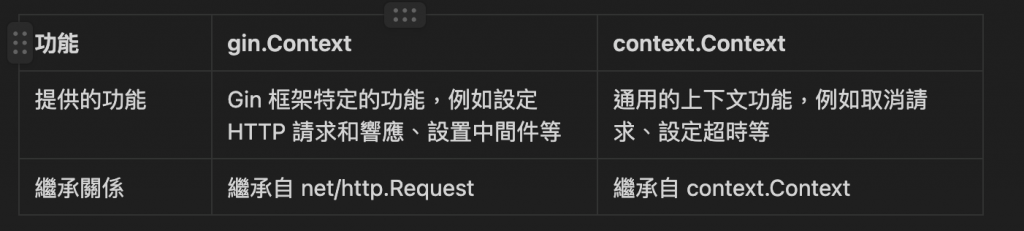
context.Context 更為通用,用於在各種類型的操作中攜帶上下文,不僅僅是 HTTP 請求。gin.Context 有一個 .Request 字段,它的類型是 **http.Request**專為 Gin 的 HTTP 請求/響應處理而設計。使用情境:
gin.Context。context.Context。在 Server 結構體中添加一個新的 Start() 函數。此函數將輸入一個地址並回傳一個錯誤,其角色是在輸入地址上運行 HTTP 伺服器以開始監聽 API 請求。
Gin 已經在router中提供了一個函數來執行此操作,所以我們需要做的只是調用 server.router.Run(),並傳入address。
在 Go 中,如果一個字段或函數的名稱以小寫字母開始,那麼它是Private,只能在其所屬的package中被存取。如果它以大寫字母開始,則它是Public,可以被任何其他package存取。
因此**server.router** 字段是Private,所以它不能從這個 api 套件的外部被訪問。
// Start HTTP server
func (server *Server) Start(address string) error {
	return server.router.Run(address)
}
接下來在根目錄建立 main.go ,做為我們Backend Server的Entry Point。
Package name: main,並且它應該有一個 main() func。
並且Backend Server 也需要於Database進行連線,於之前在db/sqlc/main_test.go 所實現的方式相似。
其中使用 db.NewStore() 函數創建一個New Store。
然後,我們通過調用 api.NewServer() 來創建一個New Server,並傳入該Store。
並透過server.Start() 代入serverAddress ,來建立一個Http Server : http://localhost:8080
另外需blank import lib/pq ,這樣才有辦法與PostgreSQL 進行溝通。
~/main.go

package main

import (
	"database/sql"
	"log"

	"github.com/Kcih4518/simpleBank_2023/api"
	db "github.com/Kcih4518/simpleBank_2023/db/sqlc"
	_ "github.com/lib/pq"
)

const (
	dbDriver      = "postgres"
	dbSource      = "postgresql://root:secret@localhost:5432/simple_bank?sslmode=disable"
	serverAddress = "0.0.0.0:8080"
)

// Entry point for the application
func main() {
	conn, err := sql.Open(dbDriver, dbSource)
	if err != nil {
		log.Fatal("cannot connect to db: ", err)
	}

	store := db.NewStore(conn)
	server := api.NewServer(store)
	err = server.Start(serverAddress)
	if err != nil {
		log.Fatal("cannot start server:", err)
	}
}
最後再Makefile 新增一個run server command:
Makefile
...

server:
    go run main.go

.PHONY: postgres createdb dropdb migrateup migratedown sqlc test
透過指令建立http server
$ make server
go run main.go
[GIN-debug] [WARNING] Creating an Engine instance with the Logger and Recovery middleware already attached.

[GIN-debug] [WARNING] Running in "debug" mode. Switch to "release" mode in production.
 - using env:	export GIN_MODE=release
 - using code:	gin.SetMode(gin.ReleaseMode)

[GIN-debug] POST   /accounts                 --> github.com/Kcih4518/simpleBank_2023/api.(*Server).createAccount-fm (3 handlers)
[GIN-debug] [WARNING] You trusted all proxies, this is NOT safe. We recommend you to set a value.
Please check https://pkg.go.dev/github.com/gin-gonic/gin#readme-don-t-trust-all-proxies for details.
[GIN-debug] Listening and serving HTTP on 0.0.0.0:8080
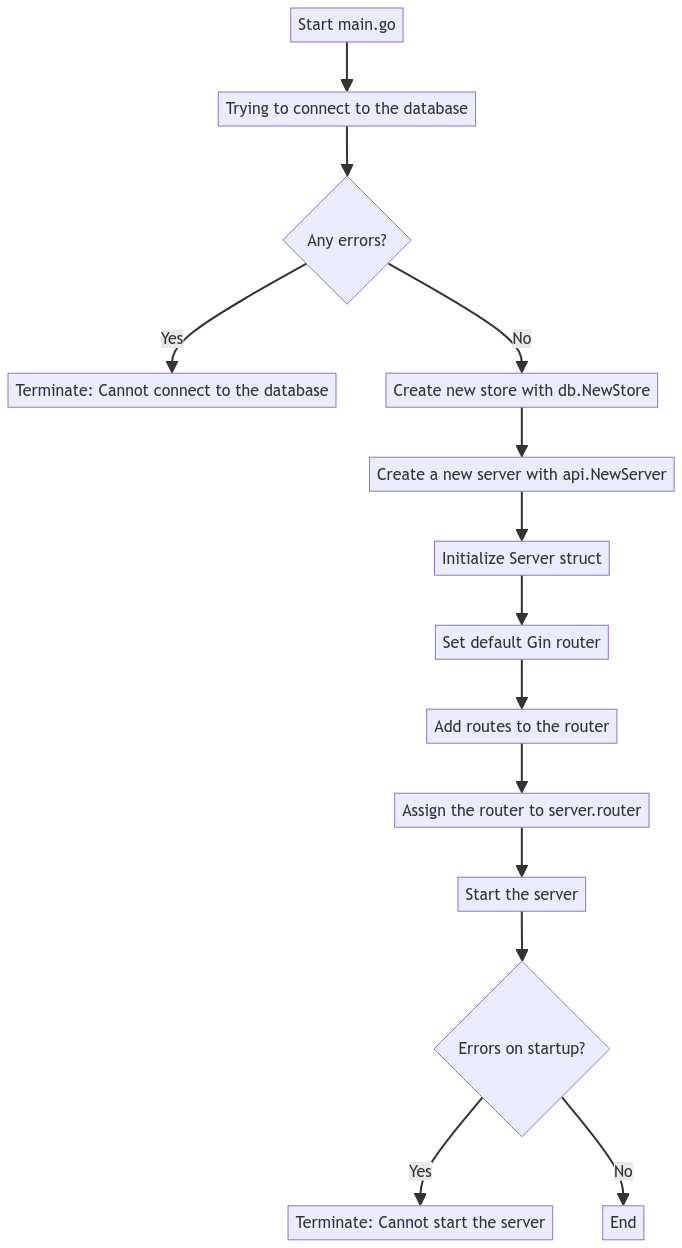
main.go 中,程序首先嘗試連接到數據庫。db.NewStore 創建一個新的存儲。api.NewServer 函數(定義在 server.go 中)來創建一個新的伺服器實例。server.go 中,NewServer 函數初始化 Server 結構體,設置預設的 Gin 路由器,添加路由,然後將路由器分配給 server.router。main.go 中,程序嘗試啟動伺服器。如果啟動過程中出現錯誤,它會終止程序。C**reate Account Request**:
POST。http://localhost:8080/accounts
選擇Body標籤,選擇Raw,並選擇JSON格式。
添加2個輸入字段:擁有者的名字(這裡使用我的名字)和貨幣(例如USD)。
{
    "owner": "Quang Pham",
    "currency": "USD"
}
點擊Send。
成功回應:
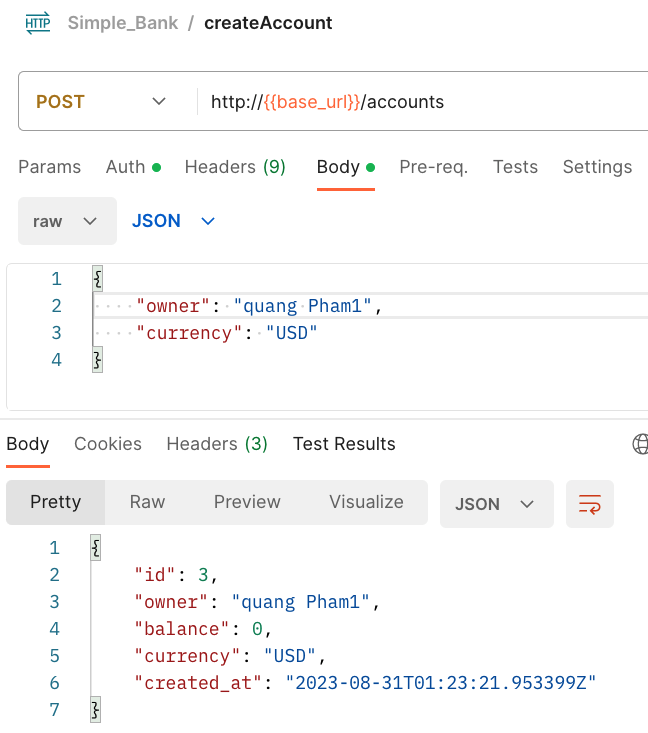
測試無效數據:
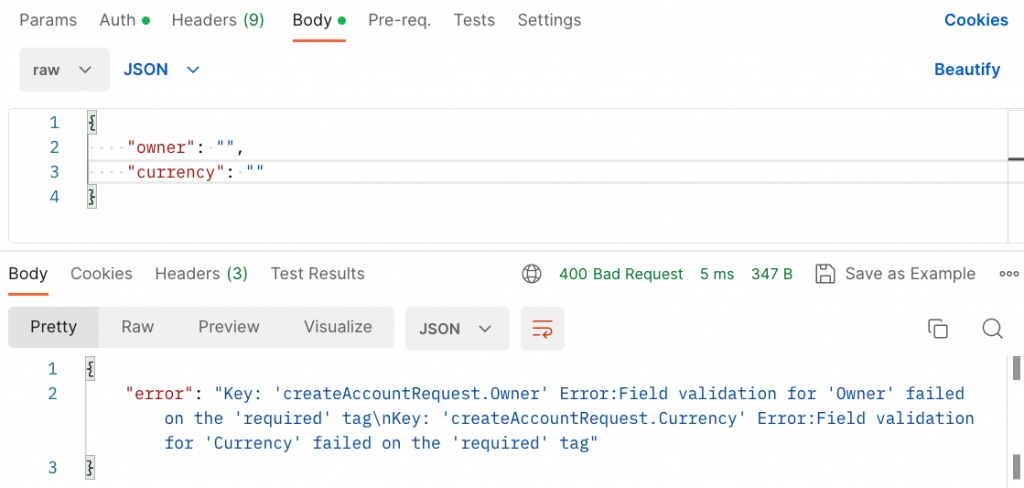
設置兩個字段為空字符串,然後點擊Send。
{
    "owner": "",
    "currency": ""
}
這次,我們收到了400 Bad Request,並收到一條說明字段是必需的錯誤消息。這個錯誤消息看起來很難讀,因為它將2個字段的驗證錯誤結合在一起。這是我們未來可能想改進的地方。
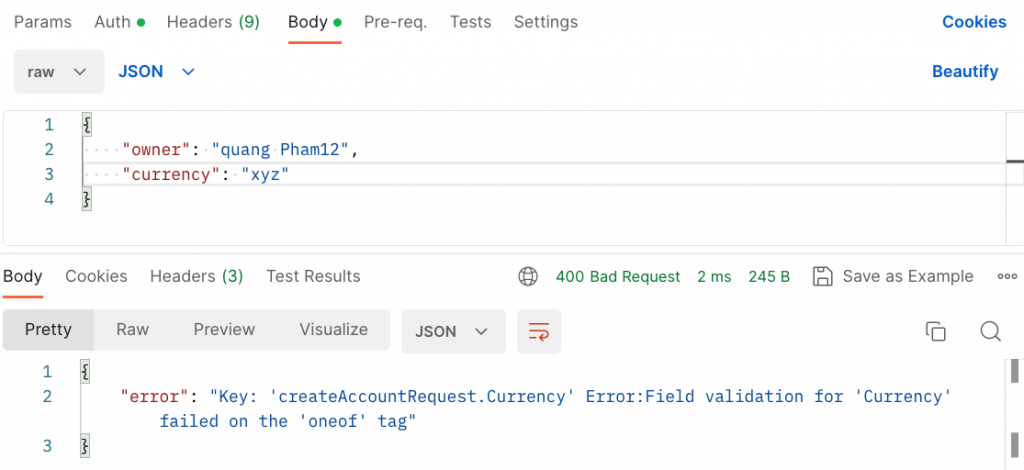
嘗試使用無效的貨幣代碼,例如xyz。
{
    "owner": "Quang Pham",
    "currency": "xyz"
}
這次,我們也收到400 Bad Request狀態碼,但錯誤消息不同。它表示在oneof標籤上的驗證失敗,這正是我們想要的,因為在代碼中我們只允許貨幣的2個可能值:USD和EUR。


 iThome鐵人賽
 看影片追技術