到昨天為止算是看完了 Maps SDK for Android 的核心功能與 Utility 工具包。今天則要帶大家來看看一個跟定位比較有關的地理圍欄功能--Geofence。
地理圍欄 Geofence (也可稱為電子圍籬)顧名思義,就是利用使用者的地理位置建立一個虛擬的圍欄,而開發者透過 API 的設定,可以在使用者進入、離開圍欄,或是在圍欄內停留一段時間時獲得通知。
在行動端的 GIS 系統上,可以作為特定行為觸發的手段,例如,如果是田野調查使用的 App,就可以設定使用者進入指定的調查範圍時跳出通知提醒,或是執行調查所需的資料更新等作業。
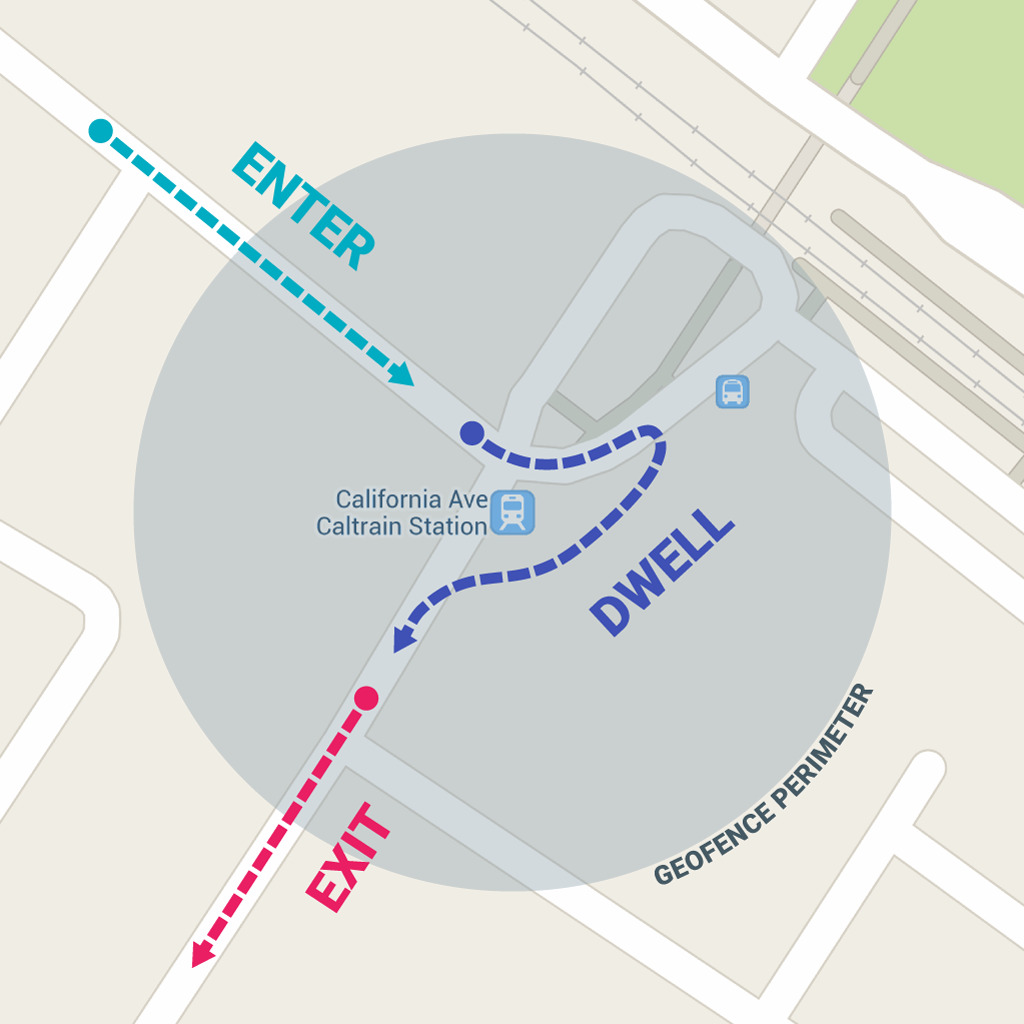
圖片來源:Google 官方文件
要設定一個完整的地理圍欄實作,概略的步驟如下:
使用 Geofence 會需要使用者的定位權限,所以 App 需要向使用者取得以下權限:
ACCESS_FINE_LOCATION:取得使用者精確位置ACCESS_BACKGROUND_LOCATION: Target SDK API 29 (Android 10) 以上必須加入BTW 這兩種權限都是要動態向使用者請求的喔!
Geofence)要新增地理圍欄,需要使用 Geofence.Builder 建立個別的圍欄。
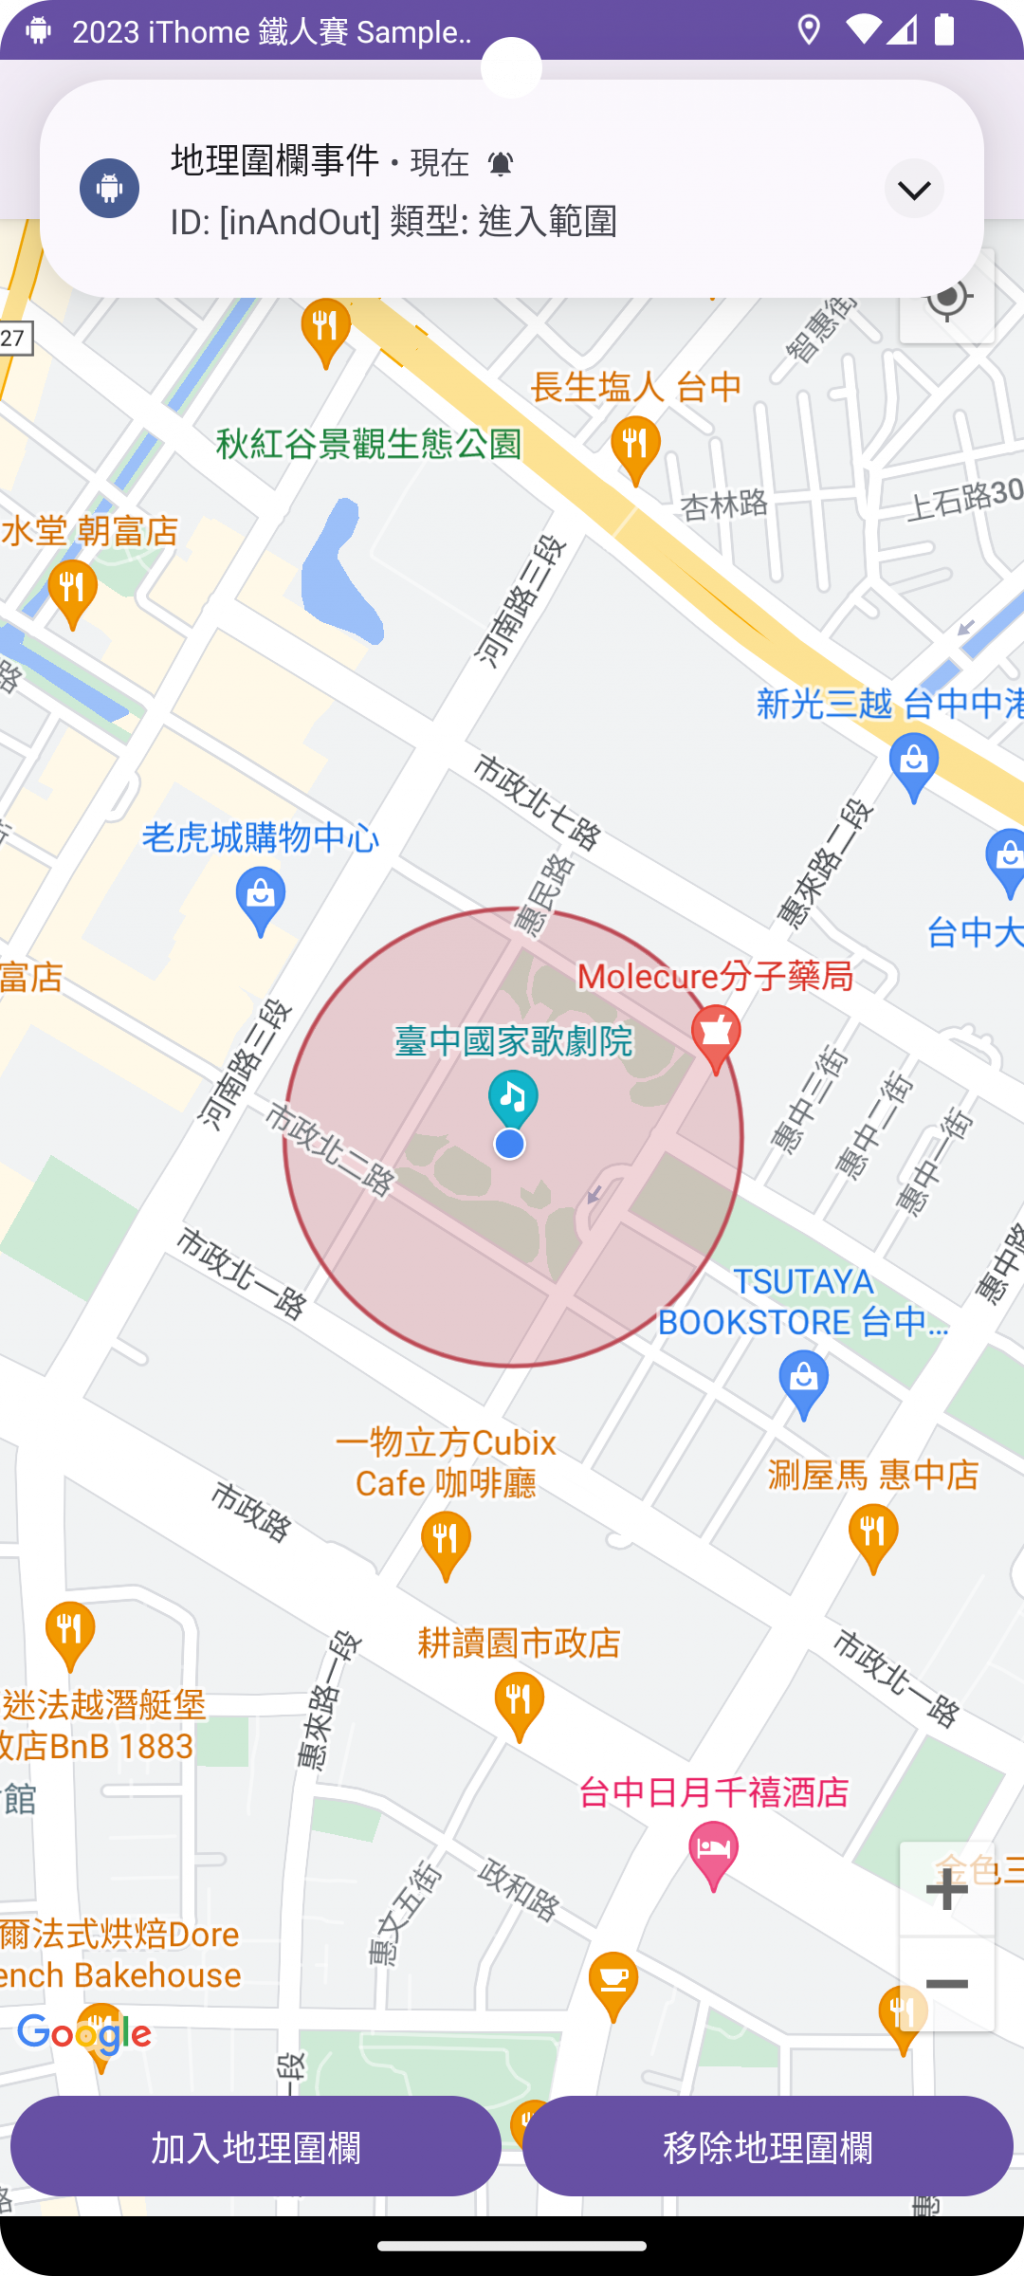
如果針對台中歌劇院的經緯度,分別針對進入、離開以及停留新增兩個圍欄。
private fun createGeofences(): List<Geofence> {
    val resultList = mutableListOf<Geofence>()

    val taichungOpera = LatLng(24.1627, 120.6403)
    val radius = 200f
    val expiredTime: Long = 1000 * 60 * 15
    val responsivenessTime: Int = 1000 * 60 * 1
    val dwellDuration = 1000 * 60 * 5

    val inAndOutGeofence = Geofence.Builder()
        // string 用來區分 Geofence
        .setRequestId("inAndOut")
        // 設定中心點(經緯度)與半徑(公尺)
        .setCircularRegion(taichungOpera.latitude, taichungOpera.longitude, radius)
        // 有效期限 (超過指定時間圍欄自動失效)
        .setExpirationDuration(expiredTime)
        // 觸發的事件類型 (進入與離開)
        .setTransitionTypes(Geofence.GEOFENCE_TRANSITION_ENTER or Geofence.GEOFENCE_TRANSITION_EXIT)
        // 通知的反應時間
        // 預設為零,即便設定最小值,系統可能會為了省電而延遲
        .setNotificationResponsiveness(responsivenessTime)
        .build()
    resultList.add(inAndOutGeofence)

    val dwellGeofence = Geofence.Builder()
        // string 用來區分 Geofence
        .setRequestId("dwell")
        // 設定中心點與半徑
        .setCircularRegion(taichungOpera.latitude, taichungOpera.longitude, radius)
        // 有效期限 (超過指定時間圍欄自動失效)
        .setExpirationDuration(expiredTime)
        // 觸發的事件類型 ()
        .setTransitionTypes(Geofence.GEOFENCE_TRANSITION_DWELL)
        // Dwell 停留的時間長度
        .setLoiteringDelay(dwellDuration)
        .build()
    resultList.add(dwellGeofence)

    return resultList
}
送出 GeofenceRequest 以註冊 Geofence。
註:在單一使用者裝置上,每個應用程式最多只能註冊 100 個地理圍欄。
GeofenceRequestsetInitialTrigger(): 用來設定圍欄新增時初始觸發條件
INITIAL_TRIGGER_ENTER 代表如果裝置已經進入範圍,需要馬上觸發。INITIAL_TRIGGER_DWELL 就可以了。這樣只有當使用者在範圍內停留達指定時間時才會觸發。這樣可減少短暫進出圍欄所觸發的事件,。/**
* 建立 Geofence Request
*
* @param geofenceList
* @return
*/
private fun createGeofenceRequest(geofenceList: MutableList<Geofence>): GeofencingRequest {
return GeofencingRequest.Builder().apply {
// 設定圍欄加入時該觸發的行為 (如果數值為零則加入時不做任何觸發行為)
setInitialTrigger(GeofencingRequest.INITIAL_TRIGGER_ENTER)
// 加入圍欄
addGeofences(geofenceList)
}.build()
}
GeofenceRequest要注意的是這裡除了 PendingIntent.FLAG_UPDATE_CURRENT外,當 Target SDK 設為 Android 12 時 PendingIntent 需要加上 FLAG_MUTABLE,不然在接收事件 Intent 時會拿不到資料。
private val geofencePendingIntent: PendingIntent by lazy {
    val intent = Intent(this, GeofenceBroadcastReceiver::class.java)
    // 為了在 addGeofences() 與 removeGeofences() 時拿到相同的 PendingIntent
    // 要使用 FLAG_UPDATE_CURRENT
    PendingIntent.getBroadcast(
        this, 0, intent,
        PendingIntent.FLAG_UPDATE_CURRENT or PendingIntent.FLAG_MUTABLE
    )
}


private fun registerGeofence(geofenceRequest: GeofencingRequest) {
    geofencingClient.addGeofences(geofenceRequest, geofencePendingIntent).run {
        addOnSuccessListener {
            Toast.makeText(this@GeofenceActivity, "Geofence 註冊成功", Toast.LENGTH_SHORT)
                .show()
        }
        addOnFailureListener {
            Toast.makeText(this@GeofenceActivity, "Geofence 註冊失敗", Toast.LENGTH_SHORT)
                .show()
        }
    }
}
BroadcastReceiver根據官方文件的說明,Geofence 事件所發出的 Intent 不應用來啟動 Activity 或 Fragment,原因是這些 Components 只應在回應使用者行為時顯示。
所以,接收 Geofence 事件 (transition) 最好的解法,就是使用 BroadcastReceiver。
GeofenceBroadcastReceiverclass GeofenceBroadcastReceiver : BroadcastReceiver() {
override fun onReceive(context: Context?, intent: Intent?) {
if (context == null) {
Log.d(TAG, "onReceive: Context is NULL")
return
}
if (intent == null) {
Log.d(TAG, "onReceive: Intent is NULL")
return
}
// 取得 Geofencing 事件
val geofencingEvent = GeofencingEvent.fromIntent(intent)
if (geofencingEvent == null) {
Log.d(TAG, "onReceive: GeofencingEvent is NULL")
return
}
if (geofencingEvent.hasError()) {
val errorMessage = GeofenceStatusCodes.getStatusCodeString(geofencingEvent.errorCode)
Log.e(TAG, errorMessage)
return
}
// 製作事件訊息
val message = generateGeofenceEventDetails(geofencingEvent)
// 收到事件發出推播
sendNotification(context, message)
}
private fun sendNotification(context: Context, message: String) {
val notificationManager = context.getSystemService(NotificationManager::class.java)
val notification = NotificationCompat.Builder(context, "${context.packageName}.geofence")
.setContentTitle("地理圍欄事件")
.setContentText(message)
.setSmallIcon(R.drawable.icons8_android_48)
.build()
notificationManager.notify(Random.nextInt(0, 20), notification)
}
private fun generateGeofenceEventDetails(geofencingEvent: GeofencingEvent): String {
val typeString = when (geofencingEvent.geofenceTransition) {
Geofence.GEOFENCE_TRANSITION_ENTER -> {
"進入範圍"
}
Geofence.GEOFENCE_TRANSITION_EXIT -> {
"離開範圍"
}
Geofence.GEOFENCE_TRANSITION_DWELL -> {
"在範圍內停留"
}
else -> {
"不知道發生什麼事..."
}
}
// 取得被 Triggered 的 Geofence 們
// 單一事件有可能觸發多個 Geofence
val triggeringGeofences = geofencingEvent.triggeringGeofences
// 取得被觸發的 Geofence 們的 ID
val idList = mutableListOf<String>()
triggeringGeofences?.forEach {
idList.add(it.requestId)
}
val message = "ID: $idList\n類型: $typeString"
return message
}
companion object {
val TAG: String = GeofenceBroadcastReceiver::class.java.simpleName
}
}
在 onReceive() 方法中,可以從 Intent 取得圍欄事件、類型、哪些圍欄被觸發。
為了讓測試接收的事件能夠在裝置上呈現,在測試的專案中,接收事件成功後會發出通知到前景。但實際上,這個發通知的行為,
可以看專案的需求去代換,像是執行背景工作。
註:
- 畫面中看到的紅圈是我另外在加入 Geofence 時,根據經緯度與半徑繪製的 Circle,以方便識別目前的定位與地理圍欄的關係。
- 在 Android 8.0 以上的版本,如果 App 在背景執行時有設定圍欄監控,則裝置每幾分鐘就會對於圍欄事件做出回應。
AndroidManifest.xml 註冊 GeofenceBroadcastReceiver<application>
<!-- 略... -->
<receiver android:name=".geofence.GeofenceBroadcastReceiver"
android:exported="false"/>
</application>
/**
 * 移除地理圍欄
 */
private fun removeGeofences() {

    val requestIdList = mutableListOf<String>()
    geofenceList.forEach {
        requestIdList.add(it.requestId)
    }

    geofencingClient.removeGeofences(requestIdList).run {
        addOnSuccessListener {
            Toast.makeText(this@GeofenceActivity, "Geofence 移除成功", Toast.LENGTH_SHORT)
                .show()

            // 移除地圖上繪製的圈圈
            uniqueId?.let {
                circleManager?.getCollection(it.toString())?.clear()
            }

            // 清空暫存的 Geofence
            geofenceList.clear()
        }
        addOnFailureListener {
            Toast.makeText(this@GeofenceActivity, "Geofence 移除失敗", Toast.LENGTH_SHORT)
                .show()
        }
    }
}
官方文件中有提供幾個最佳做法的建議,這裡歸納幾個我覺得比較實用的。
考量到使用者手機的定位精準度,建議半徑要設在 100~150 公尺左右,不然使用者定位精準度如果不夠準確,定位的偏移可能會造成圍欄事件的誤判。
註:
連上 WiFi 的情況下,定位精準度約 20~50 公尺。
鄉下地方精準度可能會擴大到數百公尺,甚至數公里。
地理圍欄屬於背景使用定位,以目前 Google Play 的政策,必須要清楚向使用者說明使用的原因。
如果使用者的使用情境會是開車經過圍欄,那這時候就會建議使用 GEOFENCE_TRANSITION_DWELL (而不是 GEOFENCE_TRANSITION_ENTER),讓只有使用者停留一段時間後再觸發事件。
官方文件也有提供事件可能沒觸發的原因,大概整理如下:
以上就是今天的地理圍欄介紹。如果對於內容或範例程式碼有問題,歡迎留言討論~
謝謝大家的耐心閱讀,明天見啦~