昨天幫 ALB 加上 CDN 但還沒開啟 cache,今天要來實驗一下 CDN 的 cache 機制~
cloudfront distribution 的 cache 相關參數是透過 cache policy 設定的,我們會先新增一個 cache policy、設置相關參數,接著在 distribution 多加一個 behavior,開啟某個 path pattern 的 cache 功能。(本日程式碼)
cloudfront cache policy 的 resource 是 aws_cloudfront_cache_policy :
resource "aws_cloudfront_cache_policy" "cached" {
  name        = "my-app-caching"
  default_ttl = 600
  max_ttl     = 86400
  min_ttl     = 60
  parameters_in_cache_key_and_forwarded_to_origin {
    cookies_config {
      cookie_behavior = "none"
    }
    headers_config {
      header_behavior = "none"
    }
    query_strings_config {
      query_string_behavior = "none"
    }
    enable_accept_encoding_brotli = true
    enable_accept_encoding_gzip   = true
  }
}
default_ttl 、max_ttl 跟 min_ttl 是設定 cloudfront cache 的 expire time,單位是秒。打開壓縮相關的支援,enable_accept_encoding_brotli 跟 enable_accept_encoding_gzip 設為 true。其他 cache key 相關的設定先不設。
先在 Laravel 加一個 api /api/demo ,讓它回傳 Hello Laravel 的字串,用這個 api 當作要 cache 的 api 示範。
接著在 terraform aws_cloudfront_distribution.cdn 裡增加一個 ordered_cache_behavior block:
ordered_cache_behavior {
  allowed_methods          = ["HEAD", "GET"]
  cached_methods           = ["HEAD", "GET"]
  path_pattern             = "/api/demo"
  target_origin_id         = aws_lb.alb.dns_name
  viewer_protocol_policy   = "redirect-to-https"
  cache_policy_id          = aws_cloudfront_cache_policy.cached.id
  origin_request_policy_id = data.aws_cloudfront_origin_request_policy.all_viewer.id
}
path_pattern 設定 /api/demo ,表示當 request 是要到這個 path 時,會使用這個 behavior。path pattern 除了可以寫定一個 path 之外,也可以用 wildcard 如 * ,詳細設定方式可參考 文件 。cache_policy_id 使用剛剛新增的 cache policy 的 id。其他部份跟 default behavior 一樣。
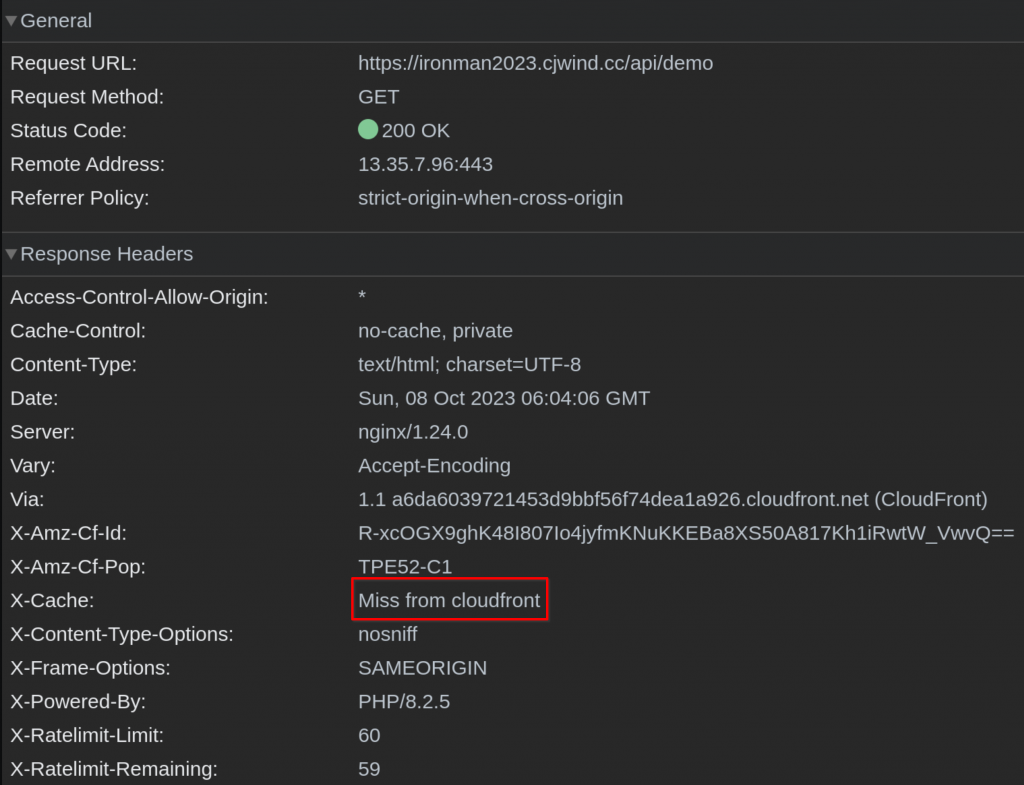
terraform apply 後(cdn distribution 通常需要幾分鐘),就能用瀏覽器 access /api/demo 看 cloudfront cache 的作用~
這是第一次連,沒有在 cloudfront hit 到 cache:
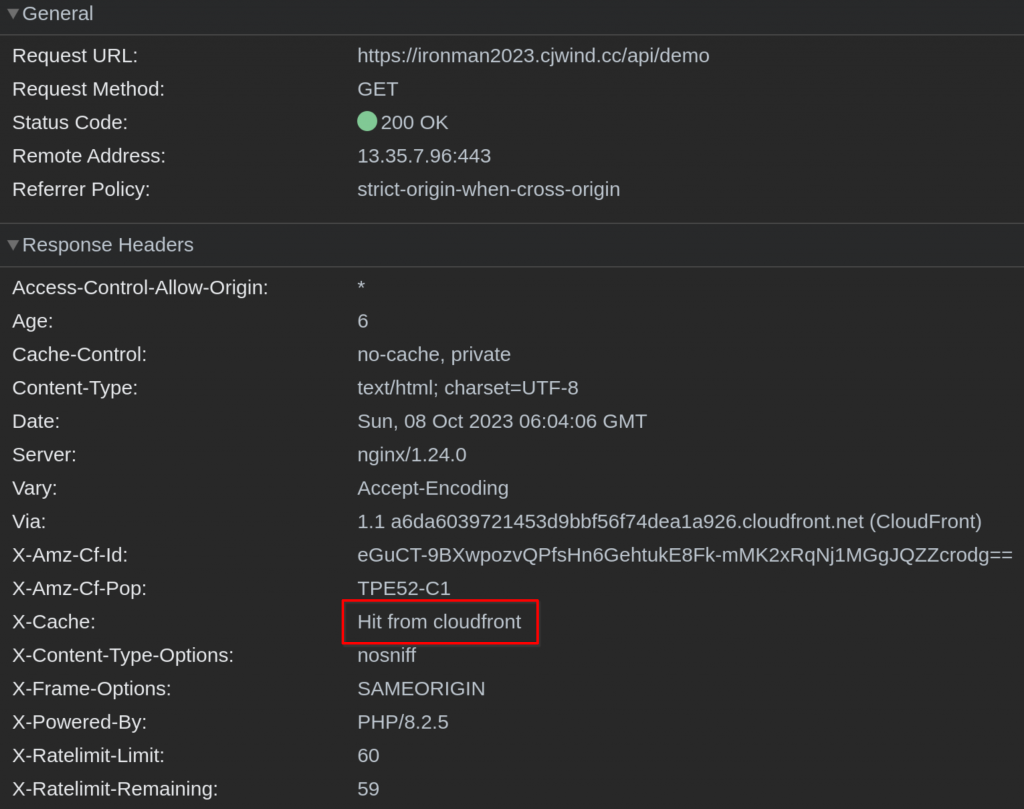
第二次可以看到有 hit 到 cloudfront cache 了:
這就是最基本的 cloudfront distribution caching 設定,其他更複雜的 cache 參數設定就要依據 application 的需求設置。
cloudfront distribution 有 cache 就有「什麼時候要清掉舊資料 cache」的問題,顯而易見的,在 deploy Laravel 後要清 cdn cache,因為可能新 container 產生的結果已經跟 cdn cache 不同,這時候我們應該要主動清理 cdn cache 以免使用者拿到舊資料。
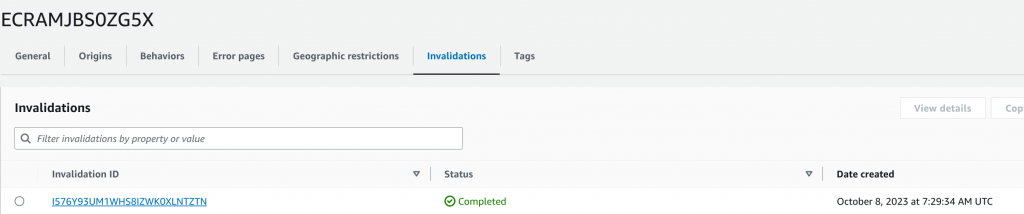
cloudfront distribution 清理 cache 的動作稱為 Invalidation,可以從網頁也可以透過 API 等方式進行,下圖是網頁介面:

想要清 cache 的時候就建立一個 invalidation,它會讓我們選擇要清 cache 的 path,設定 path 後建立 invalidation,cloudfront 就會開始清相關的 cache。因為 cloudfront 是 global 層級的服務,完成操作會需要幾分鐘。
既然是 deploy 後要清理 cdn cache,最適合觸發 cache 清理動作的地方當然是 codepipeline 啦~我們要在 codepipeline 的 deploy stage 後面加一個 stage 來清理指定的 cloudfront distribution。要用 codepipeline 做清 cdn cache 的動作當然不可能用網頁……我們會用 AWS 的 lambda function 來實作~
Lambda function 是 AWS 一個 serverless 的服務,讓我們可以不用管執行的 server 與環境等等 infrastructure,直接在 AWS 上執行 function。Lambda function 支援的執行環境有 .Net、Go、Java、Python 跟 Ruby,我們只要把 function 寫好丟上去就能直接執行了!當然有費用囉~
我們會用 python 配合 AWS SDK 來寫 invalidate cloudfront distribution 的程式,把這個 python 程式丟上 Lambda function,再由 CodePipeline trigger 執行,達到我們想在 deploy ECS 後清 cdn cache 的流程。
開始實作吧~
首先新增讓 lambda function 放 log 的 cloudwatch log group:
resource "aws_cloudwatch_log_group" "invalidate_cdn_cache_lambda" {
  name = "/aws/lambda/my-app-invalidate-cdn-cache"
}
接著新增要給 lambda function 用的 IAM role 及 policy,讓 lambda function 可以 invalidate cloudfront distribution cache、寫 log 跟回報 codepipeline 結果:
resource "aws_iam_role" "invalidate_cdn_cache_lambda" {
  name = "my-app-invalidate-cdn-cache-role"

  assume_role_policy = jsonencode({
    Version = "2012-10-17",
    Statement = [
      {
        Action = "sts:AssumeRole",
        Principal = {
          Service = "lambda.amazonaws.com"
        },
        Effect = "Allow",
      }
    ]
  })
}

resource "aws_iam_role_policy" "invalidate_cdn_cache_lambda" {
  name = "my-app-invalidate-cdn-cache-policy"
  role = aws_iam_role.invalidate_cdn_cache_lambda.id

  policy = jsonencode({
    Version = "2012-10-17"
    Statement = [
      {
        Action = [
          "logs:CreateLogGroup",
        ]
        Effect   = "Allow"
        Resource = "arn:aws:logs:${var.region}:${var.account_id}:*"
      },
      {
        Effect = "Allow"
        Action = [
          "logs:CreateLogStream",
          "logs:PutLogEvents"
        ]
        Resource = "arn:aws:logs:${var.region}:${var.account_id}:log-group:${aws_cloudwatch_log_group.invalidate_cdn_cache_lambda.name}:*"
      },
      {
        Effect = "Allow"
        Action = [
          "codepipeline:PutJobFailureResult",
          "codepipeline:PutJobSuccessResult",
          "cloudfront:CreateInvalidation"
        ]
        Resource = "*"
      }
    ]
  })
}
再來是用 python 寫的 invalidate cloudfront distribution cache 的 function,把它存成 invalidate_cdn_cache.py :
import json
import boto3

code_pipeline = boto3.client("codepipeline")
cloud_front = boto3.client("cloudfront")

def lambda_handler(event, context):
    job_id = event["CodePipeline.job"]["id"]
    try:
        user_params = json.loads(
            event["CodePipeline.job"]
                ["data"]
                ["actionConfiguration"]
                ["configuration"]
                ["UserParameters"]
        )
        cloud_front.create_invalidation(
            DistributionId=user_params["distributionId"],
            InvalidationBatch={
                "Paths": {
                    "Quantity": len(user_params["objectPaths"]),
                    "Items": user_params["objectPaths"],
                },
                "CallerReference": event["CodePipeline.job"]["id"],
            },
        )
    except Exception as e:
        code_pipeline.put_job_failure_result(
            jobId=job_id,
            failureDetails={
                "type": "JobFailed",
                "message": str(e),
            },
        )
    else:
        code_pipeline.put_job_success_result(
            jobId=job_id,
        )
最後是壓縮 python 程式的 data source 以及 lambda function resource:
data "archive_file" "invalidate_cdn_cache" {
  type        = "zip"
  source_file = "invalidate_cdn_cache.py"
  output_path = "invalidate_cdn_cache.zip"
}

resource "aws_lambda_function" "invalidate_fe_cdn_cache" {
  filename         = "invalidate_cdn_cache.zip"
  function_name    = "my-app-invalidate-cdn-cache"
  role             = aws_iam_role.invalidate_cdn_cache_lambda.arn
  handler          = "invalidate_cdn_cache.lambda_handler"
  source_code_hash = data.archive_file.invalidate_cdn_cache.output_base64sha256
  runtime          = "python3.10"
  timeout          = 300
}
這邊我們用到新 module archive 來幫 source code 做壓縮,所以 plan 或 apply 前要先安裝 archive module:
$ terraform init -upgrade
aws_lambda_function resource 的 handler 要設定程式的執行入口,在 python 的格式是 FILENAME.FUNCTION_NAME ,我們的 python 是 invalidate_cdn_cache.py 、裡面要給 lambda 使用的 function 是 lambda_handler ,所以 handler 是 "invalidate_cdn_cache.lambda_handler" 。source_code_hash 參數是用來決定要不要更新 lambda function 的,它是由 invalidate_cdn_cache.zip 經過 base64 encode 後再算 SHA256 hash 得到的。如果 python 程式碼有改動,這個 hash 值就會改變,也就會觸發 lambda resource 的更新。timeout 是這個 lambda function 最久可以執行多長時間,單位是秒。因為 invalidate distribution cache 需要幾分鐘,所以建議設長一點,否則可能出現實際上 invalidation 有成功,但因為超過 timeout 被認為 lambda function 執行失敗導致 codepipeline 失敗的 false alarm。
最後是在 Codepipeline 的最後增加一個 AfterDeploy stage,裡面包含 invalidate cloudfront distribution 的 action:
stage {
  name = "AfterDeploy"
  action {
    category = "Invoke"
    configuration = {
      FunctionName = aws_lambda_function.invalidate_fe_cdn_cache.function_name
      UserParameters = jsonencode(
        {
          distributionId = aws_cloudfront_distribution.cdn.id
          objectPaths    = ["/*"]
        }
      )
    }
    input_artifacts  = []
    name             = "InvalidateCDNCache"
    output_artifacts = []
    owner            = "AWS"
    provider         = "Lambda"
    region           = var.region
    run_order        = 1
    version          = "1"
  }
}
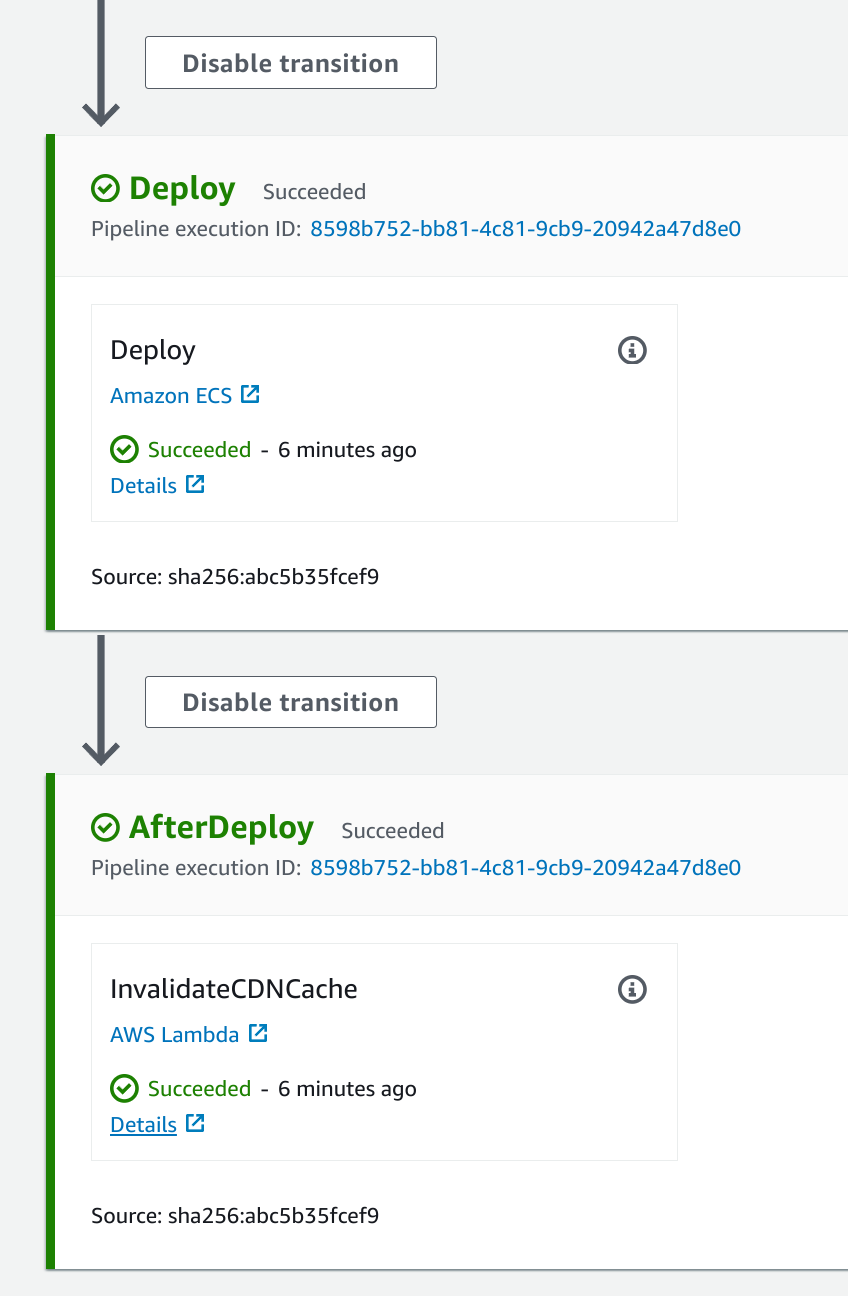
apply resource 上去後,可以在 codepipeline 最後多了一個 stage,每次 deploy 後都會清理 cdn 的 cache:
執行 codepipeline 後,也可以在 cloudfront distribution 裡看到執行完成的 invalidation: