
Redux 是一個用於狀態管理的第三方 Library,它在概念上類似於使用 Context API + useReducer,因此,如果已經了解 Context API 跟 useReducer,在 Redux 的學習上會有更好的理解。
首先,讓我們安裝 redux。
npm i redux
安裝完成後,在 src 資料夾底下建立一支 store.js,並將其引入到 index.js,方便我們查看資料狀態。
import React from "react";
import ReactDOM from "react-dom/client";
import App from "./App";
import "./store.js";

const root = ReactDOM.createRoot(document.getElementById("root"));
root.render(
  <React.StrictMode>
    <App />
  </React.StrictMode>
);
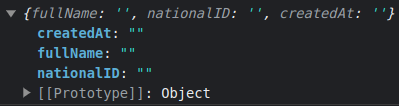
在 store.js 中定義初始狀態 initialState 以及 reducer 函式,這邊會發現與 useReducer 非常類似。
const initialState = {
  fullName: "",
  nationalID: "",
  createdAt: "",
};

function reducer(state = initialState, action) {
  switch (action.type) {
    case "customer/createCustomer":
      return {
        ...state,
        fullName: action.payload.fullName,
        nationalID: action.payload.nationalID,
        createdAt: action.payload.createdAt,
      };
    case "customer/updateName":
      return {
        ...state,
        fullName: action.payload.fullName,
      };
    default:
      return state;
  }
}
接著,從 redux 中引入 createStore 這個函式,這邊可以看到 createStore 被標示為已淘汰,但作為學習目的還是可以的。

import { createStore } from "redux";
將 reducer 傳入 createStore 函式內,並宣告一個變數 store 接收。
const store = createStore(reducer);
目前的完整程式碼如下:
import { createStore } from "redux";

const initialState = {
  fullName: "",
  nationalID: "",
  createdAt: "",
};

function reducer(state = initialState, action) {
  switch (action.type) {
    case "customer/createCustomer":
      return {
        ...state,
        fullName: action.payload.fullName,
        nationalID: action.payload.nationalID,
        createdAt: action.payload.createdAt,
      };
    case "customer/updateName":
      return {
        ...state,
        fullName: action.payload.fullName,
      };
    default:
      return state;
  }
}

const store = createStore(reducer);
有了 store 之後,我們就可以透過 dispatch 方法並傳入 action(包含 type 和 playload 屬性)來修改資料狀態。
store.dispatch({
  type: "customer/createCustomer",
  payload: {
    fullName: "Jim",
    nationalID: "L124512451",
    createdAt: new Date(),
  },
});
使用 getState 方法來查看狀態,可以看到狀態已經順利的更新。
console.log(store.getState());

通常,我們不會手動撰寫 action,而是透過 action creators 函式來產生。
function createCustomer(fullName, nationalID) {
  return {
    type: "customer/createCustomer",
    payload: {
      fullName,
      nationalID,
      createdAt: new Date(),
    },
  };
}

function updateName(fullName) {
  return {
    type: "customer/updateName",
    payload: fullName,
  };
}
有了 action creators 函式之後,就可以在 dispatch 的時候調用它們。
store.dispatch(createCustomer("Jim", "L124512451"));
當需要管理多個資料狀態時,可以將 store 拆成不同的 slice 切片(記得將 reducer 和 action creators 函式導出)。
// customerSlice.js
const initialStateCustomer = {
  fullName: "",
  nationalID: "",
  createdAt: "",
};

export default function customerReducer(state = initialStateCustomer, action) { ... }

export function createCustomer(fullName, nationalID) { ... }

export function updateName(fullName) { ... }
// accountSlice.js
const initialStateAccount = {
  balance: 0,
  loan: 0,
  loanPurpose: "",
};

export default function accountReducer(state = initialStateAccount, action) { ... }

export function deposit(amount) { ... }

export function withdraw(amount) { ... }

export function requestLoan(amount, purpose) { ... }

export function payLoan() { ... }
在 store.js 中使用 combineReducers 這個函式結合多個 reducer。
import { combineReducers, createStore } from "redux";
import accountReducer from "./accountSlice";
import customerReducer from "./customerSlice";
const rootReducer = combineReducers({
account: accountReducer,
customer: customerReducer,
});
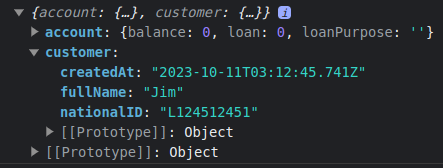
const store = createStore(rootReducer);
在執行 dispatch 的時候不要忘記引入相對應的 action creators 函式。
import { createCustomer } from "./customerSlice";

store.dispatch(createCustomer("Jim", "L124512451"));
console.log(store.getState());
在前面,我們已經安裝了 redux,接著安裝 react-redux 將其和 React 做結合。
npm i react-redux
首先,將 store.js 裡面的 store 導出。
import { combineReducers, createStore } from "redux";
import accountReducer from "./accountSlice";
import customerReducer from "./customerSlice";

const rootReducer = combineReducers({
  account: accountReducer,
  customer: customerReducer,
});

const store = createStore(rootReducer);

export default store;
在 index.js 中,從 react-redux 中引入 Provider 元件。
import { Provider } from "react-redux";
將 App 元件放入 Provider 元件中,並傳遞 store。
import React from "react";
import ReactDOM from "react-dom/client";
import App from "./App";
import store from "./store.js";
import { Provider } from "react-redux";
import "./index.css";

const root = ReactDOM.createRoot(document.getElementById("root"));
root.render(
  <React.StrictMode>
    <Provider store={store}>
      <App />
    </Provider>
  </React.StrictMode>
);
在需要使用 store 狀態的元件中,可以使用 react-redux 提供的 useSelector 來讀取 store 的狀態。
import { useSelector } from "react-redux";

function Customer() {
  const customer = useSelector((state) => state.customer);
  console.log(customer);

  return <h2>👋 Welcome, %NAME%</h2>;
}
由於目前的 customer 是一個物件,我們可以將需要的值解構出來,或者只取出我們需要的 fullName。
function Customer() {
  // 1. 從 customer 中解構出需要的 fullName
  const { fullName } = useSelector((state) => state.customer);
  // 2. 只讀取 fullName
  const fullName = useSelector((state) => state.customer.fullName);

  return <h2>👋 Welcome, {fullName}</h2>;
}
在讀取完 store 的狀態後,讓我們嘗試更新狀態,首先,從 react-redux 中引入 useDispatch,並將其賦予給變數 dispatch。
import { useSelector, useDispatch } from "react-redux";

function Customer() {
  const fullName = useSelector((state) => state.customer.fullName);
  const dispatch = useDispatch();

  return (
    <>
      <h2>👋 Welcome, {fullName}</h2>
      <button>Add new customer</button>
    </>
  );
}
綁定一個事件處理函式 handleCreateCustomer 到 button 上。
import { useDispatch, useSelector } from "react-redux";

function Customer() {
  const fullName = useSelector((state) => state.customer.fullName);
  const dispatch = useDispatch();

  function handleCreateCustomer() { ... }

  return (
    <>
      <h2>👋 Welcome, {fullName}</h2>
      <button onClick={handleCreateCustomer}>Add new customer</button>
    </>
  );
}
最後,執行 dispatch 並傳入 action 來更新 store 狀態,不要忘記引入 action creators 函式 createCustomer。
import { useDispatch, useSelector } from "react-redux";
import { createCustomer } from "./customerSlice";

function Customer() {
  const fullName = useSelector((state) => state.customer.fullName);
  const dispatch = useDispatch();

  function handleCreateCustomer() {
    dispatch(createCustomer("Jim", "L124512451"));
  }

  return (
    <>
      <h2>👋 Welcome, {fullName}</h2>
      <button onClick={handleCreateCustomer}>Add new customer</button>
    </>
  );
}
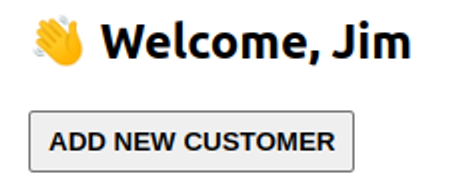
可以看到畫面順利更新了!
在一開始的時候,我們建立了初始狀態以及 reducer 函式,並透過 action creators 函式來執行 dispatch 的 action 操作,當有不同的狀態需要管理的時候,可以嘗試將其分成不同的切片,方便各自維護不同的狀態,最後,我們安裝了 react-redux 來將 Redux 跟 React 應用程式做結合。


 iThome鐵人賽