到目前為止,整個 astro 專案都只是在本地的伺服器上運行而已。而今天要來分享的內容即是:如何將 astro 專案發佈到為 GitHub Pages。有兩種方式:官方文件採用的 GitHub Actions 或是比較傳統的打包後手動更新。
對於要將 astro 專案部署為 GitHub Pages 且網址為 <YOUR_USERNAME>.github.io 型態的朋友,基本上你不需要在這邊追加太多內容,設定一下 site 即可:
import { defineConfig } from 'astro/config';

export default defineConfig({
  compressHTML: true,
  site: 'https://<YOUR_USERNAME>.github.io/',
});
GitHub Actions 簡單來說就是:根據開發者放在 repo .github/workflows 資料夾中的 .yaml 腳本來執行一系列工作。開發者可以在 .yaml 中指定工作被觸發的條件(比如 main 分支有合併事件時),以及一系列執行內容(比如「先打包專案」再「將打包內容部署至 GitHub Pages」)。
以官方食譜來說,該份 deploy.yml 在做的事情翻成白話文就是:
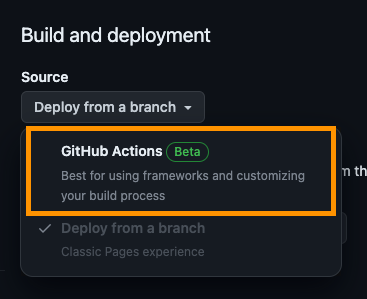
git push 發生在 main 分支時,就要執行這份 .yml 內列出的工作permissions)main 分支的內容執行工作(jobs) build 與 deploy,最終的 GitHub Pages 是根據 main 分支建立的在專案建立 .github/workflows/deploy.yml 後,需調整 repo 設定,指定使用 GitHub Actions 作為 GitHub Pages 的來源。如下圖:

完成以上設定後,每次 git push 到 main 分支時,都會自動開啟 GitHub Pages 部署流程。你的網站現在會自動更新了。
你想要做一個能自主決定部署與否的人,那麽,請在 Makefile 新增以下腳本:
.PHONY: deploy
deploy: build
	cd dist && \
	git init && \
	git remote -v | grep -w origin || git remote add origin <REPO URL> && \
	git branch -m gh-pages && \
	git add -A && \
	git commit -m "[feat] deploy as gh-pages `date +'%Y-%m-%d %H:%M:%S'`" && \
	git push -u origin gh-pages -f
以上內容翻譯為白話文為:
make deploy 時,會先連帶執行 make build
./dist 資料夾(此為 astro 預設的輸出資料夾名稱,如果你在 astro.config.ts 中修改了 outDir 內容,這裡需連動更新)./dist 資料夾中啟動 git 並將所有的內容 commit 起來,訊息為 [feat] deploy as gh-pages YYYY-MM-DD HH:mm:ss
gh-pages 的分支記得將 repo 的 GitHub Pages branch 指向 gh-pages,如下圖:

這樣就變成「只有在每次執行 make deploy 時,才會進行部署流程」了。
astro 預設的 build.assets 輸出資料夾為 _astro(參考官方文件)。如果沒有透過 astro.config.ts 更動資料夾名稱設定,請記得在專案的 ./public 中新增一個名為 .nojekyll 的空檔案,讓 astro 在打包時將該檔案一併複製到 dist 中。
追加此 .nojekyll 檔案能讓 GitHub Pages 正常取得「底線開頭資料夾」中的內容。參考:
Bypassing Jekyll on GitHub Pages: This should only be necessary if your site uses files or directories that start with underscores since Jekyll considers these to be special resources and does not copy them to the final site.
或是直接指定無底線的 build.assets 名稱來避免此問題。
現在你的專案已經公諸於世了。明天會來介紹如何為 astro 專案設定 sitemap(將網站內容提供給搜尋引擎爬蟲)以及 RSS(讓讀者可以訂閱內容)。
感謝你今天的閱讀。
本文同步發佈於普通文組 2.0
