
本次的程式碼與目錄結構可以參考 FastAPI Tutorial : Day31 branch
我們先想個情境:
假設我們有 將音檔轉成文字 和 物件偵測 這些服務
需要用戶上傳 media file 後,由後端處理
但是這些服務 都需要花費一定的時間 來處理
可能需要 數10秒 或 數分鐘 來處理
那我們的 Backend API 要如何處理這些服務呢?
STT 的服務可拆解成以下步驟:
這邊的 speech_recognition 是一個 Python 的 library
pypi : SpeechRecognition
單跑一次 sample1.mp4 的轉檔和 Speech Recognition
大概需要 11.5 秒 
這邊先建立 /api/stt.py
from fastapi import APIRouter
from fastapi import File, UploadFile
import aiofiles
from uuid import uuid4

from setting.config import get_settings
from jobs.stt import get_text_from_video

settings = get_settings()

router = APIRouter(
    tags=["speech to text"],
    prefix="/stt",
)
並加上印出 response time 的 middleware main.py
def create_message_queue_app():

    app = FastAPI()

    # ...

    @app.middleware("http")
    async def add_process_time_header(request: Request, call_next: callable):
        start_time = time.time()
        response = await call_next(request)
        process_time = (time.time() - start_time)
        formatted_process_time = '{0:.4f}'.format(process_time)
        logger.info(f"{request.method} {request.url} {formatted_process_time}s")
        response.headers["X-Process-Time"] = formatted_process_time
        return response

最基本的解法:
將所有事情都丟給同一個 API 去處理
/api/stt.py
# ...
@router.post("/native")
async def native_processing(file: UploadFile = File(...)):
    save_path = settings.upload_path

    ext_name = file.filename.split(".")[-1]
    hash_name = uuid4().hex[:8]

    out_file_path = f"{save_path}/{hash_name}.{ext_name}"
    async with aiofiles.open(out_file_path, 'wb') as out_file:
        content = await file.read()  # async read
        await out_file.write(content)  # async write

    text = get_text_from_video(video_path=out_file_path,uuid=hash_name)

    return {"job_id": hash_name, "text": text}
可以看到這個 API 完成了:上傳檔案、轉檔、送到 speech_recognition、回傳結果
而 get_text_from_video 是主要將 media file 轉成 wav file 並送到 speech_recognition 的 function
這邊我們先將上傳的檔案存到 local 做 demo
實際上應該要存到 S3 或是其他的 storage
我們再額外寫一個 muti-process 的 benchmark script /tests/mq/parallel_upload.py
import subprocess
from multiprocessing import Pool
import time

file_name = "sample1.mp4"
url = "http://0.0.0.0:8001/stt/native"

urls = [url for _ in range(5) ]

def upload(url):
    subprocess.call(['curl', '-H', 'Content-Type: multipart/form-data', '-X', 'POST', '-F', f"file=@{file_name};type=video/mp4", url])

if __name__ == '__main__':
    start = time.time()

    agents = 5
    with Pool(processes=agents) as pool:
        result = pool.map(upload, urls )
    print(result)

    end = time.time()
    print(f"\nTime taken: {end - start}")
執行 python3 parallel_upload.py 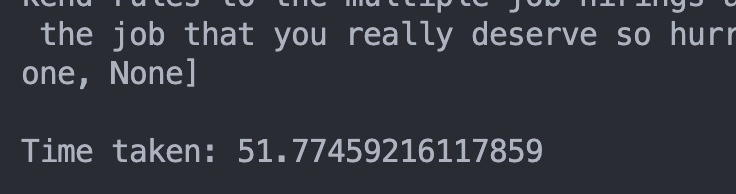
同時發出 5 個 request,等全部都收到 response 的總時間
可以看到總共花費了快 50 秒才收到所有的 response
由 logging 可以看到
一開始的 response time 都是 20 秒左右
但是後面的 response time 都接近 40 到 50 秒 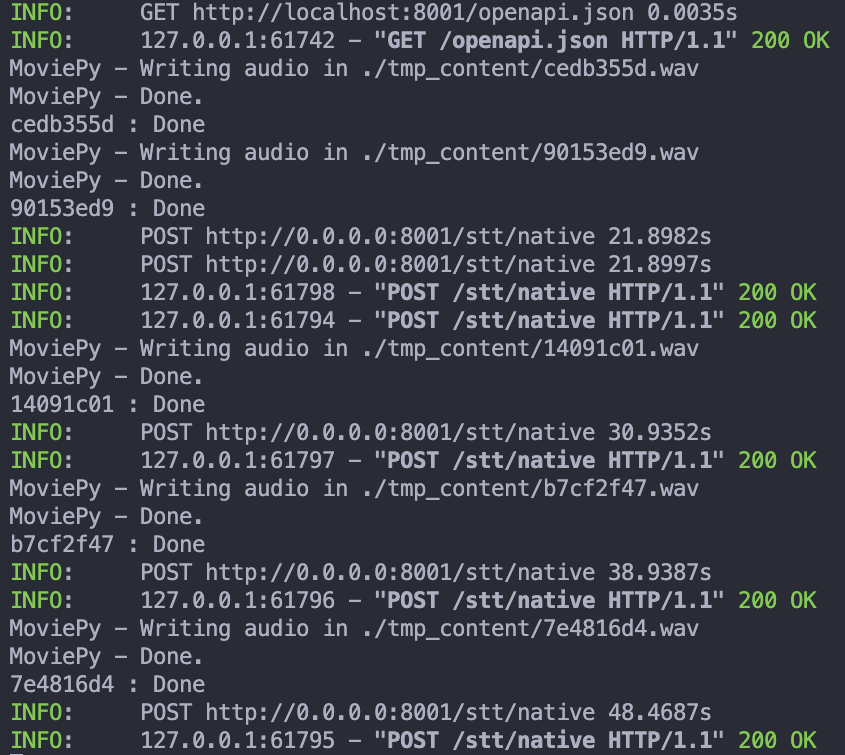
這是因為以 Uvicorn 最為 FastAPI 的 server
而 Uvicorn 是以 Muti-threading 的方式來處理 request 的
這代表
當我們發出 request 時,FastAPI 會將這個 request 丟給一個 thread 去處理
而這個 thread 會一直處理這個 request 直到處理完畢
所以當我們發出多個 request 時,會有多個 thread 同時在處理這些 request
但是這些 thread 都是在同一個 process 裡面
所以當我們的 CPU 資源不足時,這些 thread 會開始競爭 CPU 資源
這會導我們在處理 CPU bound (需要大量 CPU 資源) 的工作時
執行效率會變得很差
那我們要如何解決這個問題呢?
我們可以先將這些 需要大量 CPU 資源的 job 都丟到 message queue 中
再由 worker 來處理這些 job
當 worker 處理完畢後
就可以由後端的 API 撈取結果
架構圖如下: 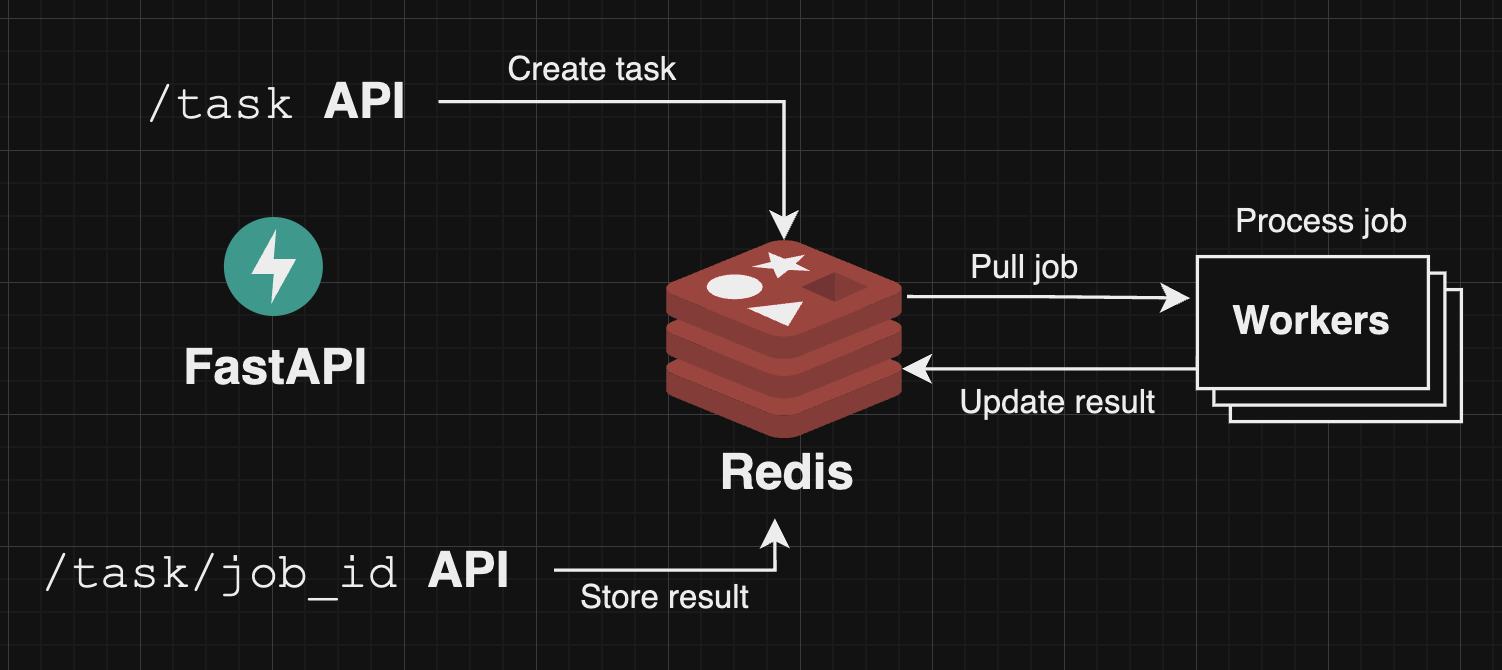
後端將「 job 丟到 message queue 」 的實作可以看成
把一個 message 丟到 message queue 中
而 message 包含了這個 job 的資訊
以我們的情境來說: 就是 media file 的路徑
以 ML Application 來說: 可能是要跑的 model 和 data resource
這邊的 worker 其實只是一個 process
而這些 worker 會從 message queue 中取得 job 來處理
由一個完整的 process 來處理一個 job 當然會比由後端的 muti-threading 來處理快
( 剛剛在上面有提到 )
所以 workers 可以看成 一堆獨立的 process
而這些 process 會從 message queue 中取得 job 資訊來跑 CPU bound 的工作
我們可以透過 Redis 作簡易的 message queue
在 Redis 5.0 之後,Redis 有提供 Stream 的資料結構
Redis 原本就有提供 Pub/Sub 的功能
但是因為 Pub/Sub 沒有提供資料持久化
當 Redis 當機,就會所有 message 都會丟失
而 Stream 解決 Redis Pub/Sub 的問題
提供資料持久化的功能
並提供 :
我們這邊使用 rq 來實作 message queue
而 rq 是一個 輕量級 的 Python job queue
rq 提供了 worker 和 job queue 的封裝
只需要將 job 丟到 job queue 中
等待 worker 來處理
我們可以透過 rq 的 Queue 來建立一個 job queue
from redis import Redis

from rq import Queue

redis_connection = Redis.from_url(settings.redis_url)
task_queue = Queue('rq',connection=redis_connection)
可以使用 Queue.enqueue 來將 job 丟到 job queue 中
這邊的 job 是指一個要給 worker 的 function
並可以額外設定:
job:Job = task_queue.enqueue(
    get_text_from_video,
    video_path,
    hash_name,
    on_success=Callback(report_success),
    ttl=180 # 3 minutes
)
而 enqueue 會回傳一個 Job 物件
可以再使用 Job.get_id() 來取得 job 的 id
回傳給前端,讓前端可以透過這個 id 來查詢 job 的狀態
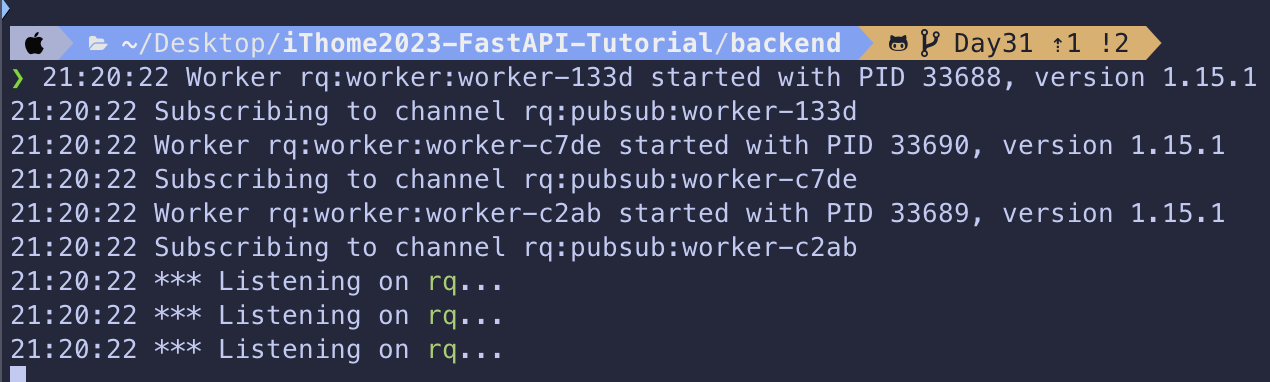
我們可以直接在 command line 中執行 rq worker QUEUE_NAME
來啟動一個 worker 從 QUEUE_NAME 中取得 job 來處理 
但是在 MacOS 中,會有一個 fork() 的問題 
在這邊查到解決辦法 :rq macos issue about
fork()
需要用:
export NO_PROXY=*
export OBJC_DISABLE_INITIALIZE_FORK_SAFETY=YES
如果要指定 job 在什麼時候執行
可以使用 enqueue_at 或 enqueue_in
並且 worker 需要加上 --with-scheduler 來啟動 scheduler
enqueue_at: 指定 job 在什麼時間執行,用datetime來設定enqueue_in: 指定 job 在多久後執行,用timedelta來設定
rq : scheduling
所以這邊我們寫了 manage_worker.py 來 管理 worker
因為在 MacOS 中,環境需要設定 NO_PROXY 和 OBJC_DISABLE_INITIALIZE_FORK_SAFETY
所以這邊我們使用 subprocess 並在 env 中設定這兩個環境變數
# ...
subprocess.Popen(
    ["rq","worker",queue_name,"--name",f"worker-{uuid4().hex[:4]}","--with-scheduler"],
    env={
        **os.environ,
        "OBJC_DISABLE_INITIALIZE_FORK_SAFETY":"YES",
        "NO_PROXY":"*"
    }
)
# ...

rq 實作 非同步 API原本存 *.mp4 檔案同樣是由後端 API 處理
畢竟 write file 是 I/O bound 的工作
所以可以由後端 API 處理
我們可以將原本的 /api/stt.py 改成
@router.post("/task")
async def create_message_queue_task(file: UploadFile = File(...)):
    # save file
    # ...

    # create STT job
    try:
        job = task_queue.enqueue(
            get_text_from_video,
            hash_name,
            on_success=Callback(report_success),
            on_failure=Callback(report_failed),
            ttl=30, # 30 sec timeout
            failure_ttl=60, # 1 minute cleanup for failed job
            result_ttl=180, # result will be kept for 3 minutes
        )
    except Exception as e:
        print(e)
        raise HTTPException(status_code=500, detail=str(e)  )
    # ...
可以看到我們將 get_text_from_video 丟到 job queue 中
並設定 Callback function 和 timeout 參數 :
ttl : 這個 job 執行多久後會被判斷為 timeoutfailure_ttl : 這個 job 執行失敗後,多久後會被刪除result_ttl : 這個 job 執行成功後,多久後會被刪除這邊的 刪除 是指從 Redis 中刪除
並加上清除 *.mp4 和 *.wav 檔案的 job
但是這個 job 要等 STT job 執行完畢後才能執行
所以這邊使用 enqueue_in 來設定
@router.post("/task")
async def create_message_queue_task(file: UploadFile = File(...)):
    # create STT job
    # ...

    # clean up file job
    try:
        clean_job = task_queue.enqueue_in(
            timedelta(seconds=60),
            clean_file,
            hash_name,
            ttl=10, # 5 minutes timeout
            failure_ttl=20, # 5 minutes cleanup
            result_ttl=20, # 5 minutes cleanup
        )
        print("clean job", clean_job.get_id())
    except Exception as e:
        print(e)
        raise HTTPException(status_code=500, detail=str(e)  )

    return {
        "job_id": job.get_id(),
        "file_id": hash_name,
    }
並在最後回傳 job id 和 file id 給前端
我們的 task API 回傳了 job id 給前端
所以前端可以透過 job id 來查詢當前 job 的狀態
使用 Job.fetch 來取得 job /api/stt.py
@router.get("/task/{job_id}")
async def get_message_queue_result(job_id: str):
    try:
        job = Job.fetch(job_id, connection=redis_conn)
    except Exception as e:
        print(e)
        raise HTTPException(status_code=500, detail=str(e)  )

    if job.is_finished:
        return {"job_id": job_id, "text": job.result}

    return {
        "job_id": job_id,
        "status":"processing"
    }
並使用 Job.is_finished 來判斷 job 是否執行完畢
如果執行完畢,就回傳 job id 和結果
在 3 個 workers 的環境同時送出 10 個 request 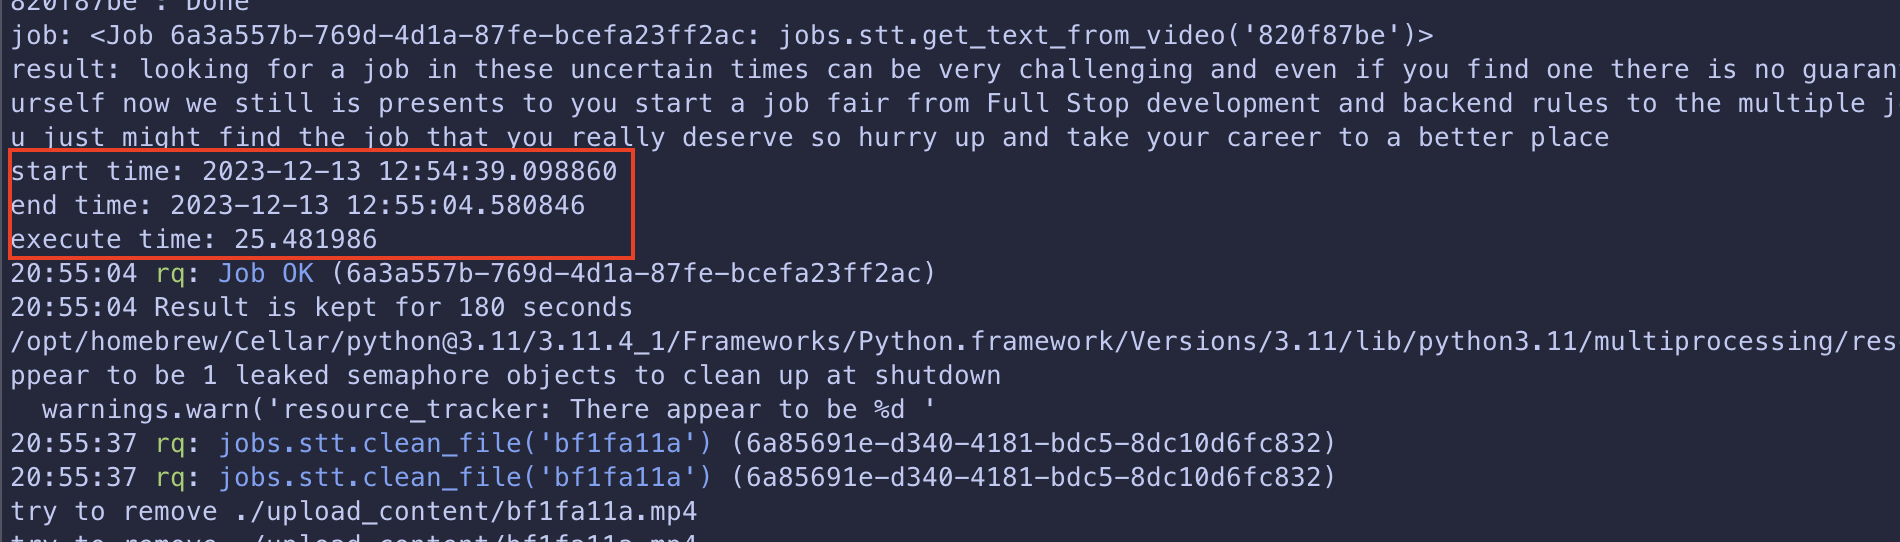
可以看到最慢的 job 從進入 job queue 到執行完畢花了 25.4 秒
比 Naive Solution 的 48.4 快了 一倍
在 10 個 workers 的環境同時送出 10 個 request 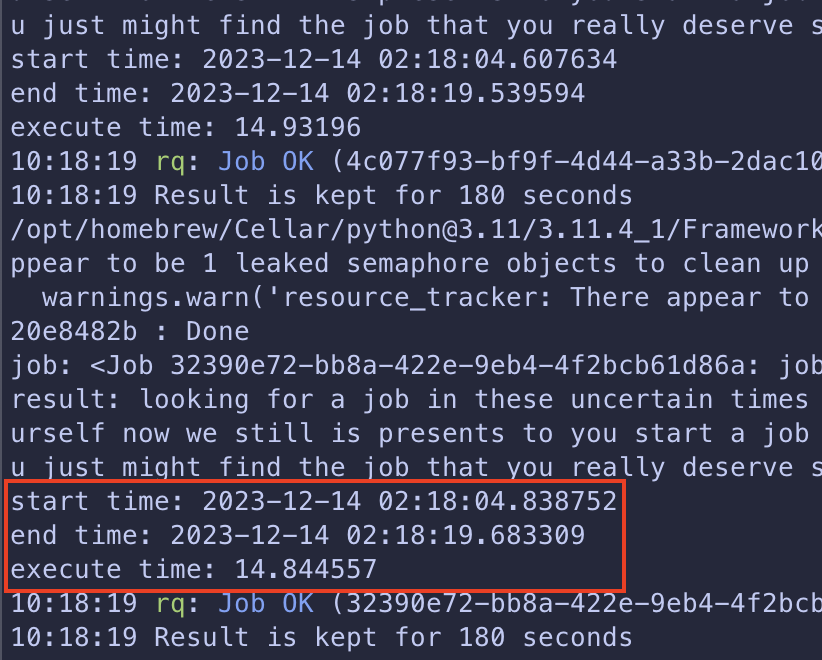
可以看到最慢的 job 從進入 job queue 到執行完畢花了 14 秒
比 Naive Solution 的 48.4 快了 三倍
今天我們使用 rq 來實作 message queue
並將原本的 API 改成非同步的 API
可以看到在 10 個 workers 的環境下
比 Naive Solution 快了 三倍
所以對於 需要大量 CPU 資源 的工作
或是 需要花費大量時間 的工作
可以考慮使用 message queue 來處理 !
fork()
