在專案的src/lib/database/schema.json 建立以下檔案
{
  "tables": [
    {
      "name": "services",
      "columns": [
        { "name": "name", "type": "string" }, // 服務名稱
        {
          "name": "topLinks", // 頂端連結
          "type": "json",
          "notNull": true,
          "defaultValue": "[]"
        },
        {
          "name": "headLinks", // 標題下方的連結
          "type": "json",
          "notNull": true,
          "defaultValue": "[]"
        },
        { "name": "description", "type": "text" }, // 描述
      ]
    },
    {
      "name": "threads",
      "columns": [
        {
          "name": "title", //討論串標題
          "type": "string",
          "defaultValue": "Untitled"
        },
        {
          "name": "name", // 發文者名稱
          "type": "string",
          "defaultValue": "anonymous"
        },
        { "name": "content", "type": "text" }, // 內文
        { "name": "image", "type": "file" }, // 圖片
        { "name": "youtubeID", "type": "string" }, // 影片
        { "name": "replyAt", "type": "datetime" }, // 討論串最後回覆時間
        { "name": "userId", "type": "string" }, // 發文者ID
        { "name": "userIp", "type": "string" } // 發文者IP
      ]
    },
    {
      "name": "replies",
      "columns": [
        {
          "name": "name", // 回應者名稱
          "type": "string",
          "defaultValue": "anonymous"
        },
        { "name": "content", "type": "text" }, // 內文
        { "name": "image", "type": "file" }, // 圖片
        { "name": "youtubeID", "type": "string" }, // 影片
        { "name": "thread", "type": "link", "link": { "table": "threads" } }, // 關聯到Thead 用來確定reply是reply到哪一個thread上
        { "name": "userId", "type": "string" }, // 發文者ID
        { "name": "userIp", "type": "string" } // 發文者IP
      ]
    }
  ]
}
接著我們需要建立兩個script
在你的package.json內 建立兩個script
  "scripts": {
    "dev": "next dev",
    "build": "next build",
    "start": "next start",
    "lint": "next lint",
    "xata:gen": "xata codegen --output src/xata.ts", // 用來將現在的db schema同步到本地
    "xata:upload": "xata schema upload src/lib/database/schema.json" // 用來將定義好的schema推送到DB上
  }
然後我們下指令
yarn xata:upload
他會告訴你哪些table及column被增加跟刪除
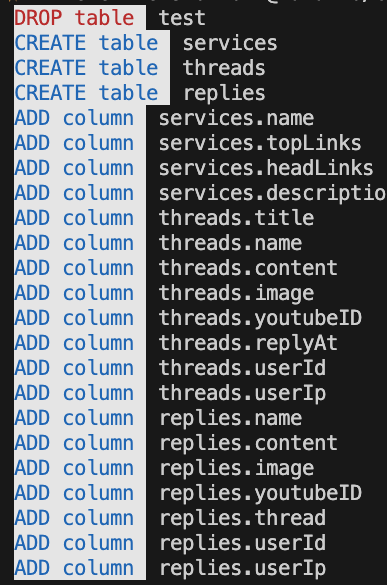
yarn xata:gen
你應該可以注意到你本地端有一個被修改的檔案
在src/xata.ts
// Generated by Xata Codegen 0.30.0. Please do not edit.
import { buildClient } from "@xata.io/client";
import type {
  BaseClientOptions,
  SchemaInference,
  XataRecord,
} from "@xata.io/client";

const tables = [
  {
    name: "services",
    columns: [
      { name: "name", type: "string" },
      { name: "topLinks", type: "json", notNull: true, defaultValue: "[]" },
      { name: "headLinks", type: "json", notNull: true, defaultValue: "[]" },
      { name: "description", type: "text" },
    ],
  },
  {
    name: "threads",
    columns: [
      { name: "title", type: "string", defaultValue: "Untitled" },
      { name: "name", type: "string", defaultValue: "anonymous" },
      { name: "content", type: "text" },
      { name: "image", type: "file" },
      { name: "youtubeID", type: "string" },
      { name: "replyAt", type: "datetime" },
      { name: "userId", type: "string" },
      { name: "userIp", type: "string" },
    ],
    revLinks: [{ column: "thread", table: "replies" }],
  },
  {
    name: "replies",
    columns: [
      { name: "name", type: "string", defaultValue: "anonymous" },
      { name: "content", type: "text" },
      { name: "image", type: "file" },
      { name: "youtubeID", type: "string" },
      { name: "thread", type: "link", link: { table: "threads" } },
      { name: "userId", type: "string" },
      { name: "userIp", type: "string" },
    ],
  },
] as const;

export type SchemaTables = typeof tables;
export type InferredTypes = SchemaInference<SchemaTables>;

export type Services = InferredTypes["services"];
export type ServicesRecord = Services & XataRecord;

export type Threads = InferredTypes["threads"];
export type ThreadsRecord = Threads & XataRecord;

export type Replies = InferredTypes["replies"];
export type RepliesRecord = Replies & XataRecord;

export type DatabaseSchema = {
  services: ServicesRecord;
  threads: ThreadsRecord;
  replies: RepliesRecord;
};

const DatabaseClient = buildClient();

const defaultOptions = {
  databaseURL:
    "https://EricWu-s-workspace-2lkpjt.ap-southeast-2.xata.sh/db/ithome",
};

export class XataClient extends DatabaseClient<DatabaseSchema> {
  constructor(options?: BaseClientOptions) {
    super({ ...defaultOptions, ...options }, tables);
  }
}

let instance: XataClient | undefined = undefined;

export const getXataClient = () => {
  if (instance) return instance;

  instance = new XataClient();
  return instance;
};
切到services這張表
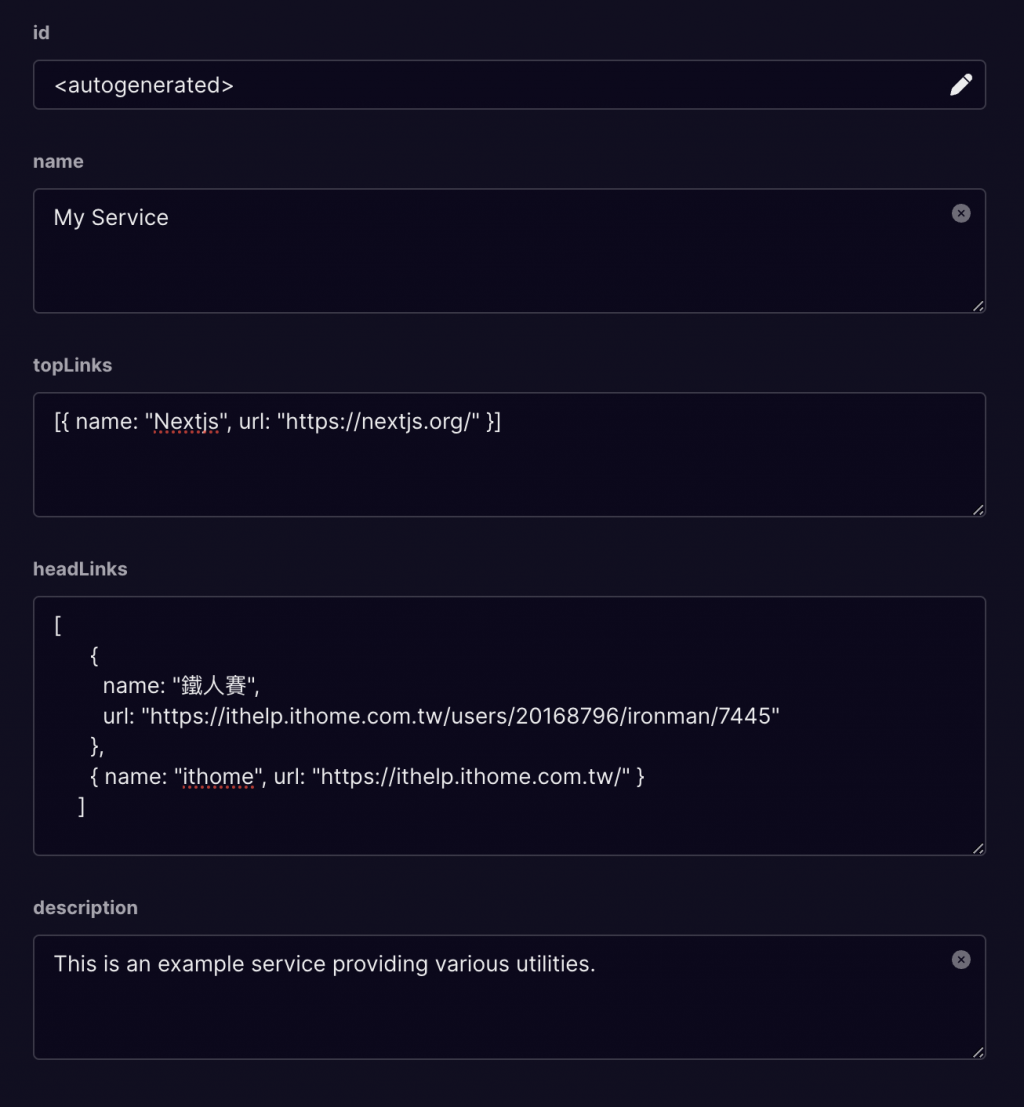
然後點選Add a record
然後根據你的需要塞入內容
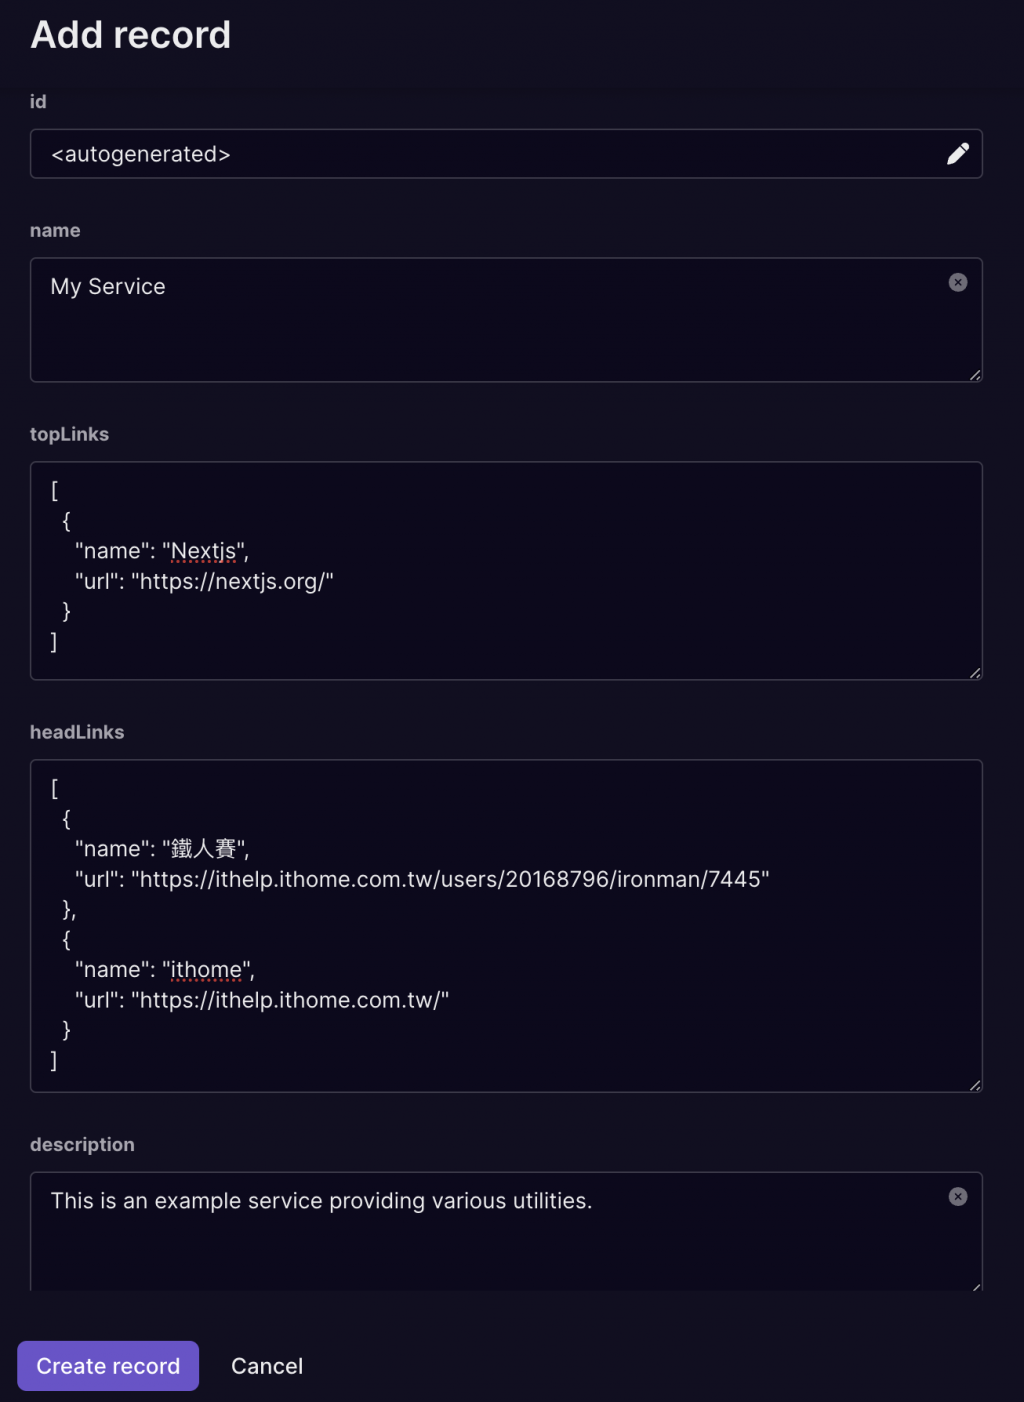
注意topLinks及headLinks必須要是正確的JSON
[
  {
    "name": "Nextjs",
    "url": "https://nextjs.org/"
  }
]
在以下路徑建立檔案
src/lib/database/service.ts
import { XataClient, ServicesRecord } from "../../xata";

interface IGetThreads {
  serviceId: string;
}

export const getService = async ({
  serviceId,
}: IGetThreads): Promise<ServicesRecord | null> => {
  try {
    const xata = new XataClient({
      branch: serviceId,
      apiKey: process.env.XATA_API_KEY,
    });

    return await xata.db.services.getFirst();
  } catch (error) {
    console.error(error);
    return null;
  }
};
修改你的src/app/service/[serviceId]/page.tsx檔案
// 增加這兩行
import { getService } from "@/lib/database/service";
import { notFound } from "next/navigation";
然後把我們原本的假資料換掉
// const service: IService = {
//   id: params.serviceId,
//   name: "My Service",
//   topLinks: [{ name: "Nextjs", url: "https://nextjs.org/" }],
//   headLinks: [
//     {
//       name: "鐵人賽",
//       url: "https://ithelp.ithome.com.tw/users/20168796/ironman/7445",
//     },
//     { name: "ithome", url: "https://ithelp.ithome.com.tw/" },
//   ],
//   description: "This is an example service providing various utilities.",
// };

const service = await getService({ serviceId: params.serviceId });
if (!service) {
    return notFound();
}
你會發現Title的service及PostCard的型別有錯
這是很正常的
修改這裡的PostCard
<PostCard description={service.description || ""} />
到Title將IService換掉
import Link from "next/link";
import { ExternalLink, Link2 } from "lucide-react";
import { ServicesRecord } from "@/xata";

export interface ILinkItem {
  name: string;
  url: string;
}

interface TitleProps {
  service: ServicesRecord;
}

export default function Title({ service }: TitleProps) {
  return (
    <>
      <div className="absolute top-2 right-2 flex items-center space-x-2 text-xs">
        {service.topLinks.map((link: ILinkItem, index: number) => (
          <a
            key={index}
            href={link.url}
            target="_blank"
            className="text-gray-400 hover:text-gray-600 flex items-center"
          >
            {link.name} <ExternalLink className="ml-1 h-3 w-3" />
          </a>
        ))}
        <Link
          href={`/service/${service.id}`}
          className="text-gray-400 hover:text-gray-600 flex items-center"
        >
          Homepage <Link2 className="ml-1 h-3 w-3" />
        </Link>
      </div>
      <h1 className="text-3xl font-bold text-center mb-2 mt-6 text-black">
        {service.name}
      </h1>
      <div className="flex justify-center mb-2 space-x-2">
        {service.headLinks.map((link: ILinkItem, index: number) => (
          <Link
            key={index}
            href={link.url}
            passHref
            target="_blank"
            className="text-blue-500 text-md py-1 px-2 rounded shadow-md border-2 border-blue-400 hover:bg-blue-500 hover:border-blue-500 hover:text-white transition duration-300"
          >
            {link.name}
          </Link>
        ))}
      </div>
    </>
  );
}
現在啟動服務吧
yarn dev
到
http://localhost:3000/service/main
這個網址去
你會發現畫面出現了
你可以去修改database裡面service的內容 看看畫面會怎麼變化
欸? 我不用接API喔
對 因為我們使用SSR 資料是先在後端準備好 變成html之後直接拿給前端 因此不需要接api
const service = await getService({ serviceId: params.serviceId });
  if (!service) {
    return notFound();
  }
你應該可以注意到這裡我們使用了await 這在原本的React是不被允許的
為什麼我們是到/service/main這裏
你可以將main換成其他的字 會notfound
這是因為我們
const xata = new XataClient({
   branch: serviceId, //這裏根據serviceId指定了branch的名稱
   apiKey: process.env.XATA_API_KEY,
});
我們現在只有main一個branch
因此只會有一個service 其他的都會notfound
明天我們繼續接thread及reply的database