哈囉大家好~
又到週末啦!可以有更多時間寫文章![]()
昨天簡單使用livewire套件創建了component,所以今天想要試試創建Form,並且將input儲存於資料庫中。
那就馬上開始吧!
在開始撰寫程式碼之前,利用migration先創建了一個資料表post在MySQL資料庫裡面,等一下表格裡填寫的title和content會被儲存。(env.裡面也要先設置好欲連接的資料庫喔!)
接下來就可以創建component啦~
順帶一提,component除了可以插入blade template之外,也可以直接作為一個新的頁面使用。這邊我要創建一個新的component:create-post。
和昨天的步驟相同,用artisan命令列快速創建component:
php artisan make:livewire create-post
接著在create-post.blade.php中撰寫前端介面:
(這裡使用了bootstrap來讓畫面好看一點點XD)
<div>
    <head>
        <title>Create a new Post</title>
        <link rel="stylesheet" href="https://stackpath.bootstrapcdn.com/bootstrap/4.5.2/css/bootstrap.min.css">
    </head>
    <body>
        <div class="card">
            <div class="card-header text-center font-weight-bold">
                Create a new Post HERE!
            </div>
            <div class="card-body">
            <form name="add-blog-post-form" id="add-blog-post-form" wire:submit="save">
                <div class="form-group">
                    <label>title: </label>
                    <input class="form-control" type="text" wire:model="title" required/>
                </div>

                <br/>

                <div class="form-group">
                    <label>content: </label>
                    <textarea class="form-control" wire:model="content" required></textarea>
                </div>

                <br/>
                <button class="btn btn-primary" type="submit">Save</button>
            </form>
            </div>
        </div>
    </body>
</div>
大致上撰寫的語法和其他主流前端框架相似,指示接收使用者input的標籤從name變成wire:model。
這裡的title和content變數等一下會需要在createPost.php中定義。
在button這裡註明type="submit",所以form這裡處理儲存這個action的語法要寫成:
wire:submit="save"
這裡的save也是在createPost.php中定義的function,用來處理數據儲存到資料庫的過程。
那麼接下來就來看看如何處理邏輯的部份~
在正式開始處理post request前,還記得Laravel框架如何處理開發者和資料庫互動的過程嗎?
沒錯!就是透過Model,讓開發者不用寫純SQL語法!
和創建component一樣,利用artisan命令列創建Post Model:
php artisan make:model Post
接著在app/Models/Post.php裡撰寫將數據儲存進資料表的設定(指定資料表與欄位):
<?php

namespace App\Models;

use Illuminate\Database\Eloquent\Factories\HasFactory;
use Illuminate\Database\Eloquent\Model;

class Post extends Model
{
    use HasFactory;

    protected $table = 'post'; #指定儲存數據的資料表
    protected $fillable = [ #要接收數據的欄位
        'title',
        'content'
    ];
}
完成後就可以來處理邏輯部分了!createPost.php的程式碼如下:
<?php

namespace App\Livewire;

use Livewire\Component;
use App\Models\Post;

class CreatePost extends Component
{

    public $title = ''; #接收user input的變數
    public $content = ''; #接收user input的變數

    public function save()
    {
        Post::create([ #這裡Post是剛剛定義好的Model,拿來用!
            'title' => $this->title, #user input儲存到指定欄位
            'content' => $this->content #user input儲存到指定欄位
        ]);

        return redirect()->to('/'); #完成後回到root route
    }

    public function render()
    {
        return view('livewire.create-post');
    }
}
最後在web.php定義顯示這個畫面的路徑:
<?php
use Illuminate\Support\Facades\Route;
use App\Livewire\CreatePost;

Route::get('/create-post', CreatePost::class);
#直接將這個component當作一個頁面
在瀏覽器裡打開localhost:8000/create-post就可以看到以下畫面:
試著輸入幾個test data進去按下save button後,成功跳轉回到主頁了!
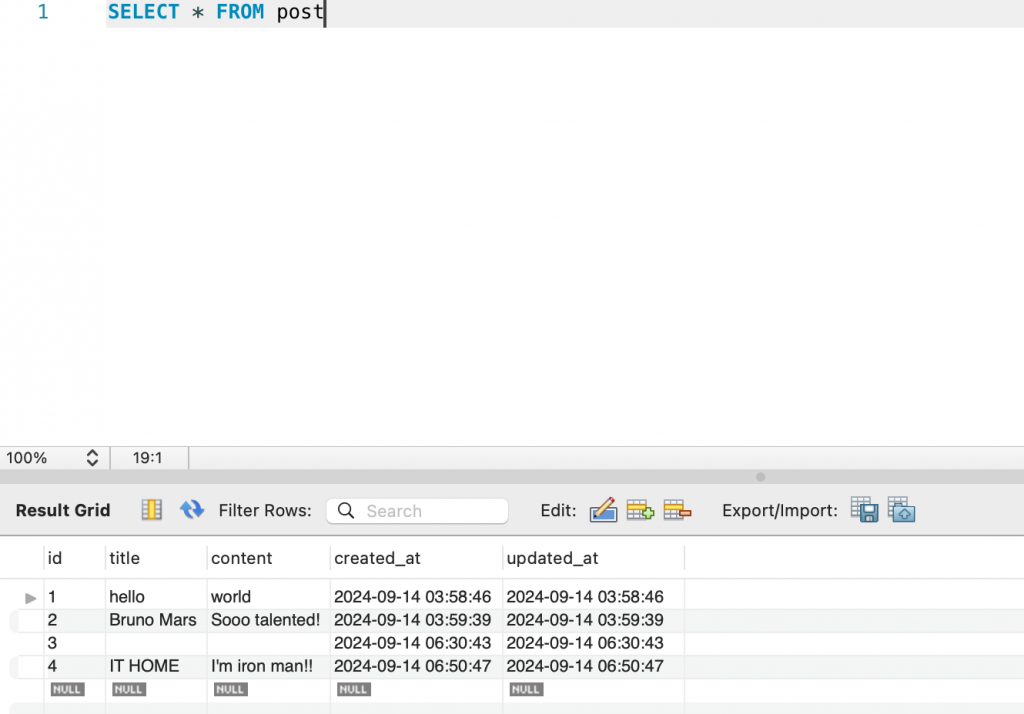
再偷偷打開資料庫看看資料表長什麼樣子了:
耶~資料有順利儲存!雖然畫面和功能還是很陽春XD
不得不說Livewire這個套件的確讓前端開發比較輕鬆![]()
而且個人覺得官方文檔蠻好閱讀,而且給人可愛的感覺XD
今天也透過實作將之前學習的內容簡單串連了一下,從在env.設置資料庫,利用migration來創建資料表和欄位,利用Livewire撰寫前端介面,搭配Model在對應資料表中新增數據⋯⋯等。
對於整個Laravel框架的架構和概念也更有感覺了~
希望今天週末大家都能好好休息,度過愉快的一天~
那就明天見囉 8181!
