上一篇跟大家介紹了 Audio API,使用的是 <audio> 標籤,今天要介紹的是 Video API,不難發現使用的標籤就是 <video> XXD,那 Video API 又有哪些好用的功能呢?
<video> 基本的功能跟 <audio> 蠻像的,我們同樣可以控制影片的播放、暫停、跳轉時間,調整音量 ... 等等
使用 play() 和 pause() 來播放與暫停影片,此外還能使用 currentTime 修改跳轉的影片位置
<video src="video.mp4" controls></video>
const video = document.querySelector('video');
video.play();  // 播放
video.pause(); // 暫停
video.currentTime = 30; // 跳轉到第30秒
我們可以使用 load() 來動態切換影片:
video.src = 'https://example.com/video.mp4';
video.load(); // 載入新的影片
調整音量也是不可少的功能 XD,還能一鍵靜音!
video.volume = 0.5; // 調整音量為 50%
video.muted = true; // 一鍵靜音
使用 <track> 設定字幕檔案位置,目前接受的是 WebVTT(Web Video Text Tracks Format) 格式,副檔名為 .vtt,特別注意的是字幕檔案的編碼必須為 UTF-8 唷。
VVT 檔案第一行必須寫 WEBVTT,表示這是一個 Web Video Text Tracks 的檔案。
以下是一個字幕檔範例:
WEBVTT

00:00:00.000 --> 00:00:02.000
你好,

00:00:02.500 --> 00:00:05.000
我是 MUKI。
很高興認識你。
與字幕有關的 block 是由三個部分組成:時間戳,字幕內容和空行:
開始時間 ---> 結束時間
小時:分鐘:秒.毫秒,例如 00:00:02.500 表示 2.5 秒字幕內容可以是單行,也可以是多行,字幕支援基本的 HTML 標記,例如 <b>、<i>。字幕與字幕之間,要用一個斷行做區隔。
如果要在影片裡使用字幕檔,程式碼要改用 <source> 載入影片檔,使用 <track> 載入字幕檔案:
<video controls>
    <source src="video.mp4" type="video/mp4">
    <track kind="subtitles" src="subtitles.vtt" srclang="en" label="English" default>
</video>
| 屬性 | 介紹 |
|---|---|
kind="subtitles" |
表示這是字幕軌 |
src="subtitles.vtt" |
字幕檔案的位置 |
srclang="en" |
字幕檔案的語言 |
label="English" |
在影片播放器的字幕選單中顯示的標籤 |
default |
字幕默認開啟 |
我們也能在字幕裡寫 CSS 調整字幕的樣式,CSS 樣式必須寫在 WEBVTT 段落的後面,所有 block 的前面,像這樣:
WEBVTT

STYLE
::cue {
  background: #FFF;
  color: #ABCDEF;
}

00:00:00.000 --> 00:00:02.000
你好,

00:00:02.500 --> 00:00:05.000
我是 MUKI。
很高興認識你。
打開影片後,就能看到字幕的顏色改為 #ABCDEF

如果希望這兩段字幕的顏色不同,可以幫他們加入 HTML 標籤 (如 <c>、<i>、<b>、<u>、<ruby>、<rt>、<v> 和 <lang> ) 來調整樣式
WEBVTT

STYLE
::cue {
  color: #ABCDEF;
}

STYLE
::cue(b) {
  color: #D40000;
}

00:00:00.000 --> 00:00:02.000
<b>你好,</b>

00:00:02.500 --> 00:00:05.000
我是 MUKI。
很高興認識你。
使用 <b> 標籤來調整文字顏色為紅色,字幕的「你好」兩個字就會變成紅色

假設影片有中文和英文兩個語系,我們先做兩個字幕檔
subtitle-zh.vtt
WEBVTT

STYLE
::cue {
  color: #ABCDEF;
}

STYLE
::cue(b) {
  color: #D40000;
}

00:00:00.000 --> 00:00:02.000
<b>你好,</b>

00:00:02.500 --> 00:00:05.000
我是 MUKI。
很高興認識你。
subtitle-en.vtt
WEBVTT

STYLE
::cue {
  color: #ABCDEF;
}

STYLE
::cue(b) {
  color: #D40000;
}

00:00:00.000 --> 00:00:02.000
<b>Hello,</b>

00:00:02.500 --> 00:00:05.000
I am MUKI, Nice to meet you.
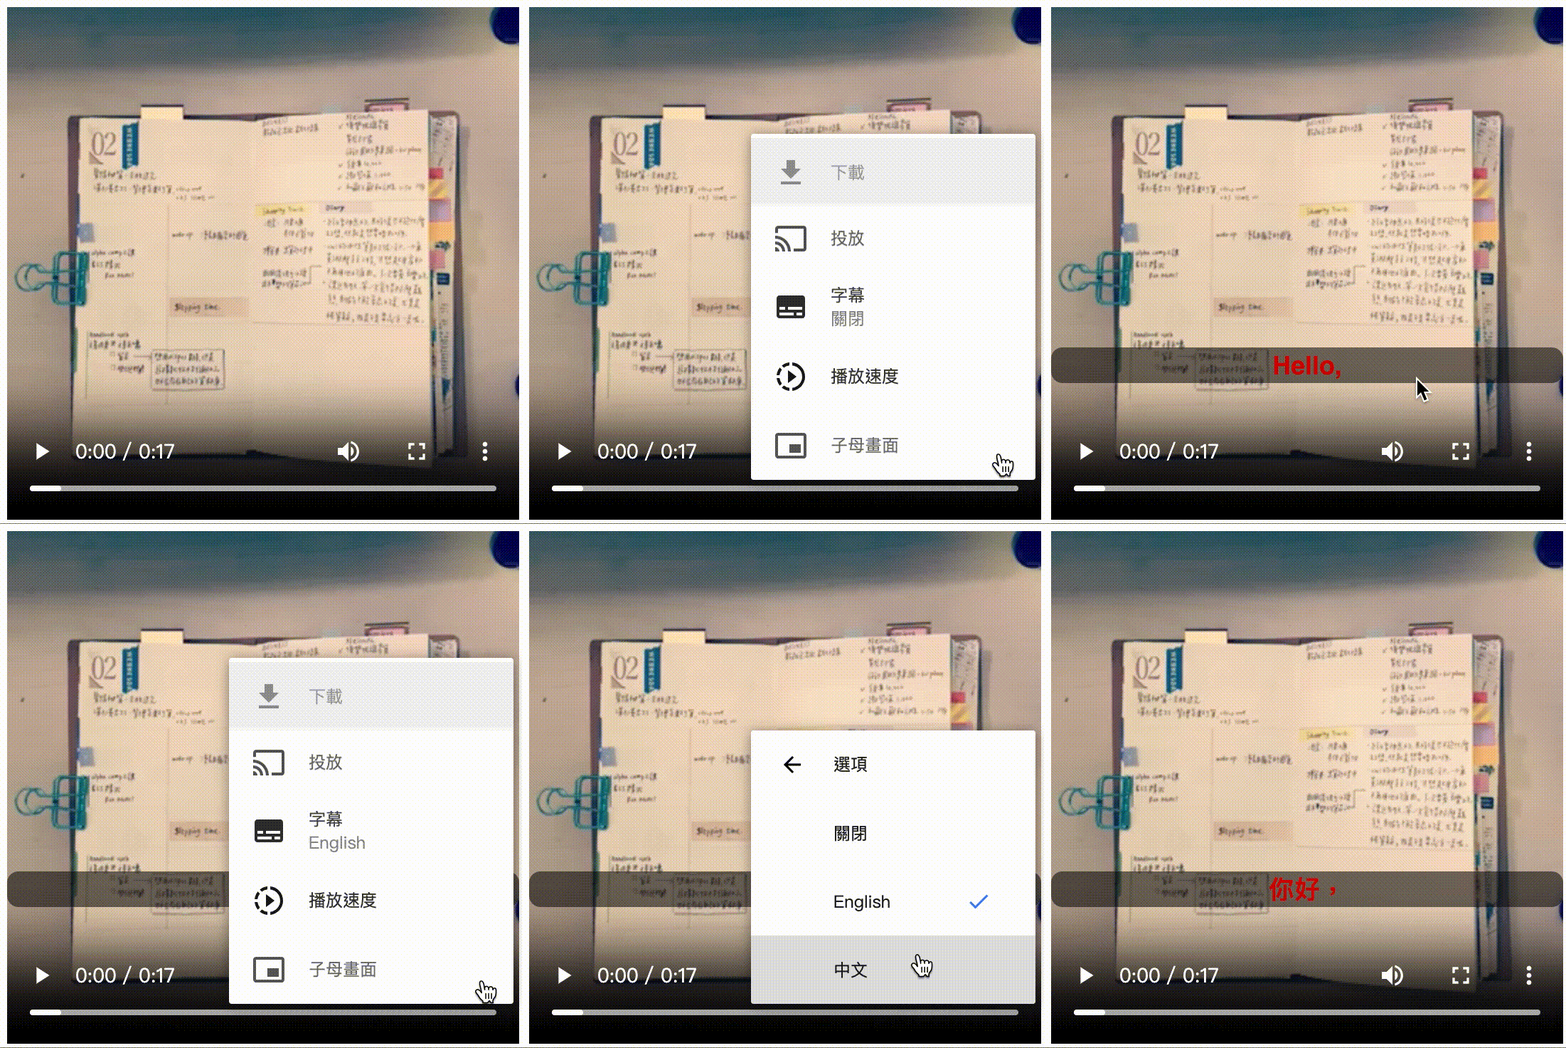
接著在 HTML 寫入兩個 <track>,設定字幕檔的位置以及讓使用者識別的文字 (label)
<video controls>
  <source src="video.mp4" type="video/mp4">
  <track kind="subtitles" src="subtitle-en.vtt" srclang="en" label="English">
  <track kind="subtitles" src="subtitle-zh.vtt" srclang="zh" label="中文">
</video>
載入影片後,點選右下角的「⋮」,就能選擇字幕了

和 Audio API 相同,我們也能客製化影片播放的介面,首先一樣將 controls 移除,接著使用跟上一篇文章相同的方式打造自己的介面
<!-- 將 <video controls> 改為 <video> -->
<video>
  <source src="video.mp4" type="video/mp4">
</video>
其實 <audio> 和 <video> 的方法很像,我也是從自定義音樂播放介面改過來的,就直接貼上所有的 javascript 給大家參考:
// 獲取 DOM 元素
const video = document.getElementById('video');
const currentTime = document.getElementById('currentTime');
const duration = document.getElementById('duration');
const range = document.getElementById("range");

const playButton = document.getElementById('playPause');

const updateVar = (value) => {
  document.documentElement.style.setProperty("--range", value + "%");
}
range.addEventListener("input", () => {
  updateVar(range.value);
});

// 播放/暫停功能
function togglePlay() {
  if (video.paused) {
    video.play();
    playButton.textContent = '暫停';
  } else {
    video.pause();
    playButton.textContent = '播放';
  }
}

// 根據滑動桿的值設置視頻的當前時間
function setVideoProgress() {
  const newTime = (range.value / 100) * video.duration;
  video.currentTime = newTime;
  updateTime();
}

// 更新時間
function updateTime() {
  const currentMinutes = Math.floor(video.currentTime / 60);
  const currentSeconds = Math.floor(video.currentTime % 60);
  const durationMinutes = Math.floor(video.duration / 60);
  const durationSeconds = Math.floor(video.duration % 60);

  currentTime.textContent = `${currentMinutes}:${currentSeconds.toString().padStart(2, '0')}`;
  duration.textContent = `${durationMinutes}:${durationSeconds.toString().padStart(2, '0')}`;
}

// 更新滑動桿
function updateRange() {
  const rangeValue = (video.currentTime / video.duration) * 100;
  range.value = rangeValue;
  updateVar(rangeValue);
}

playButton.addEventListener('click', togglePlay);
video.addEventListener('timeupdate', () => {
  updateTime();
  updateRange();
});

video.addEventListener('loadedmetadata', () => {
  updateTime();
});

range.addEventListener('input', setVideoProgress);
子母畫面 (picture-in-picture) 真是一個偉大的發明,我自己就很喜歡使用子母畫面邊工作邊看影片,可以放鬆一下又不會太墮落 XD,適合可以一心二用的我們!
先增加一個子母畫面的按鈕
<button id="pipButton">子母畫面</button>
togglePiP() 負責切換子母畫面。
async function togglePiP() {
  try {
    if (video !== document.pictureInPictureElement) {
      await video.requestPictureInPicture();
    } else {
      await document.exitPictureInPicture();
    }
  } catch (error) {
    console.error(error);
  }
}

pipButton.addEventListener('click', togglePiP);
唯一要注意的是,只有支援 Picture-in-Picture API 的瀏覽器才能使用,例如 Chrome 和 Edge,而 Firefox 目前尚未支援(來源文件:MDN)
如果影片檔案太大或網路速度不好,在播放影片時斷斷續續的,體驗就不會好。我們可以使用相關的緩衝事件,來提升影片播放的流暢度
video.addEventListener('waiting', () => {
  console.log('緩衝中...');
});

video.addEventListener('canplay', () => {
  console.log('可以播放');
});

// 檢查緩衝進度
setInterval(() => {
  const buffered = video.buffered;
  if (buffered.length > 0) {
      const bufferedEnd = buffered.end(buffered.length - 1);
      console.log(`已緩衝 ${bufferedEnd} 秒`);
  }
}, 1000);
未來也能透過緩衝的秒數,製作進度條讓使用者知道目前緩衝的狀況

程式碼範例網址:https://mukiwu.github.io/web-api-demo/video.html
對以上文章有任何問題歡迎留言討論唷。
