整體來說,前面幾天教大家API的開發流程,接下來這邊會繼續用同樣的觀念教大家開發其他的API,並且完成作為後端系統中最基本也最重要的CRUD功能,也就是新增、讀取、修改、刪除。
在前面兩天已經教大家新增與讀取功能應該要怎麼寫,接下來就要帶大家完成修改與刪除功能。
今天的工作雖然短,但是是因為我們已經有之前的經驗,並且這兩個功能的指令也很簡短,但是藉由昨天跟今天,我們就能夠完成一組最基本,也最完整的後端功能。
每次要開發後端功能,因為Repository已經設置好,不用從這裡開始,所以我們可以從Service開始做起,請到Service層新增以下兩個功能
	AccountDto updateAccount(AccountDto accountDto,Long id);
	void deleteAccount(Long id);
然後到Impl,用昨天的方法來新增這兩個功能,然後一步一步來創建這些Service
update的功能如下程式碼
	@Override
	public AccountDto updateAccount(AccountDto accountDto, Long id) {
		Account account = accountRepository.findById(id)
				.orElseThrow(()-> new ResourceNotFoundException("Account not found with id:"+id));

	    // 獲得 UTC+8 時區的日期與時間
	    ZonedDateTime utcPlus8 = ZonedDateTime.now(ZoneId.of("Asia/Taipei"));
	    LocalDateTime currentDateTime = utcPlus8.toLocalDateTime();

	    account.setExpensed(accountDto.getExpensed());
	    account.setAmount(accountDto.getAmount());
	    account.setCategory(accountDto.getCategory());
	    account.setCreateDate(currentDateTime);
	    Account savedAccount = accountRepository.save(account);

		return modelMapper.map(savedAccount, AccountDto.class);
	}
delete的功能如下程式碼,我們同樣也使用到的前一天教的錯誤訊息處理方法。
	@Override
	public void deleteAccount(Long id) {
		accountRepository.findById(id)
				.orElseThrow(()-> new ResourceNotFoundException("Account not found with id:"+id));
		accountRepository.deleteById(id);

	}
完成這兩個之後,我們可以到Controller層中去創建API的處理方
Controller
	@GetMapping
	public ResponseEntity<List<AccountDto>> getAllAccounts(){
		List<AccountDto> accountDtos = accountsService.getAllAccounts();
		return new ResponseEntity<>(accountDtos,HttpStatus.OK);
	}

	@PutMapping("{id}")
	public ResponseEntity<AccountDto> updateAccounts(@PathVariable("id") Long id,@RequestBody AccountDto accountDto){
		AccountDto updateAaccountDto = accountsService.updateAccount(accountDto, id);
		return new ResponseEntity<>(updateAaccountDto,HttpStatus.OK);
	}
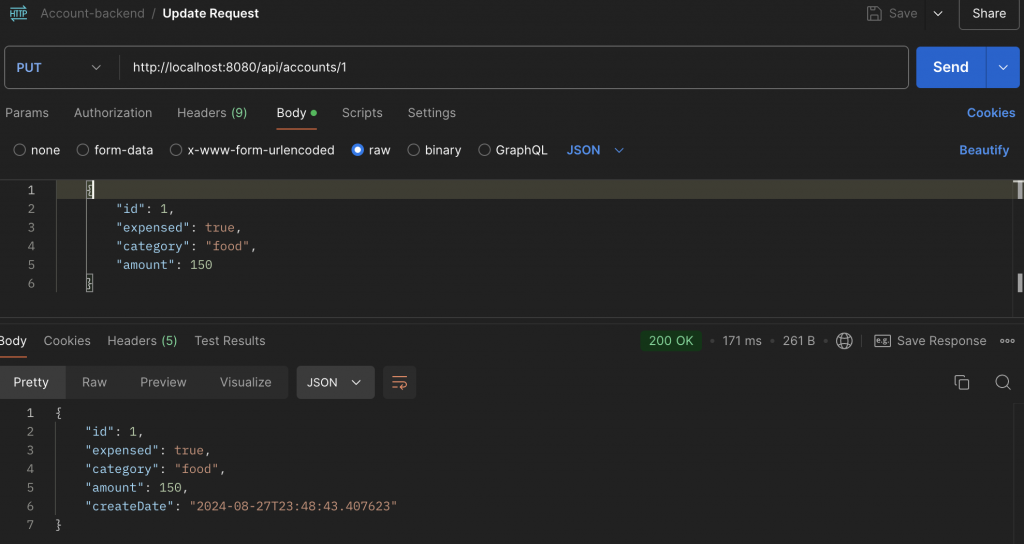
接下來就是測試,我們到Postman去新增Update Request,測試成功就會回傳200OK跟更新項目
接下來就要設置delete的接口
	@DeleteMapping("{id}")
	public ResponseEntity<String> deleteAccount(@PathVariable("id")Long id){
		accountsService.deleteAccount(id);
		return new ResponseEntity<>("Delete Success",HttpStatus.OK);
	}
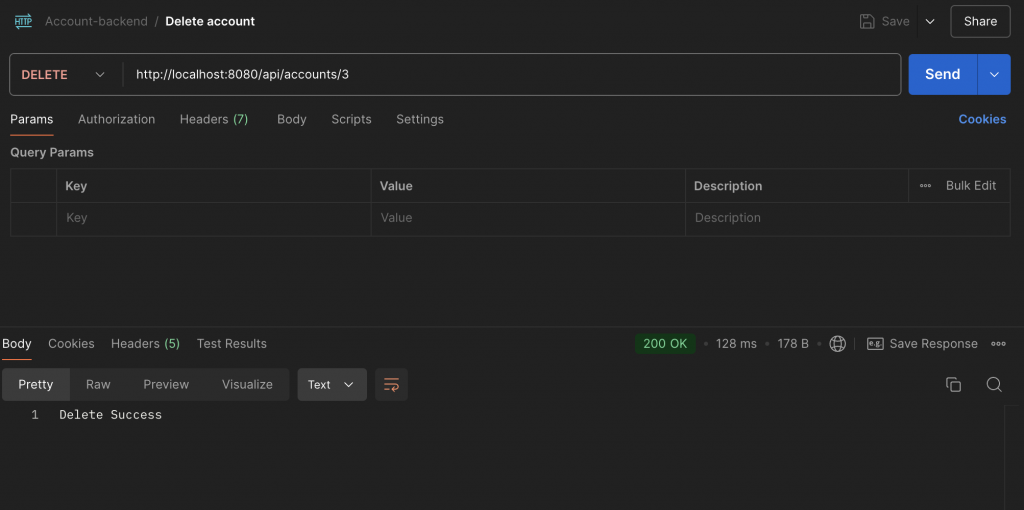
測試的方式如下
到這裡之後,我們就成功的完成了更新與刪除,完成CRUD的整個開發!
