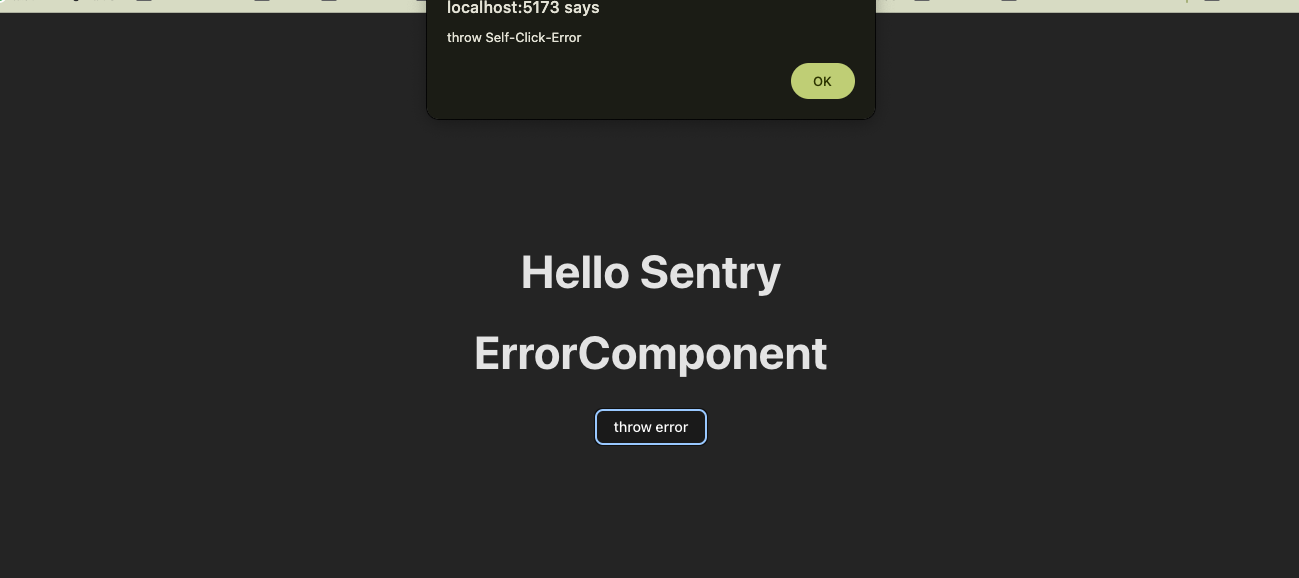
有了前一天的設定,我們可以開始來在React專案中測試一些異常,看Sentry是如何展示的。
新增一個組件ErrorComponent,點擊一個按鈕就拋出error Self click error
ErrorComponent.jsx:import React from 'react';
export default function ErrorComponent() {
const throwClickWError = () => {
alert('throw Self-Click-Error');
throw new Error(' Self-Click-Error');
};
return (
<div>
<h1>ErrorComponent</h1>
<button onClick={() => throwClickWError()}>throw error</button>
</div>
);
}
App.jsx中引入:import * as Sentry from '@sentry/react';
import { SENTRY_ENDPOINT } from './config';
import ErrorComponent from './components/ErrorComponent';
import './App.css';
Sentry.init({
dsn: SENTRY_ENDPOINT,
integrations: [
Sentry.browserTracingIntegration(),
Sentry.browserProfilingIntegration(),
Sentry.replayIntegration(),
],
// Tracing
tracesSampleRate: 1.0, // Capture 100% of the transactions
// Session Replay
replaysSessionSampleRate: 0.1, // This sets the sample rate at 10%. You may want to change it to 100% while in development and then sample at a lower rate in production.
replaysOnErrorSampleRate: 1.0, // If you're not already sampling the entire session, change the sample rate to 100% when sampling sessions where errors occur.
});
function App() {
return (
<div>
<h1>Hello Sentry</h1>
<ErrorComponent />
</div>
);
}
export default App;
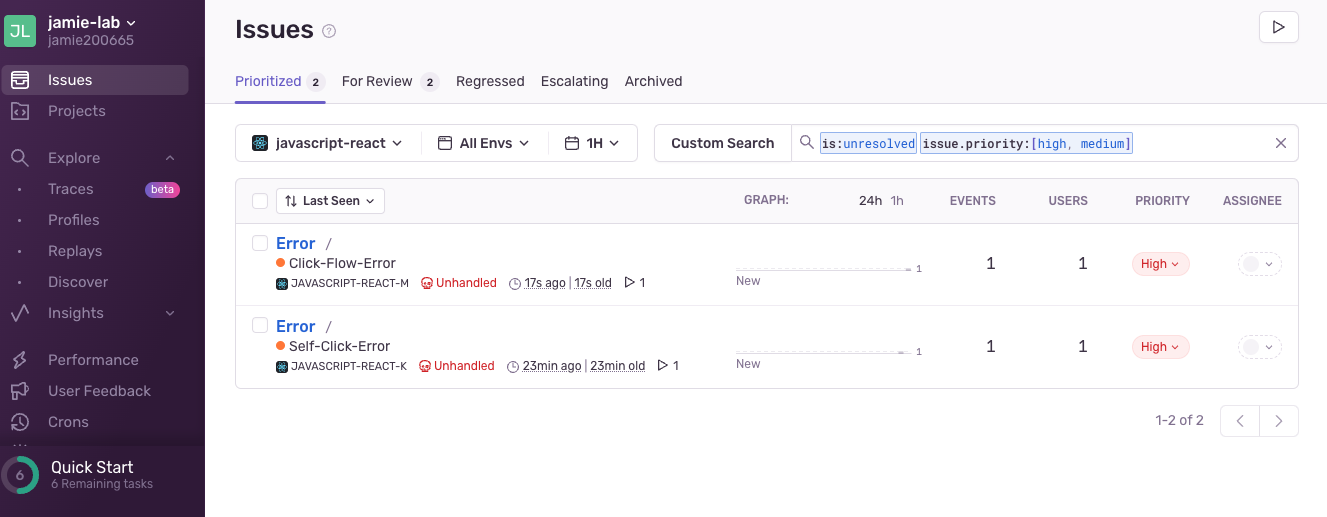
可以看到在Sentry Issue board中,已經記錄到了Self-Click-Error:
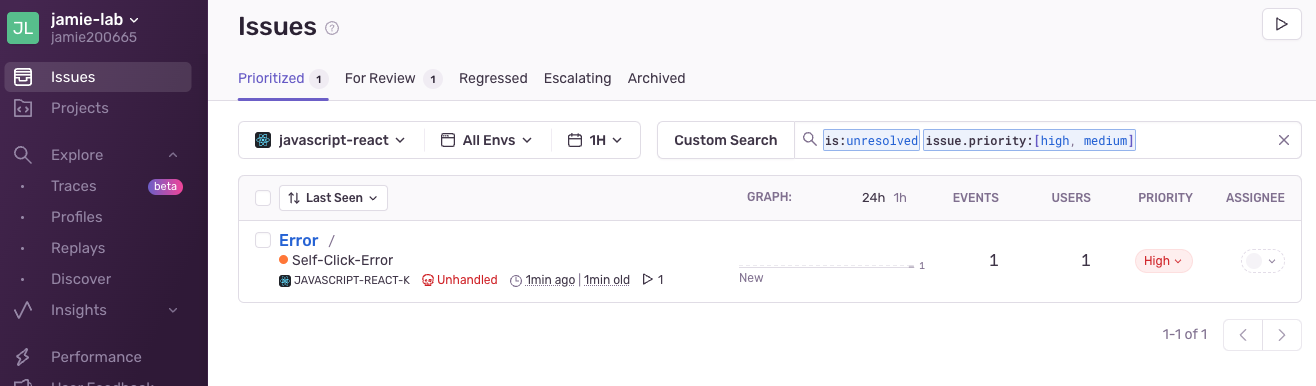
如果只是單一的error catching,其實就是換一個平台來記錄error/console;工程師如果要復現用戶是如何產生error的,需要知道用戶在我們的前端頁面上做了哪些事情;而Sentry可以記錄下用戶在Error發生前的行為歷程。
接下來設計一個簡單的組件,用戶要點擊多個button、之後拋出 error--Click-Flow-Error :
InOrderError.jsx
import React, { useState, useEffect } from 'react';

export default function InOrderError() {
    const [clickFlow, setClickFlow] = useState({
        first: false,
        second: false,
        third: false,
    });
    const clickHandler = (flag) => {
        const preBoolean = clickFlow[flag];

        setClickFlow((pre) => ({ ...pre, [flag]: !preBoolean }));
    };

    useEffect(() => {
        const { first, second, third } = clickFlow;
        if (first && second && third) {
            alert('throw Click-Flow-Error');
            throw new Error('Click-Flow-Error');
        }
    }, [clickFlow]);

    return (
        <div>
            <h1>InOrderError</h1>
            {Object.keys(clickFlow).map((flag) => (
                <button key={flag} onClick={() => clickHandler(flag)}>
                    {flag}+{clickFlow[flag] ? 'good' : 'bad'}
                </button>
            ))}
        </div>
    );
}
App.jsx中引入Click-Flow-Error

簡單寫一個效能差的組件,它要經過大量計算後,才會渲染組件
LongLoad.jsx
import React, { useState, useEffect } from 'react';

const mockMaxNumber = 100000;
function performHeavyCalculation() {
    let total = 0;
    for (let i = 0; i < mockMaxNumber; i++) {
        total += i;
    }
}

export default function LongLoading() {
    const [isReady, setIsReady] = useState(false);

    useEffect(() => {
        performHeavyCalculation();
        setIsReady(true);
    }, []);

    if (isReady) {
        return <h1>Loading...</h1>;
    }

    return (
        <div>
            <h1>LongLoading</h1>
            <ul>Completed Calculation</ul>
        </div>
    );
}
App.jsx中,查看Sentry中的Web Vitals報告: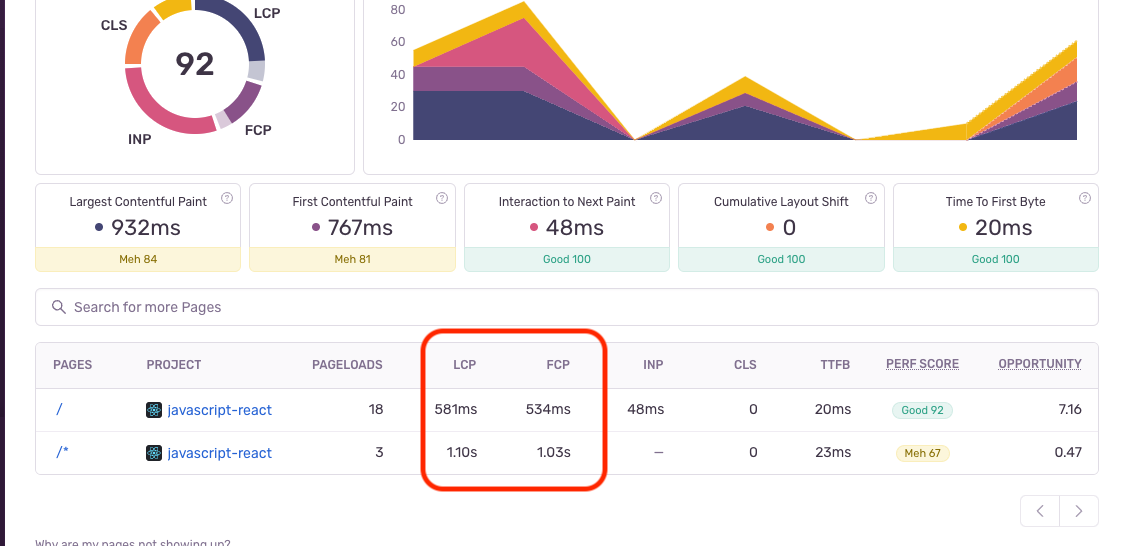
可以看到,一開始的首頁LCP和FCP只要500毫秒,但引入耗時組件的後就需要1秒以上。
以上是簡單demo Sentry的監測項目,程式碼都可以在這個Github repository查看。接下來會嘗試解析以上監控的原理。

