本系列文最終目標是要實作一個聊天APP,為了不讓伺服器偷看內容,我們不可以把對話內容以明文儲存在伺服器。此時,我們可以選擇使用端對端加密(End-to-end encryption)。聊天的雙方擁有一把共同的金鑰,而伺服器沒有,僅有雙方裝置都能加解密訊息,即使是伺服器也無法偷看!
本身不是資安專業,內容不保證完全無誤,如果有誤,煩請留言提醒,謝謝!
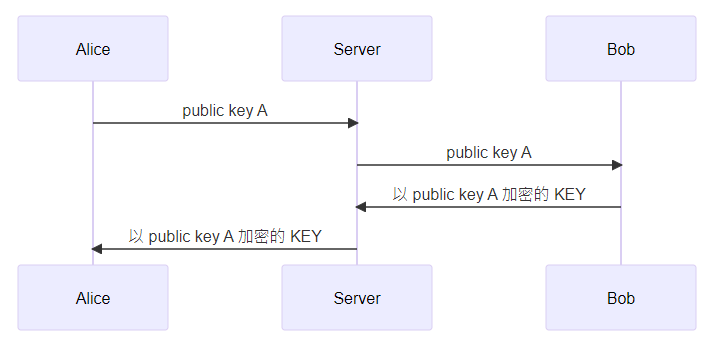
為了交換金鑰,我們可以使用非對稱式加密,先讓 A 生成一組公鑰私鑰對,透過伺服器傳送給 B。B 利用公鑰 A 將一個用來加密的金鑰 KEY 傳送給伺服器,由於伺服器沒有金鑰,因此伺服器無法得知 KEY 值。而 A 再利用自己的私鑰將已加密的 KEY 解出來。此時,A 和 B 就有一組共同的金鑰。有了共同的金鑰後,我們可以透過對稱式加密的方式使 A 和 B 進行加密通訊。其間,伺服器的擁有者也無法竊聽 A 與 B 之間交互的內容!
本次會使用 pointycastle 進行實作,處理交換金鑰及加解密的部分。為了演示方便,我們這次先用純 dart 專案做 Demo。
參考程式碼:https://github.com/ksw2000/ironman-2024/tree/master/dart-practice/e2ee
dart pub add pointycastle
參考說明文件檔 https://github.com/bcgit/pc-dart/blob/master/tutorials/rsa.md
首先,為了生成 RSA 我們先了解 RSAKeyGeneratorParameters 物件
RSAKeyGeneratorParameters RSAKeyGeneratorParameters(
  BigInt publicExponent,
  int bitStrength,
  int certainty,
)
publicExponent 公鑰指數值,通常設定為 65537
bitStrength 代表密鑰的位數。為了每次生成出來的密鑰對不同,我們還要將這個參數物件用 ParametersWithRandom 包裝
AsymmetricKeyPair<RSAPublicKey, RSAPrivateKey> generateRSAkeyPair(
    SecureRandom secureRandom,
    {int bitLength = 2048}) {
  // Create an RSA key generator and initialize it

  final keyGen = RSAKeyGenerator();

  keyGen.init(ParametersWithRandom(
      RSAKeyGeneratorParameters(BigInt.parse('65537'), bitLength, 64),
      secureRandom));

  // Use the generator
  final pair = keyGen.generateKeyPair();

  // Cast the generated key pair into the RSA key types
  final myPublic = pair.publicKey as RSAPublicKey;
  final myPrivate = pair.privateKey as RSAPrivateKey;

  return AsymmetricKeyPair<RSAPublicKey, RSAPrivateKey>(myPublic, myPrivate);
}
我們新增一個 RSA 生成器 RSAKeyGenerator(),並將 ParametersWithRandom 傳入做出始化。最後呼叫 .generateKeyPair() 用以生成密鑰對
完成密鑰對生成後,我們來處理加密和解密的邏輯。由於加解密都是由一段 Uint8List 處理,因此我們的輸入明文、密文都是 Uint8List,並且根據加解密引擎逐塊處理。以下是官方文件的範例程式:
// RSA 加密,第一個參數是公鑰,第二個參數是明文
Uint8List rsaEncrypt(RSAPublicKey myPublic, Uint8List dataToEncrypt) {
  final encryptor = OAEPEncoding(RSAEngine())
    ..init(true, PublicKeyParameter<RSAPublicKey>(myPublic)); // true=encrypt

  return _processInBlocks(encryptor, dataToEncrypt);
}

// RSA 解密,第一個參數是密鑰,第二個參數是密文
Uint8List rsaDecrypt(RSAPrivateKey myPrivate, Uint8List cipherText) {
  final decryptor = OAEPEncoding(RSAEngine())
    ..init(false, PrivateKeyParameter<RSAPrivateKey>(myPrivate)); // false=decrypt

  return _processInBlocks(decryptor, cipherText);
}

Uint8List _processInBlocks(AsymmetricBlockCipher engine, Uint8List input) {
  final numBlocks = input.length ~/ engine.inputBlockSize +
      ((input.length % engine.inputBlockSize != 0) ? 1 : 0);

  final output = Uint8List(numBlocks * engine.outputBlockSize);

  var inputOffset = 0;
  var outputOffset = 0;
  while (inputOffset < input.length) {
    final chunkSize = (inputOffset + engine.inputBlockSize <= input.length)
        ? engine.inputBlockSize
        : input.length - inputOffset;

    outputOffset += engine.processBlock(
        input, inputOffset, chunkSize, output, outputOffset);

    inputOffset += chunkSize;
  }

  return (output.length == outputOffset)
      ? output
      : output.sublist(0, outputOffset);
}
我們可以試著針對一個字串進行加解密
void main() {
  final secureRandom = SecureRandom('Fortuna')
    ..seed(
        KeyParameter(Platform.instance.platformEntropySource().getBytes(32)));
  final pair = generateRSAkeyPair(secureRandom);

  final public = pair.publicKey;
  final private = pair.privateKey;

  // 原始訊息
  String plaintext = "Hello";
  print("原始訊息: $plaintext");

  // 使用公鑰加密
  Uint8List encryptedData = rsaEncrypt(public, utf8.encode(plaintext));
  print("加密後的資料: ${base64Encode(encryptedData)}");

  // 使用私鑰解密
  Uint8List decryptedData = rsaDecrypt(private, encryptedData);
  String decryptedText = utf8.decode(decryptedData);
  print("解密後的訊息: $decryptedText");
}
原始訊息: Hello
加密後的資料: I+ZOiAxqKCkcogLKaN24w1ug0oXyDXdV91FlmXa7Uj4zK/XoQfEQ6d/Fg7Km7hYdcUgrJyvDEtEA0IVa9Vy4t/Wtj+HKPi4m603xL1tDzmP2vFgO8RjXaviao7/oi4eEmfV4zL14wI5APIePp1JihosX3cFq8seAyL8wlscy4hGggYxU981EF8AYDgaXNC1/cufXkSlimsOUCYxVfign/69VSXNoB0Pz0WU9xt52Nrx0zc6uZzs0IS4jLHtXtQc5m4rNNV5gZvj0xYMQezu2Hh2XCPLmJmgK4v+Dhmoltmjhp1sEx3+X30BENtnp9wpWDDxKylu34PEgnrD095zuGQ==
解密後的訊息: Hello
從上述的程式碼中可以看出公鑰為 pair.publicKey 這是一個物件,我們需要將其編碼成字串才可以傳送給伺服器。此時我們可以使用 ASN1 將公鑰編碼再轉成 base64 給伺服器。
參考官方文檔:https://github.com/bcgit/pc-dart/blob/master/tutorials/asn1.md
String encodePublicKeyToBase64(RSAPublicKey publicKey) {
  final seq = ASN1Sequence(elements: [
    ASN1Integer(publicKey.modulus),
    ASN1Integer(publicKey.exponent)
  ]);

  return base64Encode(seq.encode());
}
RSAPublicKey decodePublicKeyFromBase64(String publicKeyBase64) {
  // 解 base64 編碼
  Uint8List publicKeyDER = base64Decode(publicKeyBase64);

  // 解析
  ASN1Parser asn1Parser = ASN1Parser(publicKeyDER);
  ASN1Sequence publicKeySeq = asn1Parser.nextObject() as ASN1Sequence;

  BigInt modulus = (publicKeySeq.elements![0] as ASN1Integer).integer!;
  BigInt exponent = (publicKeySeq.elements![1] as ASN1Integer).integer!;

  return RSAPublicKey(modulus, exponent);
}
接著我們嘗試將公鑰轉成 base64,再轉回來觀察是否能正確轉換:
// 原本的公鑰
final public = pair.publicKey;
final private = pair.privateKey;

// 傳送到伺服器前先編成 base64
final publicBase64 = encodePublicKeyToBase64(public);

// 伺服器傳送後...

// 嘗試將 base64 轉為公鑰
final public2 = decodePublicKeyFromBase64(publicBase64);

// 原始訊息
String plaintext = "Hello";
print("原始訊息: $plaintext");

// 使用公鑰加密
Uint8List encryptedData = rsaEncrypt(public2, utf8.encode(plaintext));
print("加密後的資料: ${base64Encode(encryptedData)}");

// 使用私鑰解密
Uint8List decryptedData = rsaDecrypt(private, encryptedData);
String decryptedText = utf8.decode(decryptedData);
print("解密後的訊息: $decryptedText");
原始訊息: Hello
加密後的資料: D+9rVdm57B1WTSD5mTgJPauY6/Fes08QR1BpUcyaOu1Vzd9ftGMAqLa/kzELFqO0/Q7hCsDOD6I28U1p74yBgNYKoIBFk3hrfjAP4g+Lay8kw52Daqtupl5vo9swY+zEsxHARaBQfR7COl5DO6LpADhC5x1nMqYowAhQAh6bBoiVUet/A5SDoj3EB0q8iCI0zeQV/0mTc5JhCvr4+SqgWBJ7KOkP0/wtdt6YUmfsdzTIuuU3C2fdxa6mBGKHRx9mnZX5zIUQW3589symDkIf2giDWeaOfLpn/JSnyDXULpoPY3ZHA4Elt41ycF7QjhhhA9vI/az5uutYFIKH/0R4qA==
解密後的訊息: Hello
既然我們能將訊息加密,代表我們也能將密鑰做加密。接下來會介紹如何利用 AES 加解密訊息
參考官方文檔:https://github.com/bcgit/pc-dart/blob/master/tutorials/aes-cbc.md
Advanced Encryption Standard, AES 是一種對稱加密算法。作為對稱加密演算法,使用相同的密鑰進行加解密。AES 也是一種分組加密演算法,必需以固定大小的區塊來處理。Cipher Block Chaining, CBC 是一種實作方法,在加密每個區塊前,會將每個區塊與前一個區塊進行組合。由於第一個區塊沒有前一個區塊,因此要使用初始化向量 (Initialization Vector, IV) 進行組合。
AES 家族中有三種演算法:AES-128、AES-192 和 AES-256,數字對應於密鑰長度 (以 bits 為單位)。而這些演算法其區塊始終為 128bits
開始 AES 加解密前我們要先生成密鑰和初始化向量
const blockSize = 16; // 16bytes = 128bits

Uint8List _generateKey(int length) {
  final random = Random.secure();
  return Uint8List.fromList(
      List<int>.generate(length, (_) => random.nextInt(256)));
}

// 生成隨機 AES 密鑰
Uint8List generateAESKey(int keySizeInBits) {
  return _generateKey(keySizeInBits ~/ 8);
}

// 生成隨機 IV
Uint8List generateIV() {
  return _generateKey(blockSize);
}
random.nextInt(n) 生成 [0, n) 區間的整數generateAESKey() 的參數可以人128, 192, 256 這代表的是以 bit 為長度,_generateKey() 則是以 bytes 為長度,因此要 ~8
generateIV() 初始向量長度為 128 bits,也就是 16 bytes,因此生成長度為 16 的 Uint8List
接著我們可以看看如何進行加密,其中一開始先檢查 key 和 iv 長度,接著初始化 AES 引擎 AESEngine() 對應的是 CBC 方法 CBCBlockCipher。如同前面所述,我們要將明文以 128bits 對齊
Uint8List aesCbcEncrypt(Uint8List key, Uint8List iv, Uint8List plainText) {
  assert([128, 192, 256].contains(key.length * 8));
  assert(128 == iv.length * 8);

  // Create a CBC block cipher with AES, and initialize with key and IV

  final cbc = CBCBlockCipher(AESEngine())
    ..init(true, ParametersWithIV(KeyParameter(key), iv)); // true=encrypt

  plainText = _pad(plainText);

  // Encrypt the plaintext block-by-block
  final cipherText = Uint8List(plainText.length); // allocate space

  var offset = 0;
  while (offset < plainText.length) {
    offset += cbc.processBlock(plainText, offset, cipherText, offset);
  }
  assert(offset == plainText.length);

  return cipherText;
}
其中 _pad() 方法如下,將 data 以 128 bits (16 bytes) 對齊
Uint8List _pad(Uint8List data) {
  final padLength = blockSize - (data.length % blockSize);
  return Uint8List.fromList(data + List<int>.filled(padLength, padLength));
}
解密的方法雷同,因為加密時有做對齊,因此解密時還需要把最後的空白以 unpad() 清除
Uint8List aesCbcDecrypt(Uint8List key, Uint8List iv, Uint8List cipherText) {
  assert([128, 192, 256].contains(key.length * 8));
  assert(128 == iv.length * 8);

  // Create a CBC block cipher with AES, and initialize with key and IV
  final cbc = CBCBlockCipher(AESEngine())
    ..init(false, ParametersWithIV(KeyParameter(key), iv)); // false=decrypt

  // Decrypt the cipherText block-by-block
  final paddedPlainText = Uint8List(cipherText.length); // allocate space

  var offset = 0;
  while (offset < cipherText.length) {
    offset += cbc.processBlock(cipherText, offset, paddedPlainText, offset);
  }
  assert(offset == cipherText.length);

  return _unpad(paddedPlainText);
}
其中 _unpad() 方法如下
Uint8List _unpad(Uint8List paddedData) {
  final padLength = paddedData.last;
  return Uint8List.sublistView(paddedData, 0, paddedData.length - padLength);
}
void main(List<String> arguments) {
  // Alice 生成公鑰私鑰對
  final secureRandom = SecureRandom('Fortuna')
    ..seed(
        KeyParameter(Platform.instance.platformEntropySource().getBytes(32)));
  final pair = generateRSAkeyPair(secureRandom);

  RSAPublicKey public = pair.publicKey;
  RSAPrivateKey private = pair.privateKey;

  // Alice 將公鑰傳給 Bob
  String publicBase64 = encodePublicKeyToBase64(public);

  // ... 伺服器 ...

  // Bob 收到 Alice 的公鑰
  RSAPublicKey publicKeyFromAlice = decodePublicKeyFromBase64(publicBase64);

  // Bob 產生 AES KEY 即初始向量
  Uint8List aesKey = generateAESKey(256);
  Uint8List aesIV = generateIV();

  // Bob 將 aesKey 以及 aesIV 編碼成 base64 並以 publicKey 接密 轉送給 Alice
  Uint8List encryptedAESKey = rsaEncrypt(publicKeyFromAlice, aesKey);
  Uint8List encryptedAESIV = rsaEncrypt(publicKeyFromAlice, aesIV);

  // ... 伺服器 ...

  // Alice 利用自己的 private key 將 encryptedAESKey 及 encryptedAESIV 解碼
  Uint8List decryptedAESKey = rsaDecrypt(private, encryptedAESKey);
  Uint8List decryptedAESIV = rsaDecrypt(private, encryptedAESIV);

  // 開始互相傳送訊息
  // 假設 Bob 向 Alice 傳送訊息

  String someText = "呵呵你好(摸頭(燦笑 ❤️";
  Uint8List encryptedSomeText =
      aesCbcEncrypt(aesKey, aesIV, utf8.encode(someText));

  // 以 base64 傳給伺服器
  String encryptedSomeTextBase64 = base64Encode(encryptedSomeText);

  print("伺服器上加密訊息:$encryptedSomeTextBase64");

  // Alice 解密
  Uint8List decryptedSomeText = aesCbcDecrypt(
      decryptedAESKey, decryptedAESIV, base64Decode(encryptedSomeTextBase64));

  print("Alice解密後的訊息:${utf8.decode(decryptedSomeText)}");
}
運行結果:
伺服器上加密訊息:jnkrYIf27l0Kvg8XHaMq43uQDVH+dX4KPiR0CreyATeOUdn1q6OjjHb4wMEhsu57
Alice解密後的訊息:呵呵你好(摸頭(燦笑 ❤️
後記:若雙方更換裝置時,則原本的金鑰也會遺失,為了避免這個情況,我們可以讓使用者透過自己的 pin 碼再將讓金鑰加密儲存在伺服器,更換裝置時再用原本的 pin 碼將金鑰取回。