今天來在工作事項資料表元件上加入分頁與排序功能。
相較於我們在使用 ng add 命令產生 Table 元件時,Schematics 把分頁元件實體放至資料來源,我比較傾向單純在資料來源記錄每頁筆數與當前頁碼,來降低資料處理與介面操作之間的耦合。
export class TaskDataSource extends DataSource<TaskItem> {
  readonly pageIndex = signal(0);
  readonly pageSize = signal(10);
  readonly totalCount = signal(0);
  ...
}
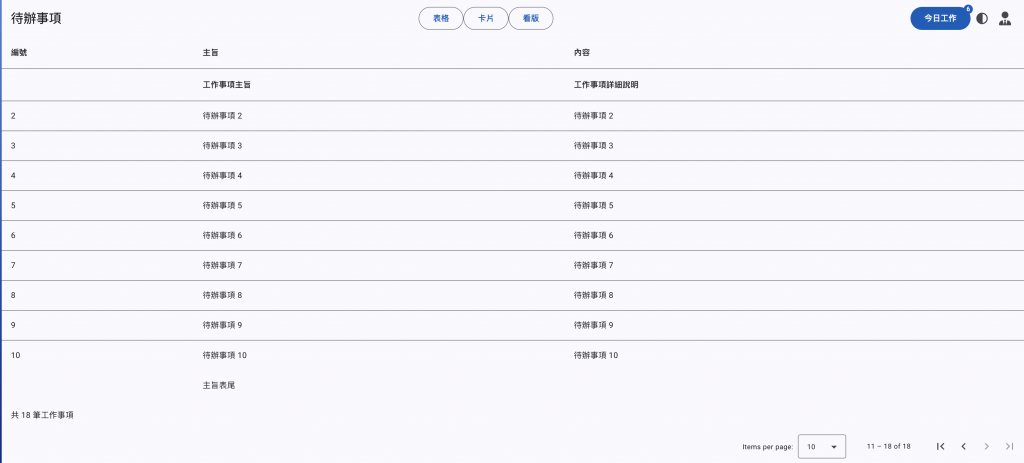
因此,在引用 MatPaginatorModule 之後,就可以利用 <mat-paginator> 標籤使用分頁元件。如下面程式,在分頁元件中將 length 、pageSize 與 pageIndex 等參數設定與資料來源的屬性連結。另外,我們可以透過 pageSizeOptions 來讓使用者選擇不同的每頁筆數,如果想關閉這個功能則可以設定 hidePageSize 為 true。
<mat-paginator
  [length]="dataSource.totalCount()"
  [pageIndex]="dataSource.pageIndex()"
  [pageSize]="dataSource.pageSize()"
  [pageSizeOptions]="[5, 10, 25, 100]"
  showFirstLastButtons="true"
  (page)="onPageChange($event)"
/>
當使用者切換每頁筆數或是點選上下頁時,就可以利用 page 事件來取得新增資訊。
onPageChange({ pageIndex, pageSize }: PageEvent): void {
  this.dataSource.pageIndex.set(pageIndex);
  this.dataSource.pageSize.set(pageSize);
}
其他屬性的部分,Paginator 元件只提供上下頁的按鈕,也可以設定 showFirstLastButton 屬性來開啟第一頁與最後一頁的按鈕,但若要使用顯示每一個頁碼的需求,就只能自行開發了。
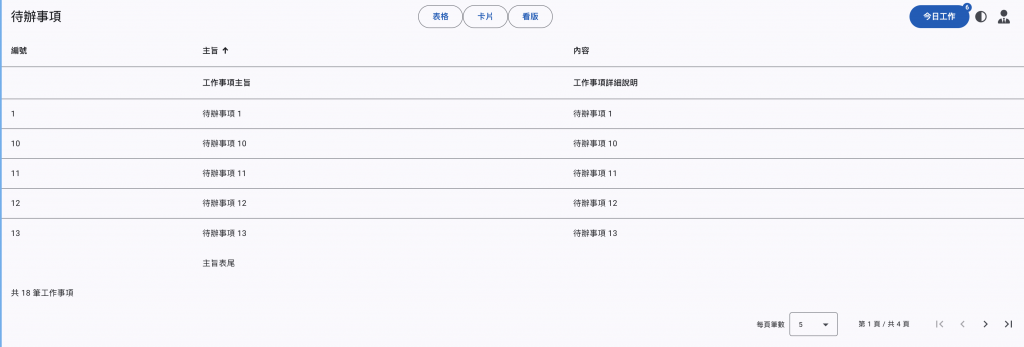
從上面可看到,Paginator 元件的預設的語系會是英文,如果希望使用其他語系或是修正元件的文字,可以建立一類別來實作 MatPaginatorIntl 介面。
@Injectable()
export class CustomPaginatorIntl implements MatPaginatorIntl {
  changes = new Subject<void>();

  firstPageLabel = '第一頁';
  itemsPerPageLabel = '每頁筆數';
  lastPageLabel = '最後一頁';
  nextPageLabel = '下一頁';
  previousPageLabel = '上一頁';

  getRangeLabel(page: number, pageSize: number, length: number): string {
    if (length === 0) {
      return '第 1 頁 / 共 1 頁';
    }
    const amountPages = Math.ceil(length / pageSize);
    return `第 ${page + 1} 頁 / 共 ${amountPages} 頁`;
  }
}
接著,就可以在 app.config 來抽換 MatPaginatorIntl 提供者的實作。
export const appConfig: ApplicationConfig = {
  providers: [
    ...
    { provide: MatPaginatorIntl, useClass: CustomPaginatorIntl },
  ],
};

Angular Material 把排序的實作獨立出來,在引用 MatSortModule 模組後,我們可以在一般的資料表中使用 matSort 與 mat-sort-header 指令元件。
<table matSort (matSortChange)="sortData($event)">
  <tr>
    <th>編號</th>
    <th mat-sort-header="subject">主旨</th>
    <th>內容</th>
  </tr>
  ...
</table>
如上面程式,在一般表格中使用 mat-sort-header 會指定要排序的對象;然而,如果使用在 MatTable 之中,則會以 matColumnDef 的設定為主。
<table
  mat-table
  [dataSource]="dataSource"
  aria-label="Elements"
  matSort
  (matSortChange)="onSortChange($event)"
>
  <ng-container matColumnDef="subject">
    <th mat-header-cell *matHeaderCellDef mat-sort-header>主旨</th>
    <td mat-cell *matCellDef="let row">{{ row.subject }}</td>
    <td mat-footer-cell *matFooterCellDef="">主旨表尾</td>
  </ng-container>
  ...
</table>
當使用者選擇要排序的欄位時,就可以利用 matSortChange 事件,把排序資訊設定到資料來源內,以觸發後續的資料重整。
今天完成以資料表方式來呈現工作事項的清單,接下來我們使用卡片來呈現工作事項。


 iThome鐵人賽