iT邦幫忙

2024 iThome 鐵人賽

DAY 6
0
佛心分享-IT 人自學之術

韌體小白之路系列 第 6

[Day06] 韌體小白之路_追蹤工具-2

  • 分享至 

  • xImage
  •  

如何不大更改原本的程式碼與Code,改成FreeRTOSv11 & SystemView Tool v3.52a

更改FreeRTOS & SystemView Tool 版本

Step1: 下載FreeRTOSv11
https://ithelp.ithome.com.tw/upload/images/20240920/20155520GisEdm6Dxk.png
Step2: 將新的FreeRTOS更新到Project上

  1. 將FreeRTOSv11中的port.c 取代原本的port.c
    old: Thirdparty\FreeRTOS\portable\GCC\ARM_CM4F\port.c
    new: FreeRTOS-KernelV11.1.0\FreeRTOS-KernelV11.1.0\portable\GCC\ARM_CM4F\port.c
  2. 將FreeRTOSv11中的portable.h 取代原本的portable.h
    old: ThirdParty\freeRTOS\include\portable.h
    new: FreeRTOS-KernelV11.1.0\FreeRTOS-KernelV11.1.0\include\portable.h
  3. Download SystemView Tool (Version 3.52a)
  4. Download SystemView Target Source (Version 3.54)
  5. 替換原本的SEGGER_SYSVIEW_Config_FreeRTOS.c
    old: ThirdParty\SEGGER\Config\SEGGER_SYSVIEW_Config_FreeRTOS.c
    new: SystemView_Src_V354\Sample\FreeRTOSV11\Config\Cortex-M\SEGGER_SYSVIEW_Config_FreeRTOS.c
  6. 替換SEGGER_SYSVIEW_FreeRTOS.c & SEGGER_SYSVIEW_FreeRTOS.h
    old:
    ThirdParty\SEGGER\OS\SEGGER_SYSVIEW_FreeRTOS.c
    ThirdParty\SEGGER\OS\SEGGER_SYSVIEW_FreeRTOS.h
    new:
    SystemView_Src_V354\Sample\FreeRTOSV11\SEGGER_SYSVIEW_FreeRTOS.c
    SystemView_Src_V354\Sample\FreeRTOSV11\SEGGER_SYSVIEW_FreeRTOS.h

上面已經替換好FreeRTOS跟SystemView的話,就不用Patch文件去做補強,繼續昨天的課程~

使用SEGGER作為追蹤工具

Step3: FreeRTOSConfig.h Settings
  1. SEGGER_SYSVIEW_FreeRTOS.h header must be included at the end of FreeRTOSConfig.h or above every include of FreeRTOS.h. It defineds the trace macros to creat SYSTEMVIEW events.
/* Definitions that map the FreeRTOS port interrupt handlers to their CMSIS
standard names. */
#define vPortSVCHandler SVC_Handler
#define xPortPendSVHandler PendSV_Handler
#define xPortSysTickHandler SysTick_Handler

#include "SEGGER_SYSVIEW_FreeRTOS.h" //adding

#endif /* FREERTOS_CONFIG_H */
  1. In freeRTOSConfig.h include the below macros
#define INCLUDE_vTaskDelay				1

#define INCLUDE_xTaskGetIdleTaskHandle	1 //adding, 設為1代表build時候會一併建構,設為0則不會
#define INCLUDE_pxTaskGetStackStart		1 //adding, same as above
	
/* Cortex-M specific definitions. */
Step4: MCU & Project specific settings
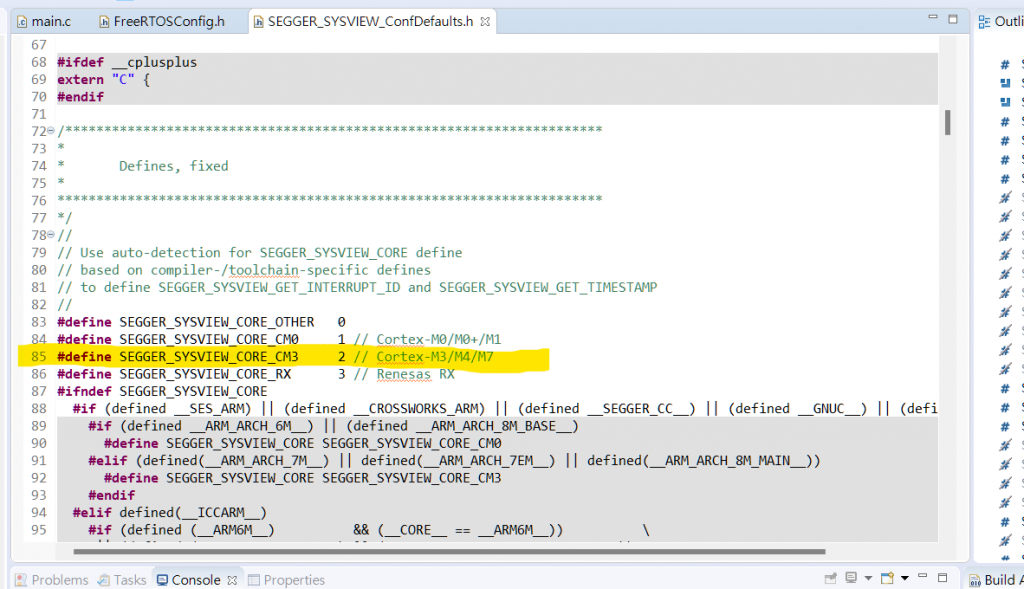
  1. Mention which processor core your MCU is using in SEGGER_SYSVIEW_ConfFefaults.h
    點開SEGGER_SYSVIEW_ConfDefaults.h (在ThirdParty\SEGGER\SEGGER下)
    使用的為SEGGER_SYSVIEW_CORE_CM3 2 // Cortex-M3/M4/M7 ==> STM32F407屬於Cortex-M4
    https://ithelp.ithome.com.tw/upload/images/20240920/20155520rvkYQ6SM4x.png
    改code
    原本:
    https://ithelp.ithome.com.tw/upload/images/20240920/20155520y3aiI89YBc.png

改為:

  #ifndef   SEGGER_SYSVIEW_CORE
    #define SEGGER_SYSVIEW_CORE SEGGER_SYSVIEW_CORE_CM3
  #endif
#endif
  1. Do SystemView buffer size configuration in SEGGER_SYSVIEW_ConfDefaults.h
    原本的Buffer Size:
    https://ithelp.ithome.com.tw/upload/images/20240920/20155520I4KxilXcYW.png

改為:為RTT Buffer增加size,讓內存可以收集更多事件

#ifndef   SEGGER_SYSVIEW_RTT_BUFFER_SIZE
  #define SEGGER_SYSVIEW_RTT_BUFFER_SIZE          (1024 * 4)
#endif
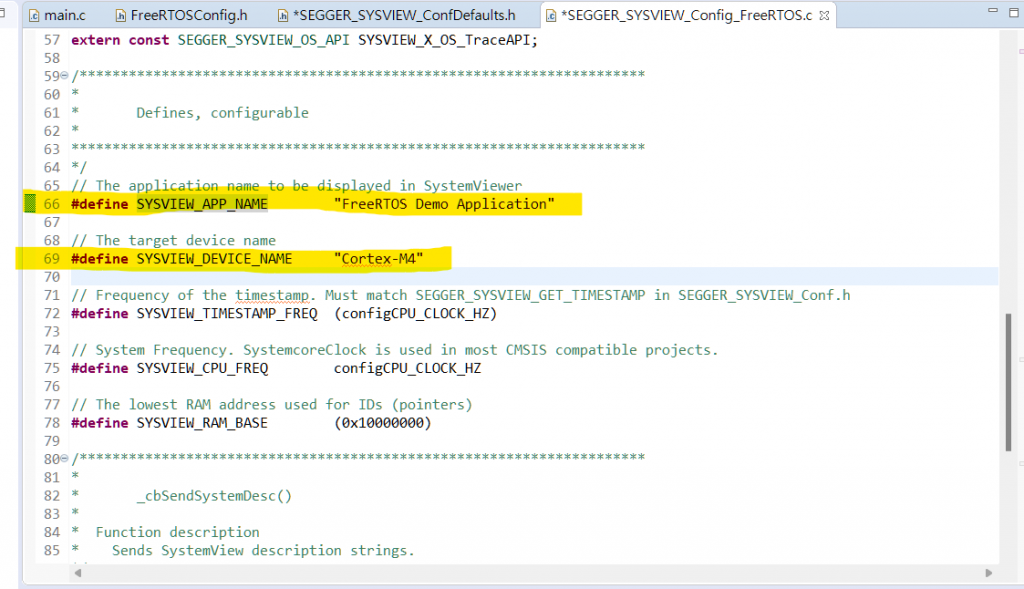
  1. Configure the some of the application specific information in SEGGER_SYSVIEW_Config_FreeRTOS.c
    原本:
    https://ithelp.ithome.com.tw/upload/images/20240920/20155520Q2fWwmgwbD.png

改為:

// The application name to be displayed in SystemViewer
#define SYSVIEW_APP_NAME        "FreeRTOS Hello World Application"

// The target device name
#define SYSVIEW_DEVICE_NAME     "STM32F407-DISC-1"
Step5: Enable the ARM Cortex M3/M4 Cycle Counter

This is required to maintain the time stamp information of application events.
SystemView will use the Cycle counter register value to keep the time stamp information of the events.
SWT_CYCCNT register of ARM Cortex M3/M4 processor stores the number of clock cycles that happened after the processor's reset.
By default, this register is disabled.

  • 建立的DWT_CTRL(為了Cycle Count)
    define it
/* Private variables ---------------------------------------------------------*/

/* USER CODE BEGIN PV */

#define DWT_CTRL	(*(volatile uint32_t*)0xE0001000) //adding

/* USER CODE END PV */

use it

  /* Initialize all configured peripherals */
  MX_GPIO_Init();
  /* USER CODE BEGIN 2 */
  
  DWT_CTRL |= (1 << 0); //adding

文件解釋:
https://ithelp.ithome.com.tw/upload/images/20240920/20155520qWpUle6w2G.png

Step6: Start the recording of events

To start the recordings of your FreeRTOS application, call the below SEGGER APIs.

SEGGER_SYSVIEW_Conf();
SEGGER_SYSVIEW_Start();
The segger systemview events recording starts only when you call SEGGER_SYSVIEW_Start().
We will call this from main.c

  /* Initialize all configured peripherals */
  MX_GPIO_Init();
  /* USER CODE BEGIN 2 */
  
  DWT_CTRL |= (1 << 0);
  
  SEGGER_SYSVIEW_Conf(); //adding
  
  SEGGER_SYSVIEW_Start(); //adding
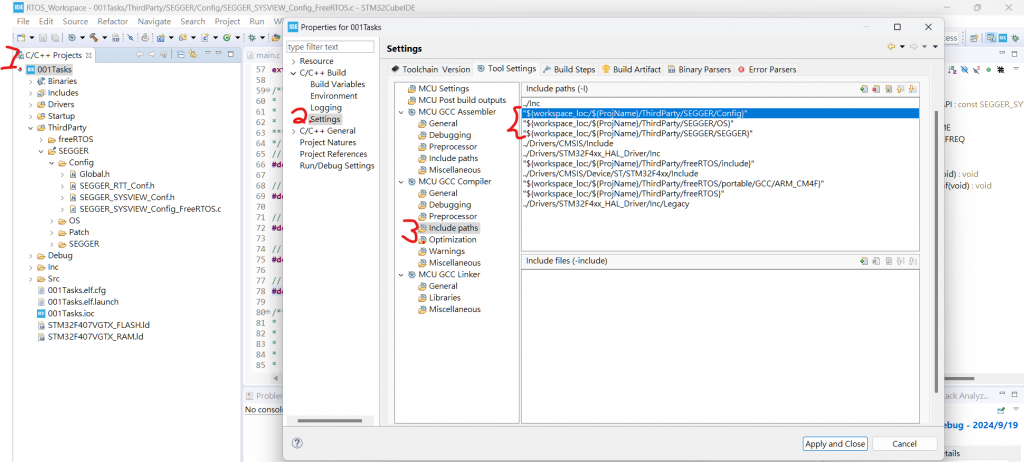
Setp7: Compile and Debug
  1. Make sure that include path settings are set
  2. Compile and flash your FreeRTOS + SystemView application
  3. Go to debugging mode using your IDE
  4. Hit run and then pause after couple seconds
  • 將已經用好的SEGGER加入到編譯路徑中
  • 對Projects右鍵,選Properties
    https://ithelp.ithome.com.tw/upload/images/20240920/20155520a5rDAqaP0a.png
    重新編譯遇到錯誤:
    ../ThirdParty/SEGGER/SEGGER/SEGGER_RTT.h:60:10: fatal error: SEGGER_RTT_Conf.h: No such file or directory
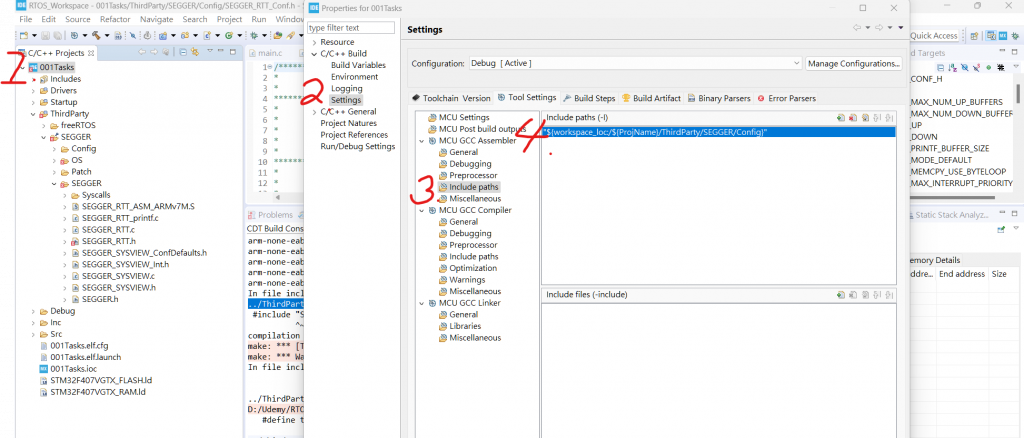
  • 將SEGGER/Config 加入Assembler的路徑中
    https://ithelp.ithome.com.tw/upload/images/20240920/20155520oe5rUrkQVP.png

Build當中遇見的錯誤:

  1. 編譯過程中無法找到變數 xIdleTaskHandles_at file SEGGER_SYSVIEW_FreeRTOS.h
    將原本#define traceTASK_SWITCHED_IN() 後面那一段改為以下code即可
  #define traceTASK_SWITCHED_IN()                   {                                                                     \
                                                      if(prvGetTCBFromHandle(NULL) == xIdleTaskHandle) {                  \
                                                        SEGGER_SYSVIEW_OnIdle();                                          \
                                                      } else {                                                            \
                                                        SEGGER_SYSVIEW_OnTaskStartExec((U32)pxCurrentTCB);                \
                                                      }                                                                   \
                                                    }

From: https://github.com/sifive/example-freertos-blinky-systemview/blob/master/SEGGER_SYSVIEW_FreeRTOS.h
2. 原本Hello World新增的Code有誤undefined reference to MPU_xTaskCreate'
將在mpu_wrapper中的#define xTaskCreate MPU_xTaskCreate
改為 #define xTaskCreate xTaskCreate即可

終於! 成功Build過去了!

  1. 為了避免在SEGGER_SYSVIEW_Start()之後才執行Scheduler,要修改一下Core\Src\stm32f4xx_hal_msp.c一下,讓Scheduler在msrpc中手動初始化,而非到vTaskStartScheduler();才初始化
  • 在stm32f4xx_hal_msp.c修改:
/* Includes ------------------------------------------------------------------*/
#include "main.h"
/* USER CODE BEGIN Includes */
#include "FreeRTOS.h" //adding
/* USER CODE END Includes */ 
  /* System interrupt init*/

  /* USER CODE BEGIN MspInit 1 */
  //vInitPrioGroupValue();//原始課程推薦使用此api,但發現他來自patch file,但是使用新的FreeRTOS又不需要patch file(而且我用patch file會報錯)
  NVIC_SetPriorityGrouping(0); // google 而來的解法,不確定可不可以
  /* USER CODE END MspInit 1 */

解法來源: https://forums.freertos.org/t/trying-to-integrate-segger-in-to-stm32-with-freertos-getting-vinitpriogroupvalue-not-found-error/15086

Step8: Collect the recorded data (RTT Buffer)
  • Single-shot Recording:
  1. Get the SystemView RTT Buffer address and the number of bytes used.
    (Normally_SEGGER_RTT.aUP[1].pBuffer and _SEGGER_RTT.aUP[1].WrOff).
  2. Take the memory dump to a file
  3. save the file with .SVdat extension
  4. use that file to load into SystemView HOST Software to analyze the events.
  • 找到RTT Buffer Address
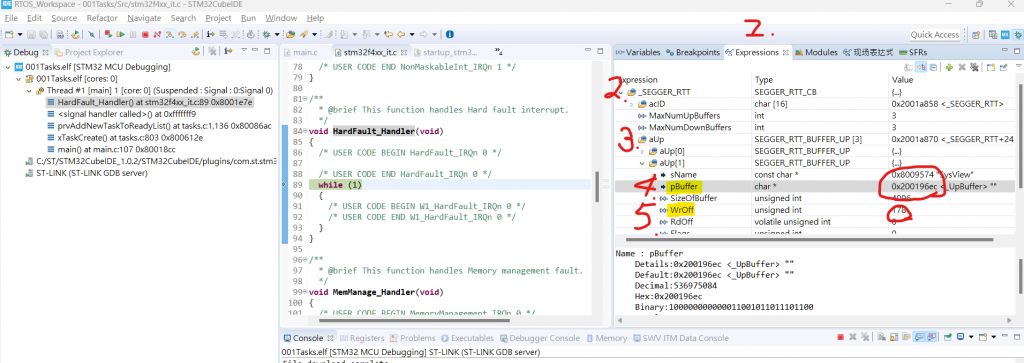
    找到Expressions(找不到可以點Windows找)-> 輸入_SEGGER_RTT->找到下面的aUP資料夾->找到pBuffer->
    取得地址0x200196ec並記住WrOff大小178
    https://ithelp.ithome.com.tw/upload/images/20240920/20155520RRJ1467LsX.png
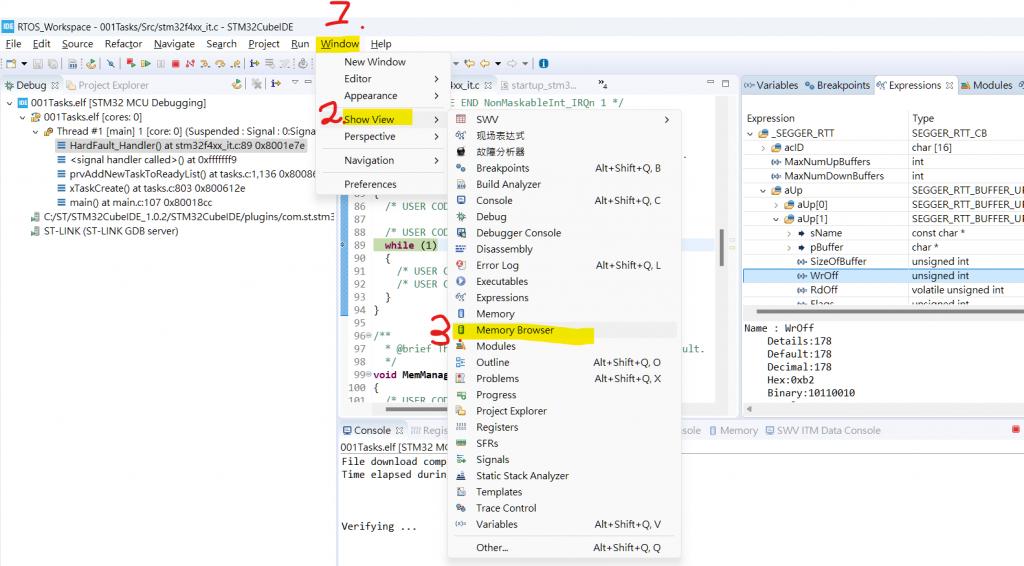
  • 打開Memeory Browser
    https://ithelp.ithome.com.tw/upload/images/20240920/20155520aAPZIigqIz.png
  • 在Memory Browser 輸入地址
    https://ithelp.ithome.com.tw/upload/images/20240920/20155520fcVbIciFuK.png
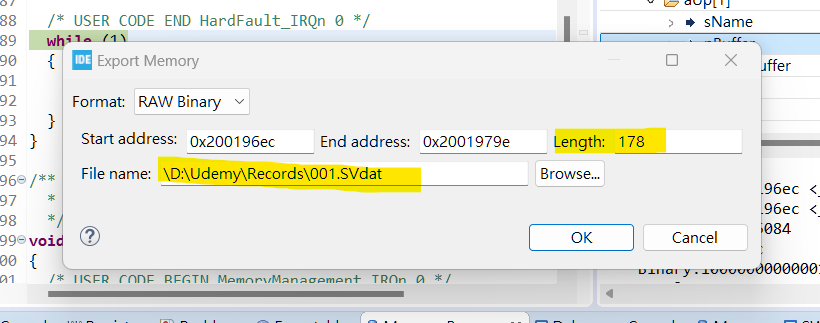
  • Export the file
    https://ithelp.ithome.com.tw/upload/images/20240920/20155520NRckHWBQOX.png
    https://ithelp.ithome.com.tw/upload/images/20240920/20155520ZEYKsdDdjD.png

這樣就產出這次事件的紀錄,明天開始用SYSVIEW來看記錄了甚麼事件吧~~


上一篇
[Day05] 韌體小白之路_追蹤工具
下一篇
[Day07] 韌體小白之路_追蹤工具-3
系列文
韌體小白之路7
圖片
  直播研討會
圖片
{{ item.channelVendor }} {{ item.webinarstarted }} |
{{ formatDate(item.duration) }}
直播中

尚未有邦友留言

立即登入留言