iT邦幫忙

2024 iThome 鐵人賽

DAY 5
0
佛心分享-IT 人自學之術

韌體小白之路系列 第 5

[Day05] 韌體小白之路_追蹤工具

  • 分享至 

  • xImage
  •  

查了一些相關網站,似乎因為ST-LINK更新,導致我的STM32F407無法從SWV ITM Data Console看到printf的資料,建議適用SEEGER來查看~

使用SEGGER作為追蹤工具

下載列表
  1. SEGGER SystemView Software -> 下載到HOST上
  2. SEGGER SystemView target source files -> 放到FreeRTOS中並整合進開發版上
  3. SEGGER ST-Link Reflash utility -> 本次不使用(如果要用3就要一併用4)
  4. SEGGER J-Link software package V5.12b or later -> 本次不使用
  5. SystemView user manual 用戶手冊

講師的建議是使用更新版本的FreeRTOSv11跟SystemView Target Source v3.54,這樣未來才不需要使用Patch file並導致其他的錯誤(os. 看來要全部重來一遍了)
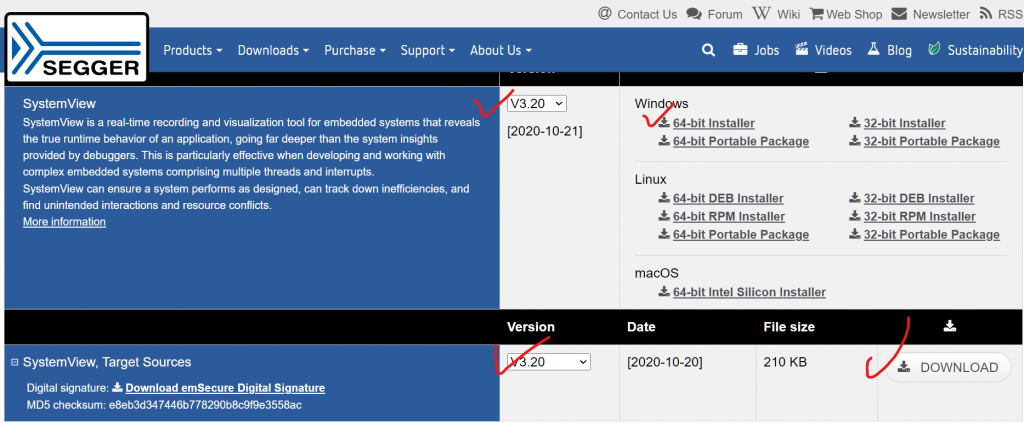
SEGGER SystemView Software & System Target source files download v3.20 version:
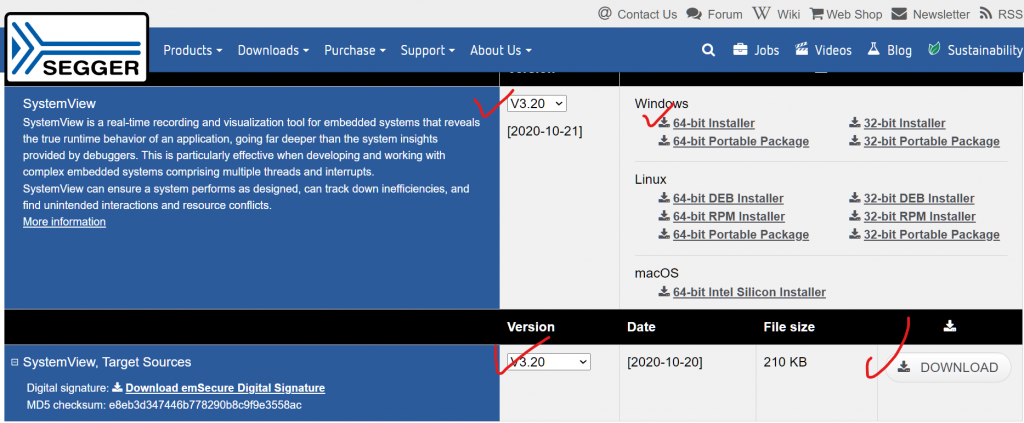
https://ithelp.ithome.com.tw/upload/images/20240919/20155520TUPlfvH4ZI.png

下載SEGGER SystemView Software到主機上:

記得要勾選install a new instance:
https://ithelp.ithome.com.tw/upload/images/20240919/20155520hVTSNGK9to.png

簡單介紹介面:

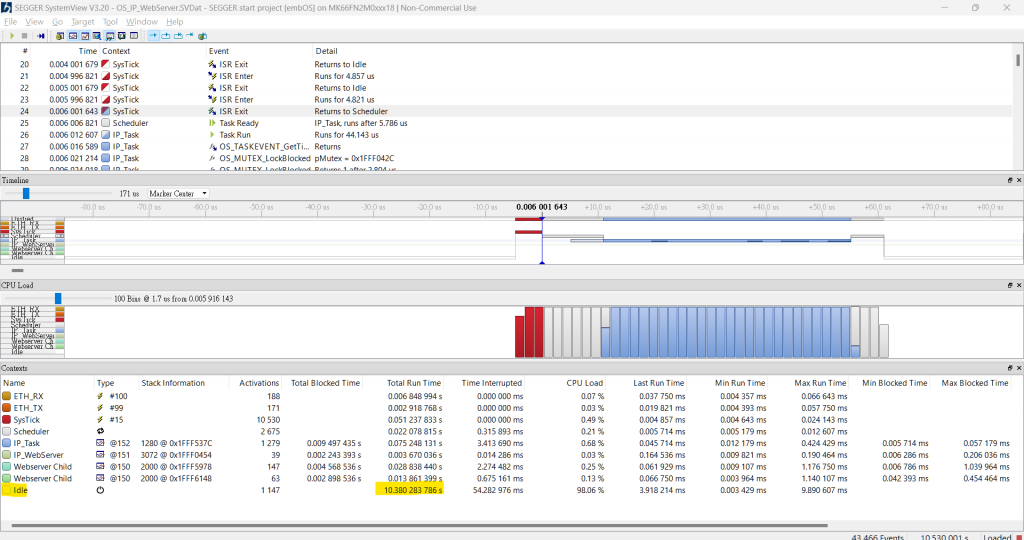
右上角選File->Load Data->C:\Program Files\SEGGER\SystemView_V320\Sample->選OS_IP_WebServer.SVDat,我們Load 範例來介紹一下SEGGER的介面
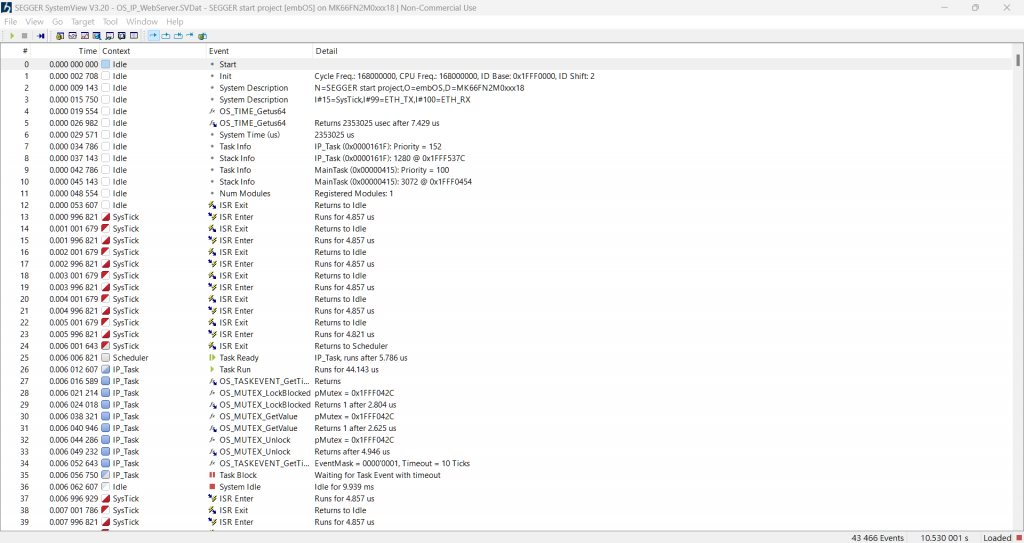
  1. 紀錄所有與Target相關事件的時間、名稱、詳細資訊等_可以拉下所有事件來看,其實這紀錄了這10秒鐘發生的事件
    https://ithelp.ithome.com.tw/upload/images/20240919/20155520I1Qflqr6s8.png
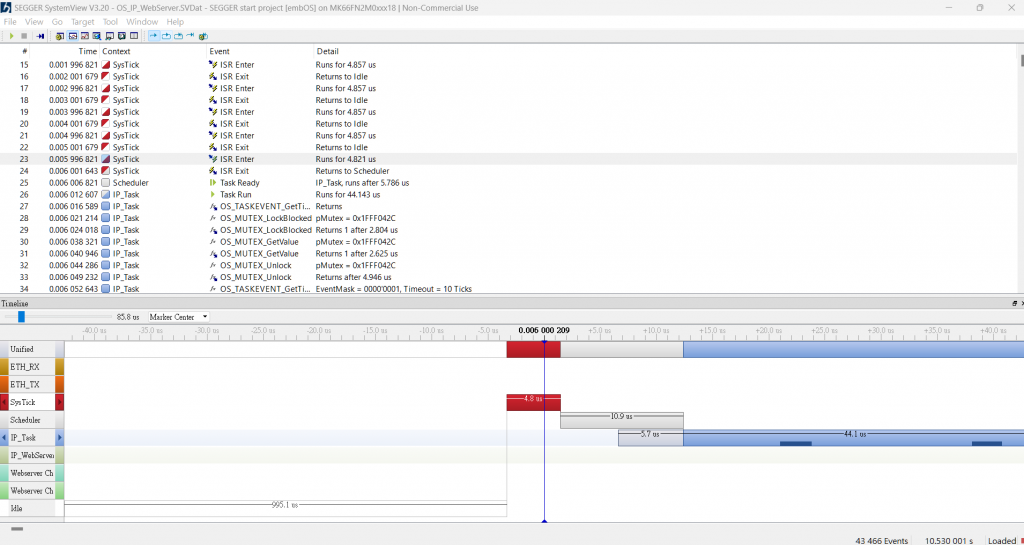
  2. 點選Windows-> Timeline
    https://ithelp.ithome.com.tw/upload/images/20240919/20155520QEcgbfNBSG.png
    紅色表示該Systick使用的時間,灰色代表進入Scheluder,藍色代表這個task運行的時間
  3. 點選Windows-> CPU Load & Windows-> Contexts
    可以看到CPU Total Run Time 近10秒,就了解到其實CPU大部分時間都在idle
    https://ithelp.ithome.com.tw/upload/images/20240919/20155520HoSKhvh0BI.png
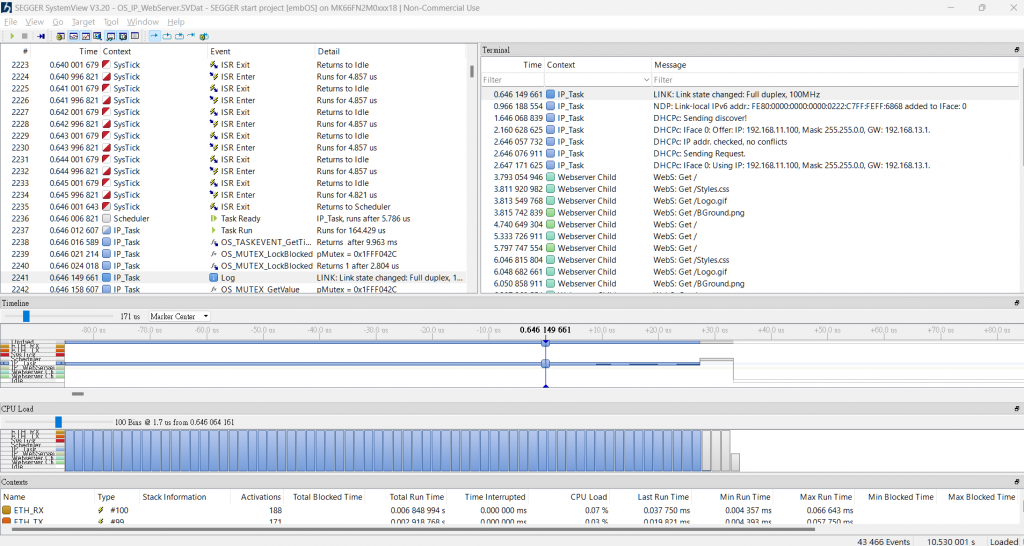
  4. 點選Windows-> Treminal
    可以從Terminal看到相對應的Task事件
    https://ithelp.ithome.com.tw/upload/images/20240919/20155520AnHC7Yflx5.png
將SEGGER System應用到Project上

Step1: Adding SEGGER SystemView target sources to the project

  • Download SystemView target sources and extract it
  • Create the folders
    (1) ThirdParty下建立名為"SEGGER"的資料夾
    (2) 在"SEGGER"資料夾下建立四個資料夾"Config"、"OS"、"Patch"、"SEGGER"
    Config資料夾要有:
    前三個檔案來自SystemView_Src_V320\Config
    最後一個來自SystemView_Src_V320\Sample\FreeRTOSV10\Config\Cortex-M
    複製貼上至Config資料夾
    https://ithelp.ithome.com.tw/upload/images/20240919/20155520Ho1XdpZUY2.png
    OS資料夾要有:
    這兩個檔案來自SystemView_Src_V320\Sample\FreeRTOSV10
    https://ithelp.ithome.com.tw/upload/images/20240919/20155520rTz5Uiyjw4.png
    Patch資料夾要有:
    來自課程提供:
    p.s 如果使用的FreeRTOS版本為v11(up)且SystemView版本為v3.54(up)就不用Patch
    https://ithelp.ithome.com.tw/upload/images/20240919/20155520o7CcIxQxkW.png
    SEGGER(最內層的)資料夾要有:
    檔案來自SystemView_Src_V320\SEGGER,全部複製貼上即可
    https://ithelp.ithome.com.tw/upload/images/20240919/20155520XeaAbqyjuT.png
    因為不會用到其他編譯方式,所以SEEGGER\Syscalls裡面僅保留GCC即可
    https://ithelp.ithome.com.tw/upload/images/20240919/20155520QyIkSgGfY0.png

Step2: Patching FreeRTOS files

you need to patch some of the FreeRTOS files with patch given.
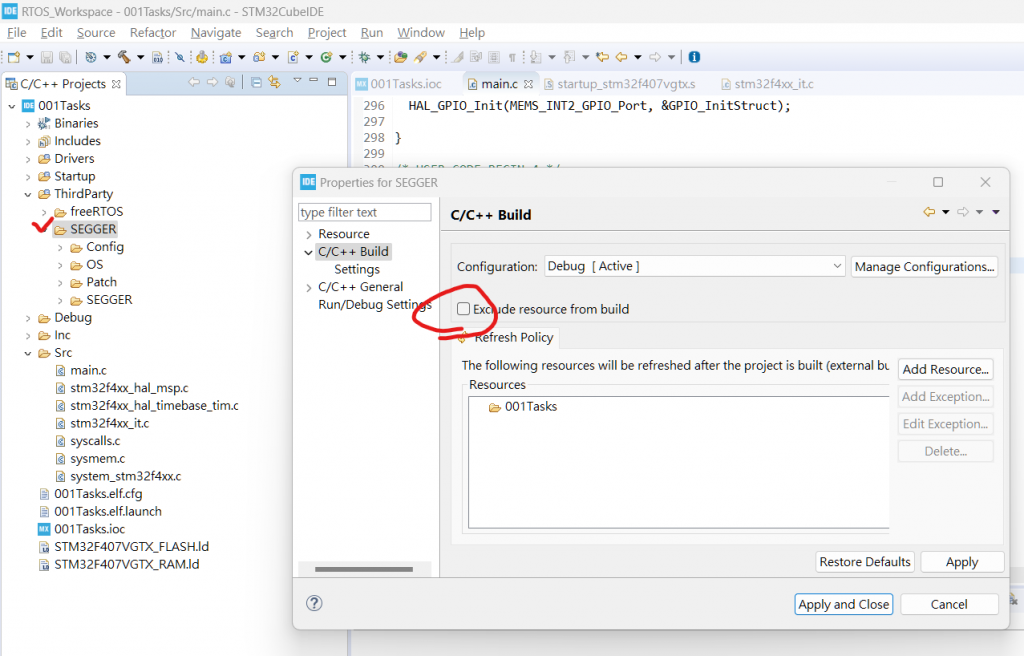
  1. 確保ThirdParty\SEGGER NOT check exclude resource from build
    https://ithelp.ithome.com.tw/upload/images/20240919/201555205vsjaCkywd.png
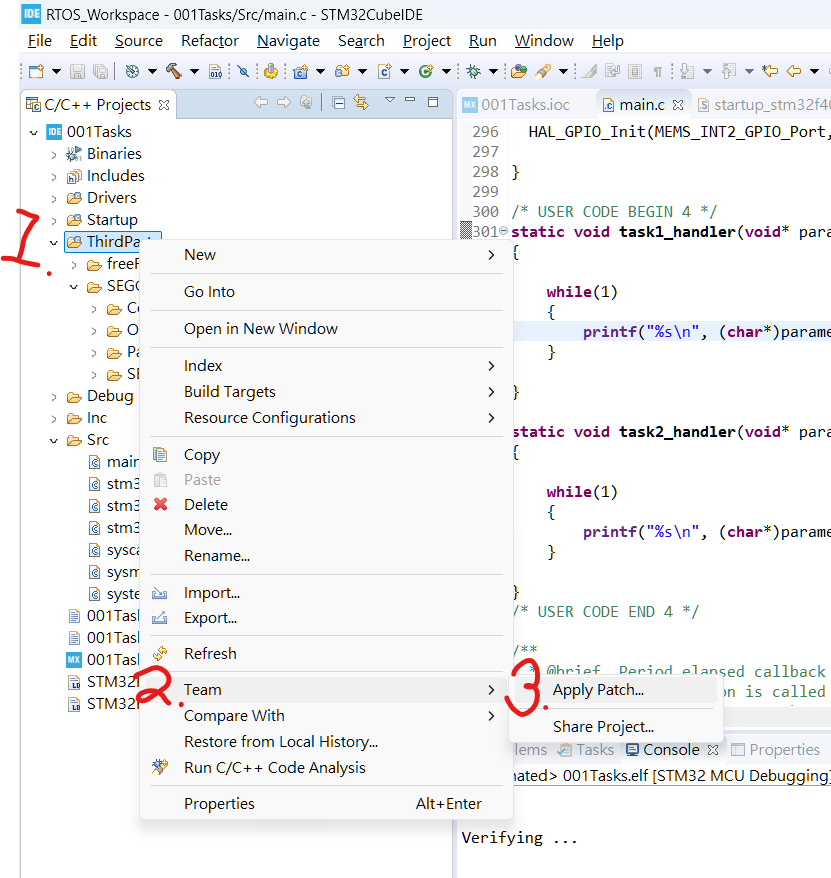
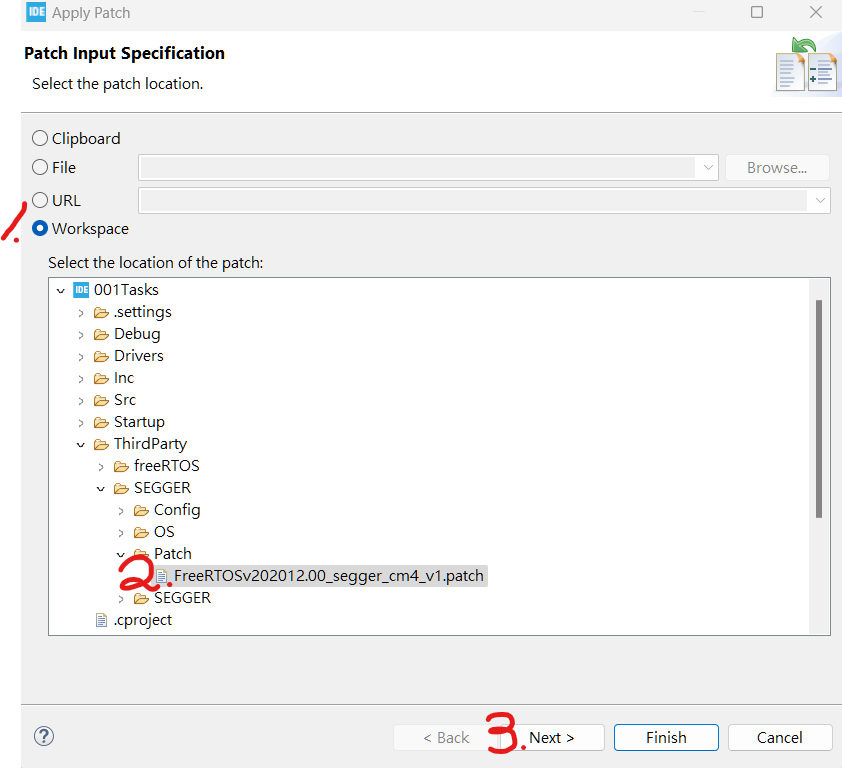
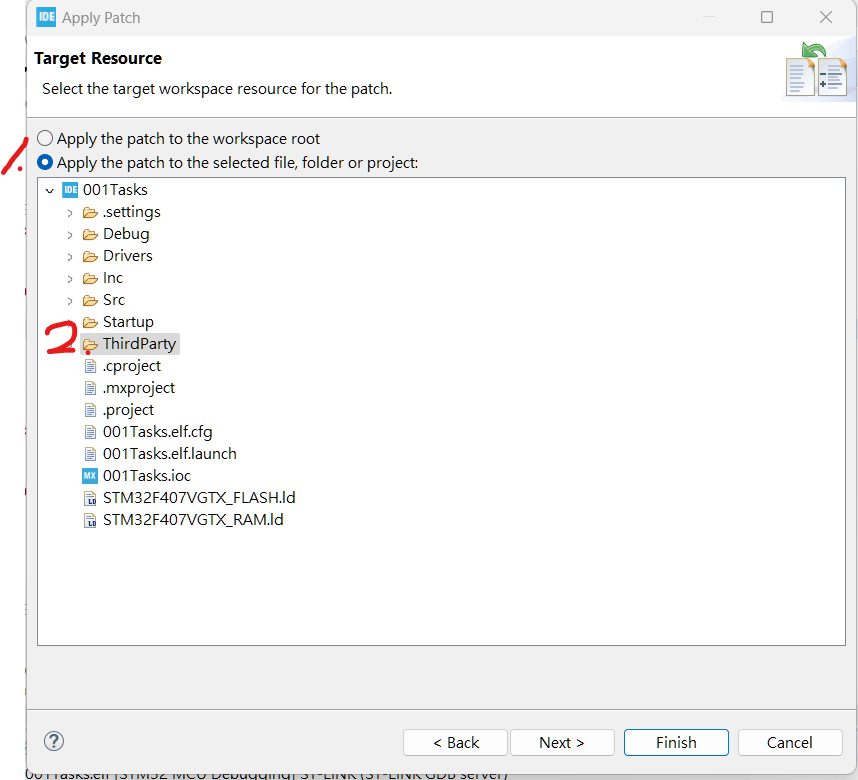
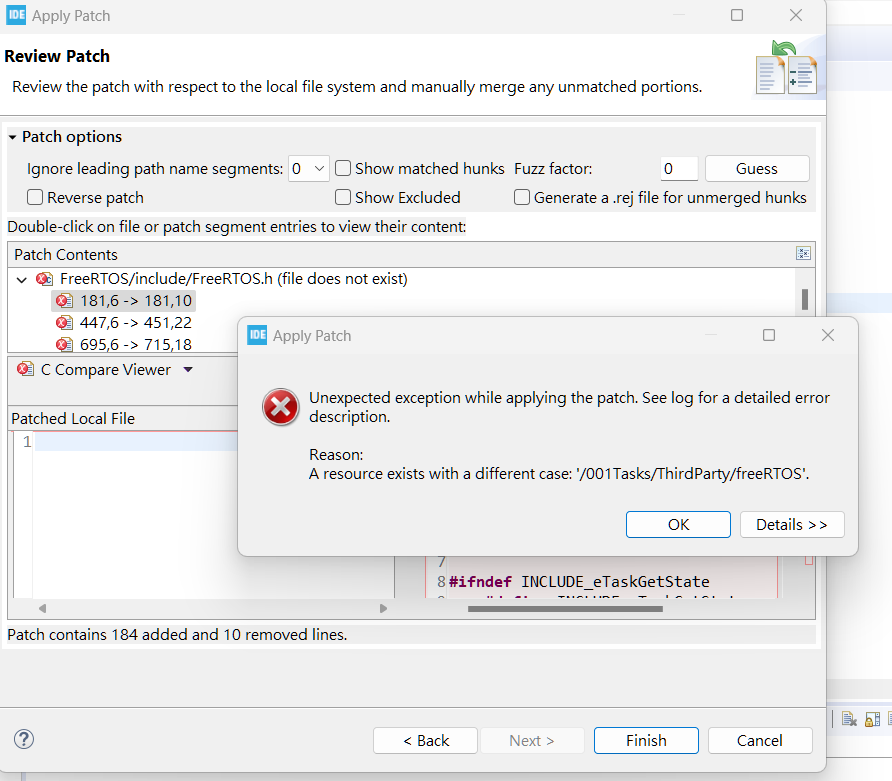
  2. 添加Patch文件
    發生error!
    講師的建議是使用更新版本的FreeRTOSv11跟SystemView Target Source v3.54...
    https://ithelp.ithome.com.tw/upload/images/20240919/20155520DSa9qdi5Ka.png
    https://ithelp.ithome.com.tw/upload/images/20240919/20155520igtRCm4hze.png
    https://ithelp.ithome.com.tw/upload/images/20240919/20155520kRoY6Ufzn9.png
    https://ithelp.ithome.com.tw/upload/images/20240919/20155520OWdsfiFHNK.png
    • Do the path settings for the include files of SEGGER in the IDE
SEGGER SystemView?

SystemView is a software toolkit which is used to analyze the embedded software behavior running on your target.
The embedded software may contain embedded OS or RTOS or it could be non-OS based application.
SEGGER SystemView Toolkin come in 2 parts, (1) PC visualization softwar: SystemView Host Software(Windows/Linux/Mac), (2) SystemView target codes (this is used to collect the target events and sending back to PC visualization software)
System Visualization modes:

  1. Real Time recording (Continuous Recording):
    With a SEGGER J-Link and its Real Time Transfer(RTT) technology SystemView can continuously record data, and analyze and visualize it in real time.
    Real Time mode can be achieved via ST-link instead of J-Link. For that J-Link firmware has to be flashed on ST-Link circuitry of STM32 boards.
  2. Single-shot recording:
    You don't need to have J-Link or ST-Link Debugger for this.
    In Single-shot mode the recording is started manually in the application, which allows recording only specific parts, which are of interest.

因為要重新下載FreeRTOSv11跟SystemView v3.54,所以全部Code & Project要重來一遍,所以進度暫停,明天繼續往下走,先去重新安裝所有東西


上一篇
[Day04] 韌體小白之路_建立Task-2
下一篇
[Day06] 韌體小白之路_追蹤工具-2
系列文
韌體小白之路7
圖片
  直播研討會
圖片
{{ item.channelVendor }} {{ item.webinarstarted }} |
{{ formatDate(item.duration) }}
直播中

尚未有邦友留言

立即登入留言