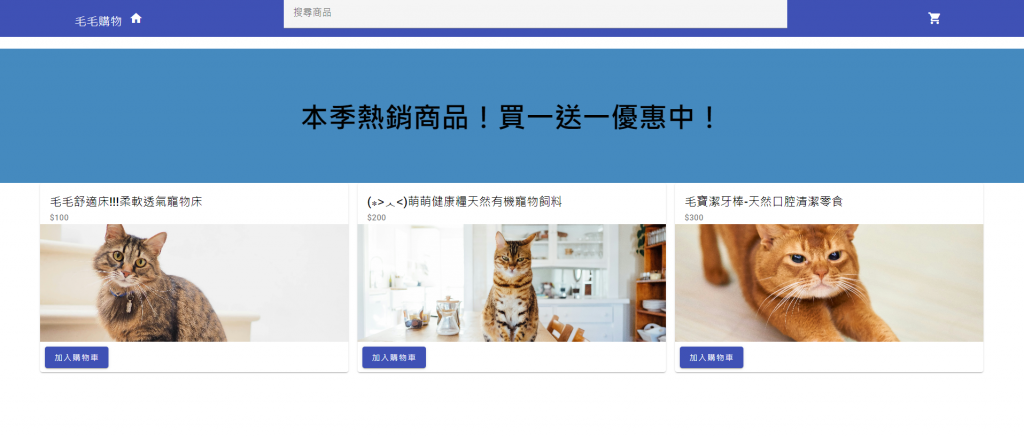
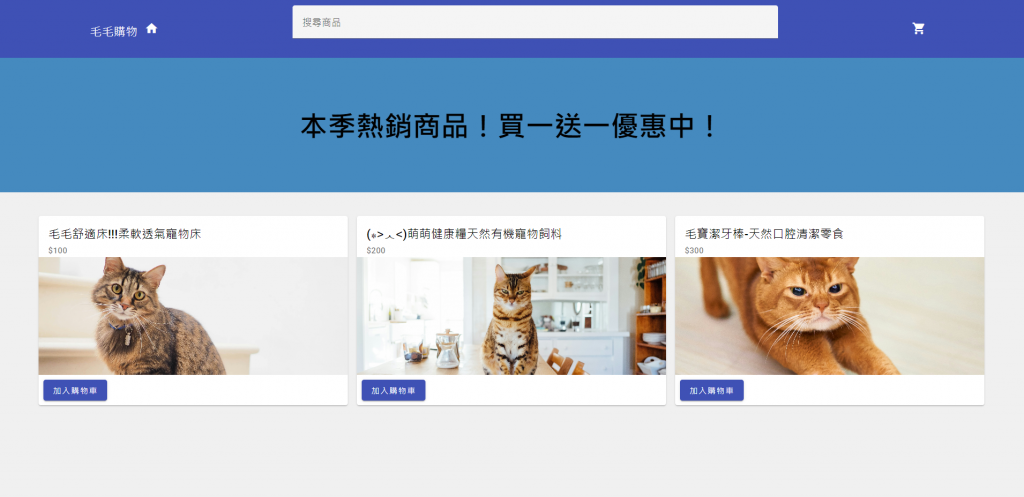
今天我們要來做一個簡單的購物網站首頁,把之前學到的 Angular Material 和 Flex Layout 全部用上!這個首頁包含三大區塊:Header(包含首頁按鈕與搜尋欄)、Banner 和 產品列表。這樣一個首頁看起來簡單又清楚,讓 User 一打開就能看到重要資訊,所以我們要讓它看起來清爽又實用。

文章大綱:
學到這裡,有時會想,那我實際要怎麼應用到我想寫的東西上,畢竟學了這麼多東西,像 Angular Material、Flex Layout,只學基礎的東西看起來好像都很簡單,但真的要合在一起用的時候,整個人就會覺得「到底要怎麼做呢?」有時候學一個工具還好,但要把所有東西一起用,真的會有點困惑。不過,這也是學習的一部分啦!邊做邊搞懂,最後就會有一種「原來這樣」的感覺。今天我們就試著把這些工具混合起來,做一個簡單的購物網站首頁,讓所有學到的東西慢慢做出我們的 Side Project!
我們今天要用到兩大好工具:Angular Material 和 Flex Layout。Angular Material 幫我們提供了好看的 UI 元件,Flex Layout 則幫我們排版,讓整個網站的佈局變得超級簡單。
我們的首頁會有三個區塊:
首先,建立一個新的 Angular 專案,並安裝所需的 Angular Material 和 Flex Layout 依賴。
ng new my-shopping-site
cd my-shopping-site
ng add @angular/material
npm install @angular/flex-layout
接下來,別忘了在 app.module.ts 中導入 MatToolbarModule、MatIconModule、MatFormFieldModule、MatInputModule、MatButtonModule 和 MatCardModule,這樣才能使用這些 Angular Material 的元件。
import { NgModule } from '@angular/core';
import { BrowserModule } from '@angular/platform-browser';
import { BrowserAnimationsModule } from '@angular/platform-browser/animations';
import { MatToolbarModule } from '@angular/material/toolbar';
import { MatIconModule } from '@angular/material/icon';
import { MatFormFieldModule } from '@angular/material/form-field';
import { MatInputModule } from '@angular/material/input';
import { MatButtonModule } from '@angular/material/button';
import { MatCardModule } from '@angular/material/card';
import { FlexLayoutModule } from '@angular/flex-layout';
import { AppComponent } from './app.component';

@NgModule({
  declarations: [AppComponent],
  imports: [
    BrowserModule,
    BrowserAnimationsModule,
    MatToolbarModule,
    MatIconModule,
    MatFormFieldModule,
    MatInputModule,
    MatButtonModule,
    MatCardModule,
    FlexLayoutModule,
  ],
  providers: [],
  bootstrap: [AppComponent],
})
export class AppModule {}
這樣設定好模組之後,你的錯誤就能夠解決了,接下來我們來編寫頁面內容。
我們的首頁會有一個 Header,包含網站名稱、搜尋欄位和購物車按鈕。這裡使用 MatToolbar 和 Flex Layout 來完成佈局。
在 app.component.html 中編寫 Header 的 HTML:
<mat-toolbar color="primary" fxLayout="row" fxLayoutAlign="space-around center">
  <div>
    <span>毛毛購物</span>
    <button mat-icon-button>
      <mat-icon>home</mat-icon>
    </button>
  </div>
  <mat-form-field fxFlex="50%">
    <mat-label>搜尋商品</mat-label>
    <input matInput placeholder="輸入商品名稱" />
  </mat-form-field>
  <button mat-icon-button>
    <mat-icon>shopping_cart</mat-icon>
  </button>
</mat-toolbar>

我們接下來製作一個簡單的 Banner 區塊,用來放一些促銷資訊或圖片,這樣用戶一進來就能看到促銷內容。
<div fxLayout="row" class="banner">
  <h1 fxFlex>本季熱銷商品!買一送一優惠中!</h1>
</div>
在 app.component.css 中設定 Banner 的樣式:
.banner {
  background-color: #458abf;
  text-align: center;
  padding: 50px;
  font-size: 24px;
}

接下來我們來設計 產品列表。每個產品將顯示圖片、名稱、價格和一個 "加入購物車" 的按鈕。我們會使用 MatCard 來製作這些產品卡片。
<div fxLayout="row" fxLayoutGap="16px" fxLayoutAlign="center">
  <mat-card fxFlex="30%">
    <mat-card-header>
      <mat-card-title>毛毛舒適床!!!柔軟透氣寵物床</mat-card-title>
      <mat-card-subtitle>$100</mat-card-subtitle>
    </mat-card-header>
    <img mat-card-image src="assets/product1.jpg" alt="產品 1">
    <mat-card-actions>
      <button mat-raised-button color="primary">加入購物車</button>
    </mat-card-actions>
  </mat-card>

  <mat-card fxFlex="30%">
    <mat-card-header>
      <mat-card-title>(⁎˃ᆺ˂)萌萌健康糧天然有機寵物飼料</mat-card-title>
      <mat-card-subtitle>$200</mat-card-subtitle>
    </mat-card-header>
    <img mat-card-image src="assets/product2.jpg" alt="產品 2">
    <mat-card-actions>
      <button mat-raised-button color="primary">加入購物車</button>
    </mat-card-actions>
  </mat-card>

  <mat-card fxFlex="30%">
    <mat-card-header>
      <mat-card-title>毛寶潔牙棒-天然口腔清潔零食</mat-card-title>
      <mat-card-subtitle>$300</mat-card-subtitle>
    </mat-card-header>
    <img mat-card-image src="assets/product3.jpg" alt="產品 3">
    <mat-card-actions>
      <button mat-raised-button color="primary">加入購物車</button>
    </mat-card-actions>
  </mat-card>
</div>
在 app.component.css 中,我們加入一些樣式來美化產品卡片:
mat-card {
  margin-bottom: 20px;
}

mat-card img {
  height: 200px;
  object-fit: cover;
}

mat-toolbar {
  margin-bottom: 20px;
}

為了讓整個頁面看起來更吸引人,我們最後來在 app.component.css 加上一些簡單的樣式設定。
.banner {
  background-color: #458abf;
  text-align: center;
  padding: 50px;
  font-size: 24px;
  margin-bottom: 40px;
}

mat-card {
  margin-bottom: 20px;
}

mat-card img {
  height: 200px;
  object-fit: cover;
}

mat-toolbar {
  padding: 50px;
}
在 styles.css加上背景底色
html,
body {
  height: 100%;
  background-color: rgb(240, 240, 240);
}
body {
  margin: 0;
  font-family: Roboto, "Helvetica Neue", sans-serif;
}
這樣整個網站首頁看起來會更整齊,也能更吸引用戶。

今天我們透過 Angular Material 和 Flex Layout,成功做出了一個簡單的購物網站首頁。這個頁面雖然簡單,但已經包含了網站的基本元素。接下來,你可以思考如何增加更多功能,比如點擊 "加入購物車" 之後的互動效果,或是加入產品詳情頁。
未來的擴展可以加入更多區塊、互動功能,讓你的購物網站更加完整。希望這篇教學對你有幫助,讓你能夠更加靈活地運用這些工具!
