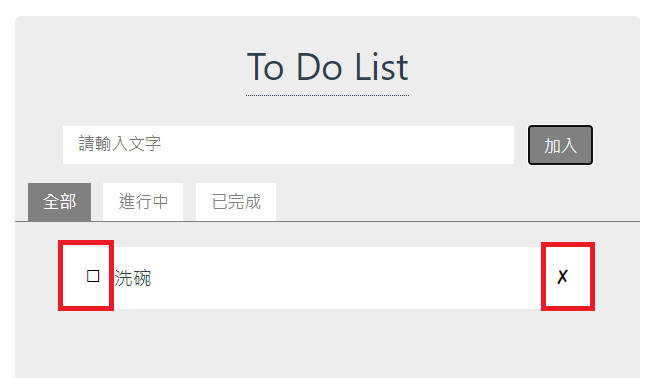
學完了SCSS基本語法,馬上就是現學現賣的時間!一樣叫出我們To Do List的css表重新改寫(現在回頭來看…真是慘不忍睹)
上網爬文了一下,Vue2之前的版本似乎是不支援直接使用SCSS,還要再透過一些元件把Sass轉成SCSS,不過Vue3只需要做以下動作:
npm add -D sass
這時候我們的網頁已經有能力轉譯Sass/SCSS了!返回html加上(也可以使用src引用外部scss):
<style lang="scss" src="@/assets/todolist.scss" scoped></style>
◎小提示:在.vue檔案中使用css會被當作全域使用,如果只是當前component要使用要加上scoped,避免其他頁面受影響

這兩個button一個靠左一個靠右,共用的樣式被包成.btn_icon,但又出現行內style
<button class="btn_icon" style="float:left">☐</button> <!--未完成button-->
<button class="btn_icon" style="float:right">✘</button> <!--刪除button-->
改寫完html:
<div class="todolist">
<div class="todo_wrapper">
<h1 style="border-bottom:1px dotted">To Do List</h1>
<br>
<div class="add_block">
<input v-model="content" type="text" placeholder="請輸入文字" />
<button @click="sendText()">加入</button>
</div>
<div class="nav_block">
<button v-for="item in navitem" :class="{'active' : action == item.value}" @click="action=item.value">{{item.name}}</button>
</div>
<ul v-if="filtertodo.length > 0">
<li v-for="todo in filtertodo" :key="todo.id" @dblclick="editTodo(todo)">
<button @click.stop="changeTodo(todo.id)" v-if="todo.status" class="btn_finish">✔</button> <!--完成button-->
<button @click.stop="changeTodo(todo.id)" v-else v-if="!todo.edit" class="btn_check">☐</button> <!--未完成button-->
<input type="text" v-if="todo.edit" v-model="todo.temptext" />
<label :class="{ 'line-through': todo.status }" v-else>{{todo.text}}</label>
<span v-if="todo.edit">
<!--編輯狀態下的button-->
<button @click.stop="saveTodo(todo.id)" class="btn_save">✔</button> <!--存檔button-->
<button @click.stop="cancleTodo(todo.id)" class="btn_cancle">✘</button> <!--取消button-->
</span>
<button @click.stop="deleteTodo(todo.id)" v-else class="btn_delete">✘</button> <!--刪除button-->
</li>
</ul>
<ul class="todo_item" v-else>
<li>沒有資料</li>
</ul>
</div>
</div>
改寫為scss:
$mouse-display:pointer;
$colordarkgray: #cacaca;
$colorgray: #808080;
$colorwhite: white;
$input-padding: .375rem .75rem;

@mixin btn_theme($color1: $colorgray,$color2: $colorwhite) {
    border: none;
    background-color: $color1;
    margin-left: 10px;
    color: $color2;
    cursor: $mouse-display;
    padding: .375rem .75rem;
}

%btn_style {
    background: none;
    border: none;
    cursor: $mouse-display;
}

.todolist {
    min-height: 100vh;
    display: flex;
    align-items: center;
}

.todo_wrapper {
    display: flex;
    flex-direction: column;
    justify-content: center;
    align-items: center;
    background-color: #ededed;
    height: 500px;
    width: 500px;
    border-radius: 5px;
}

.add_block {
    display: inline-flex;
    width: 85%;
    justify-content: space-around;

    input {
        border: none;
        outline-style: none;
        padding: $input-padding;
        width: 85%;
    }

    button {
        @include btn_theme;
    }
}

.nav_block {
    margin-top: 15px;
    border-bottom: 1px solid $colorgray;
    width: 100%;

    button {
        @include btn_theme($color1:$colorwhite,$color2:$colorgray);
    }
}

ul {
    width: 85%;
    height: 300px;
    overflow-y: auto;
    margin-top: 20px;
    scrollbar-width: thin;
    padding: inherit;

    li {
        width: 100%;
        height: 50px;
        list-style: none;
        background-color: $colorwhite;
        padding: 13px;
        cursor: $mouse-display;

        &:hover {
            background-color: $colordarkgray;
        }
    }

    input {
        border: 1px solid $colordarkgray;
        border-radius: 5px;
        outline-style: none;
        padding: $input-padding;
        width: 85%;
        margin-top: -5px;
    }

    label {
        margin-left: 5px;
        cursor: $mouse-display;
    }

    span {
        float: right;
    }
}

.btn_finish ,.btn_check {
    @extend %btn_style;
    float: left;
}

.btn_save {
    @extend %btn_style;
    color: green;
    margin-right: 5px
}

.btn_cancle {
    @extend %btn_style;
    color: darkred
}

.btn_delete {
    @extend %btn_style;
    float: right
}

.line-through {
    text-decoration: line-through
}

.active {
    background-color: $colorgray;
    color: $colorwhite;
}
SCSS語法看起來比原先CSS更長了(笑),但我的html變得超乾淨啦!塊語法的巢狀結構真的深得我心,可讀性變得很高、容易理解且找到我要改的元素!再來就是變數的應用,當我們要調整網頁的主色、輔色,透過變數的寫法一次改到位!
好的,會有這樣的內容因為自己又犯傻了。竟然又卡在很怪的問題上面,寫起來警惕未來的自己…
錯誤語法:
li{
    font-size:10px;
    :hover{
        font-size:15px;
    }
}
正確語法:少了&,:hover直接被當成子元素
li{
    font-size:10px;
    &:hover{
        font-size:15px;
    }
}
參考資料
在 Vue3 + Vite 專案下安裝使用 SASS/ SCSS 以及 CSS Module
