為了完成圖書館範例,我們先來針對資料庫先塞資料吧 !!
在這之前,我們需要再進行以下幾個設定,讓我們可以使用JPA
# transfer SQL
spring.jpa.database-platform=org.hibernate.dialect.H2Dialect
# auto create table (only develop mode to use)
spring.jpa.hibernate.ddl-auto=create
# show jpa SQL in console
spring.jpa.properties.hibernate.show_sql=true
spring.jpa.properties.hibernate.format_sql=true
特別強調 spring.jpa.hibernate.ddl-auto=create 這個是方便我們開發使用,如果再正式環境的時候切記不能加上喔!!!
這邊已經先準備好一份SQL檔案內容,請將內容放置在src/main/resources資料夾底下
DROP TABLE IF EXISTS `book`;
CREATE TABLE `book` (
  `bookId` int(11) NOT NULL AUTO_INCREMENT,
  `name` varchar(255) DEFAULT NULL,
  `author` varchar(255) DEFAULT NULL,
  PRIMARY KEY (`bookId`)
) ENGINE=InnoDB AUTO_INCREMENT=1 DEFAULT CHARSET=utf8;
INSERT INTO `book` (`BOOK_ID`, `name`, `author`) VALUES (1, '原子習慣', 'James Clear');
INSERT INTO `book` (`BOOK_ID`, `name`, `author`) VALUES (2, '我可能錯了', '比約恩.納提科.林德布勞');
INSERT INTO `book` (`BOOK_ID`, `name`, `author`) VALUES (3, '底層邏輯', '劉潤');
都設定完畢之後,我們就可以重新啟動Application了喔!
這時候你會看到log裡面會記錄我們執行的SQL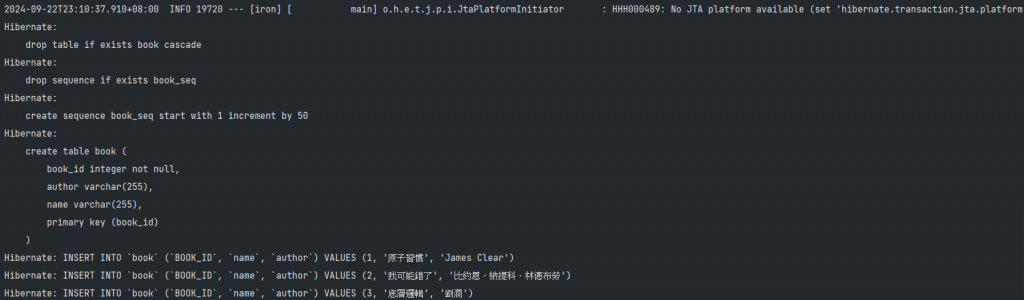
我們也可以進到localhost:8080/h2-console去看看是否建立成功!
成功的話,我們就會看到table已經存在,另外也會看到我們剛剛先預設塞入的資料喔!!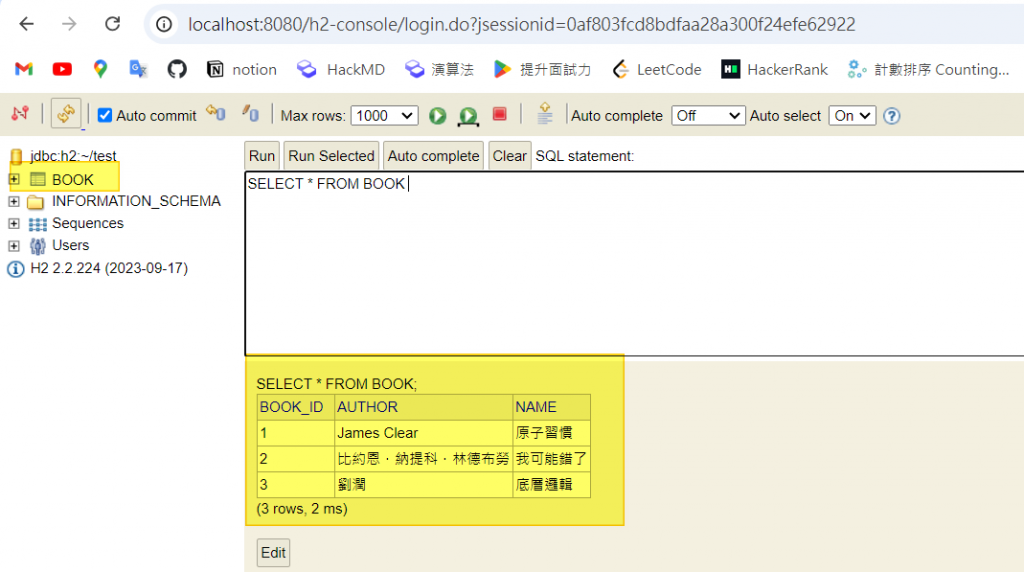
耶!!!! 那我們終於可以來好好寫個完整的範例了!
如果我們要用BookId來查詢這本書的相關資料的話,我們應該要怎麼做呢 ?
那大家來新增BookRepo.java,
package com.winnie.iron.repo;

import com.winnie.iron.model.Book;
import org.springframework.data.jpa.repository.JpaRepository;
import org.springframework.stereotype.Repository;

@Repository
public interface BookRepo extends JpaRepository<Book, Integer> {
    Book findBookByBookId(Integer bookId);
}
昨天我們已經建立的Book.java,我們接著來建立Repo.java來針對資料庫的操作。
package com.winnie.iron.service;

import com.winnie.iron.model.Book;
import com.winnie.iron.repo.BookRepo;
import lombok.extern.slf4j.Slf4j;
import org.springframework.beans.factory.annotation.Autowired;
import org.springframework.stereotype.Service;

@Service
@Slf4j
public class IronService {
    @Autowired
    private BookRepo bookRepo;

    public Book findBookById(Integer id) {
        return bookRepo.findBookByBookId(id);
    }

}
package com.winnie.iron.controller;

import com.winnie.iron.model.Book;
import com.winnie.iron.service.IronService;
import lombok.extern.slf4j.Slf4j;
import org.springframework.beans.factory.annotation.Autowired;
import org.springframework.http.ResponseEntity;
import org.springframework.web.bind.annotation.GetMapping;
import org.springframework.web.bind.annotation.PathVariable;
import org.springframework.web.bind.annotation.RequestParam;
import org.springframework.web.bind.annotation.RestController;

@RestController
@Slf4j
public class IronController {
    @Autowired
    private IronService ironService;


    @GetMapping("book/{bookId}")
    public ResponseEntity<Book> getUserName(@PathVariable("bookId") int bookId) {
        return ResponseEntity.ok(ironService.findBookById(bookId));
    }
}
我們寫一個可以給使用者透過bookId來查詢書本的介面,接著我們就可以來試試看了~~~~~
當我們輸入 http://localhost:8080/book/1 我們就可以成功查到書本資料了~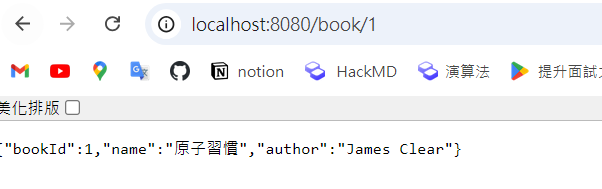
跟剛剛上面的資料庫比對,我們正確的查到BookId=1的相關資料了喔 
恭喜我們一起完成了一個完整範例了!!!
那我們明天來好好地介紹RESTFul 定義跟Spring boot好用的API文件方式吧!!

