昨天成功把程式碼拉到本地端,今天我們會來嘗試上傳到一版到 TestPyPI。為什麼 TestPyPI 而不是 PyPI 呢,顧名思義 TestPyPI 就是讓我們測試上傳的內容是否正確的地方,這樣就不用在上傳後,發現可能有幾個錯字,而還要重新上傳更新版本。
今天這篇的內容會參考這個 網站 的流程,有興趣的也可以前往閱讀。
首先第一步我們需要建立相關資料夾與使用到的檔案,參照文章所提供的範例,我們會需要以下:
// 文章範例
packaging_tutorial/
└── src/
    └── example_package_YOUR_USERNAME_HERE/
        ├── __init__.py
        └── example.py

// 我們的 Repo
baseball-stats-python/
└── src/
    └── baseball-stats-python/
        ├── __init__.py
        └── example.py
分別介紹這些資料夾與檔案:
src:Source 的簡寫,會把主要執行的程式碼放在這裡面,其他設定檔會放在外面baseball-stats-python:我們的套件名稱,讓之後用來 import 使用的__init__.py:讓我們的資料夾能順利 import 檔案,他可以是空的,也可以是從其他資料夾 import 到裡面,讓之後使用者可以有更方便的路徑使用 Functionsexample.py:存放我們測試 function 的檔案,現在測試有所以這樣命名,但之後名字就不會是 example。順利的話使用者可以使用 from baseball-stats-python import example 來取得裡面的 function 來使用知道這些檔案資料夾的功用,我們就可以打開 VSCode 來編輯,會使用到兩個圖形按鈕來新增檔案與資料夾: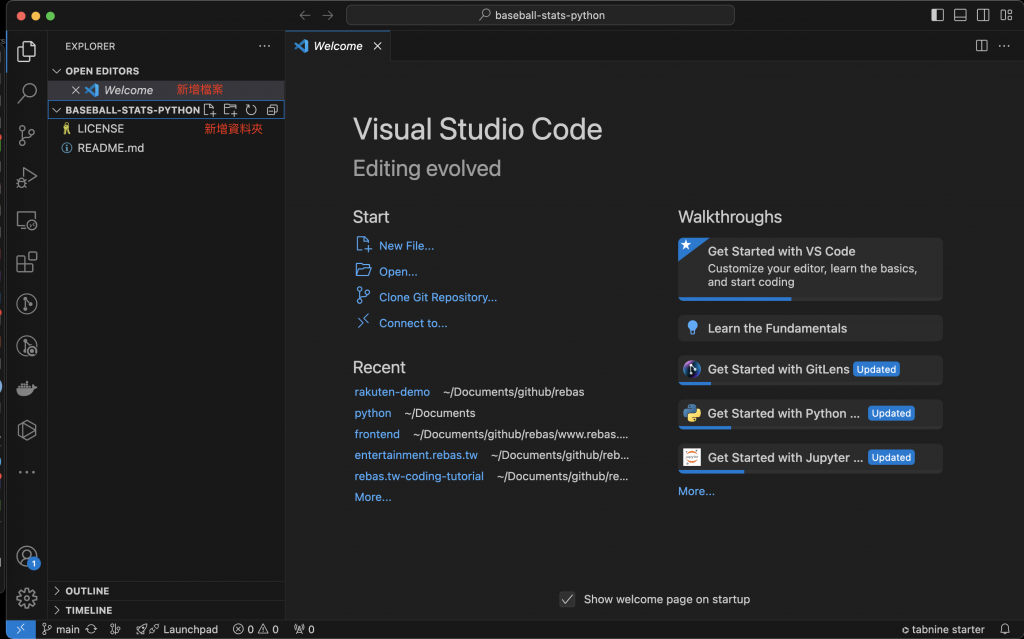
example.py 裡的 function,文章裡是使用 add_one 當範例,我這邊則是用,這個就隨意都行:
// 跟使用者 Say Hello
def hello(name):
    print(f"Hello {name}! Welcome to baseball-stats-python")
這樣就先完成我們基本的可以上傳的套件程式碼。
另外如果是使用 macOS 可以在終端機使用 code . 來直接打開
接下來我們需要建立一個給我們上傳套件使用的設定檔 pyproject.toml,這個檔案有幾個用處,一個是會幫助我們把程式碼打包成 PyPI 可以使用的上傳的檔案,另一個就是會顯示在 PyPI 上,關於套件的各種資訊也可以在這裡面設定。
文章中提供不同打包工具,包括 Hatchling、 Setuptools、Flit、PDM,大家可以挑一個自己喜歡的使用,我這邊就跟文章一樣使用 Hatchling。設定檔為如下,不同的工具設定檔也會有所不同,可以去文章內查詢:
[build-system]
requires = ["hatchling"]
build-backend = "hatchling.build"
打包設定結束後,接下來設定 Metadata,這個就會是顯示在 PyPI 上的文字資料,也有助於其他在 PyPI 上面搜尋的時候能更快找到相關的套件。以這次的套件會大概長這樣:
# 剛剛設定的打包設定
[build-system]
requires = ["hatchling"]
build-backend = "hatchling.build"

# Metadata 設定
[project]
name = "baseball-stats-python"
version = "0.0.1"
authors = [{ name = "Li-Hsuan Hsieh", email = "ss77995ss@gmail.com" }]
description = "A python pacakge for getting baseball stats"
readme = "README.md"
requires-python = ">=3.8"
classifiers = [
  "Programming Language :: Python :: 3",
  "License :: OSI Approved :: MIT License",
  "Operating System :: OS Independent",
]

[project.urls]
Homepage = "https://github.com/ss77995ss/baseball-stats-python"
Issues = "https://github.com/ss77995ss/baseball-stats-python/issues"
這些欄位分別為:
name:套件的名稱version:套件的版本,通常最左邊的是最大的版本,最右邊是最小版的更動,所以從 0.0.1 開始authors:作者資訊description:套件的詳細描述readme:提供的 README 檔名稱requires-python:最低需求的 Python 版本,目前通常都是支援從 3.8 開始classifiers:給予一些關於這個套件的一些引索資訊,詳情可以參考這個 連結
Homepage:套件的首頁,通常會提供 Repo 頁Issues:套件的 Issues 頁,這邊這頁也會是 Github 的 Issues 頁,Issue 通常會是別人回報問題或需求的地方這邊也填入完畢後,就完成我們的基本配置了,當然設定檔不只有這些,還有更多可以參考下面的連結:
Writing your pyproject.toml
設定檔完成後,我們要藉著設定檔的設定來 Build 我們的套件:
build 這個套件// Unix/macOS
python3 -m pip install --upgrade build
// Windows
py -m pip install --upgrade build
pip 不是最新版執行下面程式pip install --upgrade pip
python3 -m build
packages = ["src/foo"]
ValueError: Unable to determine which files to ship inside the wheel using the following heuristics: https://hatch.pypa.io/latest/plugins/builder/wheel/#default-file-selection

The most likely cause of this is that there is no directory that matches the name of your project (baseball_stats_python).

At least one file selection option must be defined in the `tool.hatch.build.targets.wheel` table, see: https://hatch.pypa.io/latest/config/build/

As an example, if you intend to ship a directory named `foo` that resides within a `src` directory located at the root of your project, you can define the following:

[tool.hatch.build.targets.wheel]
packages = ["src/foo"]
pyproject.toml
[build-system]
requires = ["hatchling"]
build-backend = "hatchling.build"

+ [tool.hatch.build.targets.wheel]
+ packages = ["src/baseball-stats-python"]

[project]
name = "baseball-stats-python"
version = "0.0.1"
authors = [{ name = "Li-Hsuan Hsieh", email = "ss77995ss@gmail.com" }]
description = "A python pacakge for getting baseball stats"
readme = "README.md"
requires-python = ">=3.8"
classifiers = [
  "Programming Language :: Python :: 3",
  "License :: OSI Approved :: MIT License",
  "Operating System :: OS Independent",
]

[project.urls]
Homepage = "https://github.com/ss77995ss/baseball-stats-python"
Issues = "https://github.com/ss77995ss/baseball-stats-python/issues"
python3 -m build 就會得到一個新的 dist 資料夾裡面有我們打包好的檔案,這樣就完成這個建立打包套件這個步驟了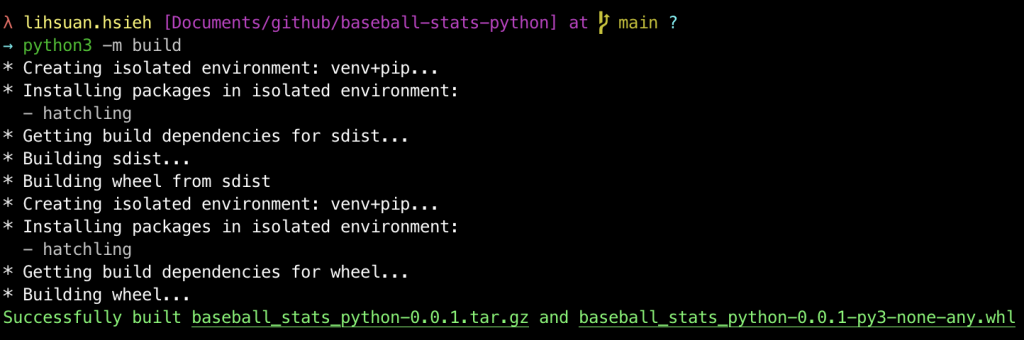
打包完畢後,我們需要上傳到 TestPyPI 上去測試,在那之前要先去上面註冊帳號,直接按右上方的 Register 連結後,輸入基本資料就好。之後記得去收信完成認證。
另外他還需要完成雙重認證,才能取得 API Token
等完成所有認證後,就能去 https://test.pypi.org/manage/account/#api-tokens 取得 API Token,這在等等我們上傳會用到
最後上傳需要再執行這個幾步驟:
twine 套件// Unix/macOS
python3 -m pip install --upgrade twine
// Windows
py -m pip install --upgrade twine
dist 的檔案// Unix/macOS
python3 -m twine upload --repository testpypi dist/*
// Windows
py -m twine upload --repository testpypi dist/*
他會要你輸入 API Token,把我們剛剛取得的貼上,等他上傳完畢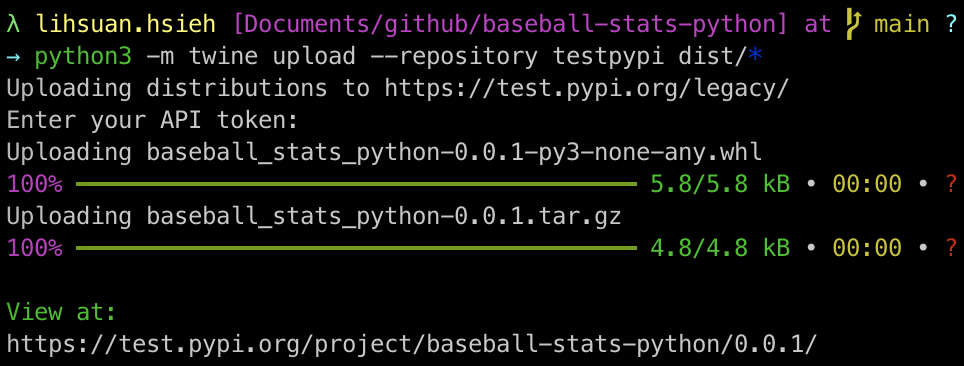
去他提供的網站查看,https://test.pypi.org/project/baseball-stats-python/0.0.1/ ,就可以剛剛我們在設定檔設定的資訊,還有顯示的 README.md 內容(雖然現在是空的)
這樣就完成上傳到測試網站了,接下來我們可以試著下載這個測試套件使用看看
到這邊我們就能上 Colab 來下載我們的套件
!pip install -i https://test.pypi.org/simple/ baseball-stats-python==0.0.1
但你會發現如果我們使用 import 會讀不到
from baseball-stats-python import example
我後來發現 src 的 import 用套件名稱不能使用 kebab-case,要就要用 snake_case 或是全部黏在一起,沒辦法那只好修改為 snake_case => baseball_stats_python ,packages = ["src/baseball_stats_python"] 這也要改成 snake_case,然後再全部流程再跑一次。
會發現在上傳的時候會出現 400 Error,那是因為 TestPyPI 上已經有一個 0.0.1 版,需要新的版本或名字,最快的方法是去 pyproject.toml 把 version 改掉,我自己要試過把 TestPyPI 上的版本刪掉,但還是無法重新上傳 0.0.1,所以最後我也是去改 toml 檔。上傳前記得先把 dist 刪掉讓他見一個新的,不然他就只會是加新的檔案進去。
上傳完畢後,再度用 Colab 測試,先安裝套件
!pip install -i https://test.pypi.org/simple/ baseball-stats-python
執行我們前面寫的 hello function
from baseball_stats_python import example

example.hello("Li-Hsuan")
最後就能看到成功顯示 Hello Li-Hsuan! Welcome to baseball-stats-python
今天原本以為照著文章走會滿順利的,結果還是遇到一些小插曲,不小心篇幅就變很長,感謝大家耐心地看完。原本想說要不要再拆成兩篇文章,但想說這樣斷點會怪怪的,最後就變成這樣一篇長篇,還請大家見諒。
成功上傳一版到 TestPyPI 後,明天想跟大家介紹怎麼把我們在本地端改完的程式碼上傳回 Github 上面,希望大家會喜歡。今天就到這邊,一樣如果有任何問題跟建議歡迎留言告訴我,明天見,掰掰。