在開發完第一個輸入帳目資料後,我們其實已經掌握了重要的React開發觀念,因為React是一個框架,裏頭包含了Html、CSS、JS的程式,我們沒有辦法一次教到這麼多,這邊提供的是React的開發觀念。
再來我們就要利用這個開發觀念,繼續熟練這個技巧了!
我們現在要來開發呈現所有帳目的清單,這個需要用到的是讀取Spring boot的資料,然後把這些資料給打開
接下來,我們回到Component,新增一個檔案,名稱為ListAccountComponent.jsx

同樣我們可以用前幾天教大家的技巧,直接創建一個ListAccountComponent的最基本程式碼
import React from 'react'
function ListAccountComponent() {
  return (
    <div>ListAccountCompinent</div>
  )
}
export default ListAccountCompinent
接下來,我們要寫這這個網易的HTML跟CSS,在bootStrap中,我們可以用許多已經命名好的CSS來調整畫面,所以以下的ClassName使用的都是Bootstrap內建的格式,其中onClick中我們呼叫addNewAccount這個function,我們會在這個ListAccount中撰寫。
    <div className='container'>
        <h2 className='text-center'>List of Todos</h2>
        <button className='btn btn-primary mb-2' onClick={addNewAccount}>Add Account</button>
        <div>
前幾天有教大家React框架的程式撰寫邏輯,這個會在return上面,新增一個addNewAccout這個funciton,然後這個功能是引導我們到新增帳目的頁面。
在這裏,我們先新增這個function,但不寫任何功能,只寫下我們接下來要做的事情
function addNewAccount(){
    //引導到Add Account
}
接下來,我們寫好了大概的介面,我們就要先來從後端取得前端的資料,我們要回到Service.js中,再新增一個getAllAccounts這個功能,因為這個功能是直接取得所有的資料,我們不需要在裡面輸入任何的值,我們只要用get的方式去取得資料,然後取得參數就好
import axios from "axios";
const BASE_REST_API_URL = "http://localhost:8080/api/accounts"
export const getAllAccounts = () => axios.get(BASE_REST_API_URL);
export const addAccount = (account) => axios.post(BASE_REST_API_URL,account);
這個事後,我們就回到ListAccountComponent中,然後在function區新增一個listAccounts這個function,在裡面輸入我們創建的函數。在打到一半的時候應該就會出現getAllAccounts這個功能。
我們可以直接按確定,這個時候系統就會自動把這個Service的功能引入,若是自己打的,請記得要去上面import列中把這個功能再引入進去。
將學取得所有動作的功能,那接下來就是要讓網頁一開始就執行
    const [accounts,setAccounts] = useState([])
    function listAccounts(){
        getAllAccounts().then((response)=>{
            setAccounts(response.data);
        }).catch(error =>{
            console.error(error)
        })
    }
我們會希望在網頁開啟的時候使用這個功能,這個時候就要使用到useEffect
useEffect 是 React 的一個 Hook,允許我們在組件渲染後執行操作。這段程式碼的目的是在組件首次渲染時執行 listAccounts 函數。
以下是對這段程式碼的詳細解釋:
這樣的設計在應用啟動時,能自動載入需要的資料,而不需要額外的操作。
    useEffect(()=>{
        listAccounts();
    },[])
完成這些撰寫之後,我們就要回到App.jsx中,把中間的網頁修改成ListAccountComponent
import { useState } from 'react'
import reactLogo from './assets/react.svg'
import viteLogo from '/vite.svg'
import './App.css'
import HelloWorld from './Helloworld'
import HeaderComponent from './Component/HeaderComponent'
import FooterComponent from './Component/FooterComponent'
import AccountComponent from './Component/AccountComponent'
import ListAccountCompinent from './Component/ListAccountCompinent'
function App() {
  const [count, setCount] = useState(0)
  return (
    <>
    <HeaderComponent />
        <ListAccountComponent />
    <FooterComponent />
    </>
  )
}
export default App
最終,我們的ListAccountComponent會長這樣
import React, { useEffect, useState } from 'react'
import { getAllAccounts } from '../Service/AccountService'
function ListAccountCompinent() {
    const [accounts,setAccounts] = useState([])
    useEffect(()=>{
        listAccounts();
    },[])
    function listAccounts(){
        getAllAccounts().then((response)=>{
            setAccounts(response.data);
        }).catch(error =>{
            console.error(error)
        })
    }
    function addNewAccount(){
    //引導到Add Account
    }
    function updateAccount(id){
        // 更新Account
    }
    function deletedAccount(id){
        //刪除Account
    }
  return (
    <div className='container'>
        <h2 className='text-center'>List of Todos</h2>
        <button className='btn btn-primary mb-2' onClick={addNewAccount}>Add Account</button>
        <div>
          <table className='table table-bordered table-striped'>
                <thead>
                    <tr>
                        <th>Account Name</th>
                        <th>Account Category</th>
                        <th>Account amount</th>
                        <th>Account expense</th>
                        <th>Actions</th>
                    </tr>
                </thead>
                <tbody>
                    {
                        accounts.map(account =>
                            <tr key={account.id}>
                                <td>{account.name}</td>
                                <td>{account.category}</td>
                                <td>{account.amount}</td>
                                <td>{account.expesned ? '收入':'支出'}</td>
                                <td>
                                    <button className='btn btn-info' onClick={()=> updateAccount(account.id)}>Update</button>
                                    <button className='btn btn-danger' onClick={()=> deletedAccount(account.id)} style={{marginLeft:"10px"}}>Delete</button>
                                </td>
                            </tr>
                        )
                    }
                </tbody>
            </table>
        </div>
    </div>
  )
}
export default ListAccountCompinent
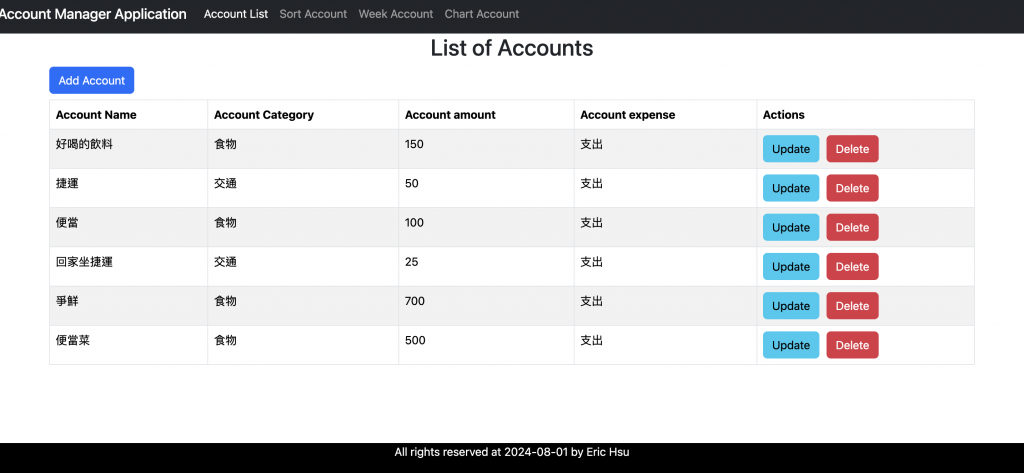
最終結果長這樣
這個頁面就不用Postman來確認,只要出現這個結果,就完成了這天的內容!
