今天我們要來實作 Account Service 的 Register 功能。
在 Account.Grpc 專案下的 Protos 內加入 account.proto 如下:
syntax = "proto3";

option csharp_namespace = "Account.Grpc";

service AccountGrpcService {
  rpc Register (RegisterRequest) returns (AccountResponse);
}

message RegisterRequest {
  string FirstName = 1;
  string LastName = 2;
  string Email = 3;
  string Password = 4;
}

message AccountResponse {
  string Id = 1;
  string FirstName = 2;
  string LastName = 3;
  string Email = 4;
  string Token = 5;
}
在 csproj 內加入 account.proto
  <ItemGroup>
    <Protobuf Include="Protos\account.proto" GrpcServices="Server" />
  </ItemGroup>
整體會變成
 <Project Sdk="Microsoft.NET.Sdk.Web">

  <PropertyGroup>
    <TargetFramework>net8.0</TargetFramework>
    <Nullable>enable</Nullable>
    <ImplicitUsings>enable</ImplicitUsings>
  </PropertyGroup>

  <ItemGroup>
    <Protobuf Include="Protos\greet.proto" GrpcServices="Server" />
  </ItemGroup>

  <ItemGroup>
    <PackageReference Include="Grpc.AspNetCore" Version="2.57.0" />
  </ItemGroup>

  <ItemGroup>
    <ProjectReference Include="..\Account.Application\Account.Application.csproj" />
    <ProjectReference Include="..\Account.Infrastructure\Account.Infrastructure.csproj" />
  </ItemGroup>

</Project>
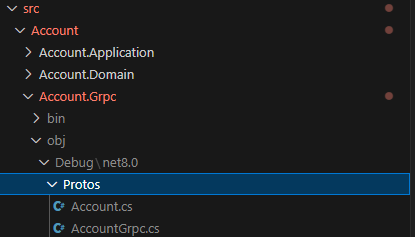
每次在 VS Code 修改 proto 都必須 rebuild 專案才能夠使用
cd ./src/Account/Account.Grpc
dotnet clean
dotnet build
這時候專案會自動產生 proto 相關的 C# Code
建立 GrpcAccountService.cs,繼承 AccountGrpcService.AccountGrpcServiceBase 並且 Override Register Method。
using Grpc.Core;

namespace Account.Grpc.Services;

public class GrpcAccountService : AccountGrpcService.AccountGrpcServiceBase
{
    private readonly IAccountService _accountService;

    public GrpcAccountService(IAccountService accountService)
    {
        this._accountService = accountService;
    }

    public override Task<AuthenticationResponse> Register(RegisterRequest request, ServerCallContext context)
    {
        var result = _accountService.Register(request.FirstName, request.LastName, request.Email, request.Password);
    }
}
IAccountService interface這裡 DI 了一個 IAccountService,它實作了 Register 的功能。所以接著就要實作這個實作層,這個實作,並不會存在在 Presentation 這層,而是 Application 這。
namespace Account.Application;

public interface IAccountService
{
    AuthenticationResult Register (string firstName, string lastName, string email, string password);
}
AuthenticationResultnamespace Account.Application;
public record AuthenticationResult(
Guid Id,
string FirstName,
string LastName,
string Email,
string Token
);
AuthenticationResult 轉換為 AuthenticationResponse 並回傳 public override Task<AuthenticationResponse> Register(RegisterRequest request, ServerCallContext context)
{
var result = _accountService.Register(request.FirstName, request.LastName, request.Email, request.Password);
var response = new AuthenticationResponse()
{
Id = result.Id.ToString(),
FirstName = result.FirstName,
LastName = result.LastName,
Email = result.Email,
Token = result.Token
};
return Task.FromResult(response);
}
IAccountServicenamespace Account.Application;
public class AccountService : IAccountService
{
public AccountService()
{
}
public AuthenticationResult Register(string firstName, string lastName, string email, string password)
{
}
}
我們來想想這個 Register 會有甚麼實質的功能,
email 是否已經存在。firstName, lastName, email, password 存到實體層。關於 JWT 是甚麼,如何保護我們的服務,過幾篇章後會詳細介紹與實作 Authentication 機制。目前我們先回傳一個字串當作 token。
實作我們暫時用一個 List<User> 來存 user 資料。
using Account.Domain.Aggregates;

namespace Account.Application;

public class AccountService : IAccountService
{
    private List<User> _users = new List<User>();

    public AccountService()
    {

    }

    public AuthenticationResult Register(string firstName, string lastName, string email, string password)
    {
        if (_users.FirstOrDefault(u => u.Email == email) != null)
            throw new ArgumentException("Email address already exists");

        var user = User.Create(firstName, lastName, email, password);

        _users.Add(user);

        return new AuthenticationResult(
            user.Id.Value,
            user.FirstName,
            user.LastName,
            user.Email,
            "token"
        );
    }
}
我們先在 gRPC 專案內安裝套件
<PackageReference Include="Grpc.AspNetCore.Server.Reflection" Version="2.65.0" />
這個 Reflection 套件可以簡單理解為讓客戶端可以動態查詢可用的 gRPC 服務和方法。
使用方法也很簡單,在 Program.cs 中加入
// ...
builder.Services.AddGrpcReflection();
// ...
app.MapGrpcReflectionService();
// ...
因為我們在 Account.Grpc 專案內的 GrpcAccountService 有使用 Account.Application 的 IAccountService,勢必就得 DI 這個服務到 Container 中。
首先我們在 Account.Application 專案做一個 Register AccountApplicationRegister,並把 IAccountService 注入,未來所有 Application 相關的註冊都可以寫在這個檔案內。
using Microsoft.Extensions.DependencyInjection;

namespace Account.Application;

public static class AccountApplicationRegister
{
    public static IServiceCollection AddAccountApplication (this IServiceCollection services)
    {
        services.AddScoped<IAccountService, AccountService>();

        return services;
    }
}
並在 Acount.Grpc 使用,最後的 Program.cs 如下:
using Account.Application;
using Account.Grpc.Services;

var builder = WebApplication.CreateBuilder(args);

// Add services to the container.
builder.Services.AddGrpc();
builder.Services.AddGrpcReflection();
builder.Services.AddAccountApplication();

var app = builder.Build();

// Configure the HTTP request pipeline.
app.MapGrpcService<GrpcAccountService>();
app.MapGrpcReflectionService();

app.Run();
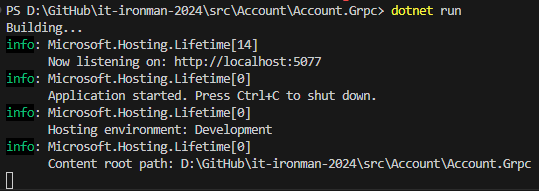
到這裡,我們來測試一下。在 .\src\Account\Account.Grpc 內執行 dotnet run
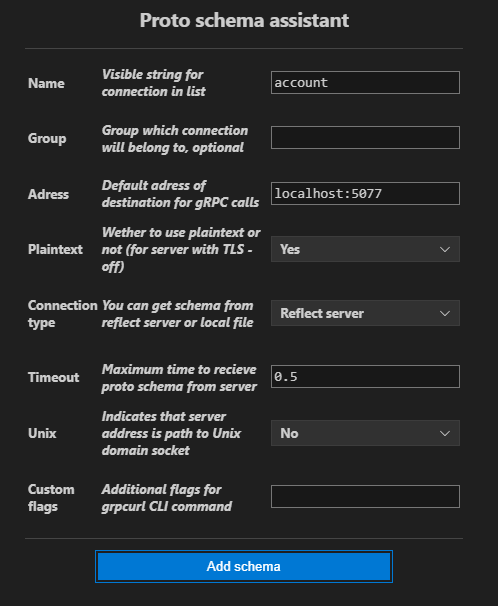
然後在我們 VS Code 的套件 gRPC Clicker 內新增 schema 如下:
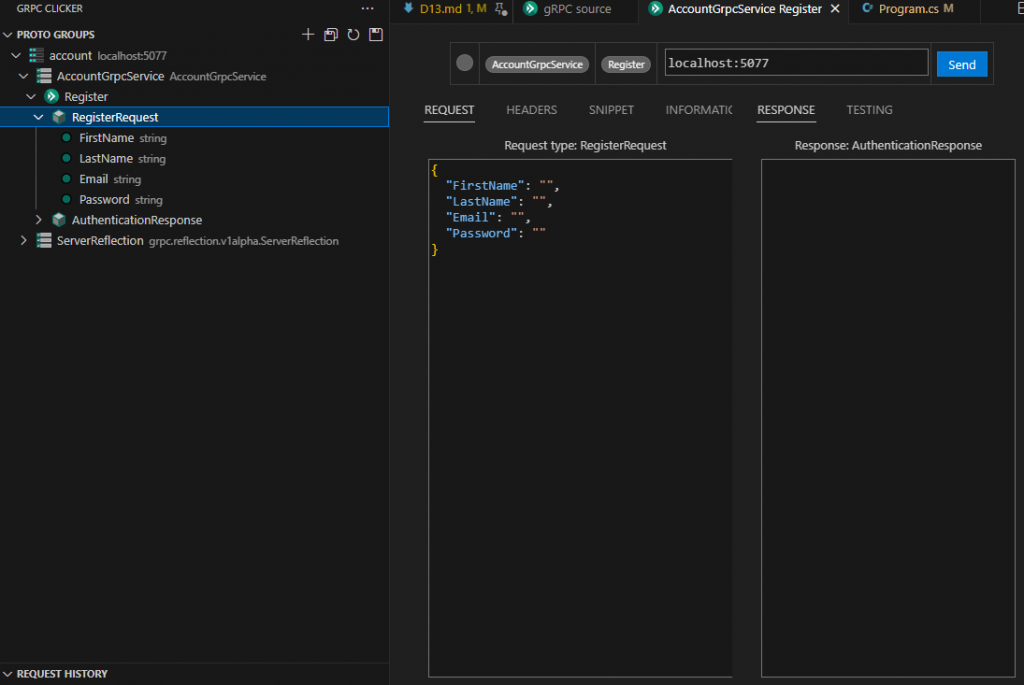
新增後可以看到 gRPC Reflection 自動回給 gRPC Clicker 我們的 proto:
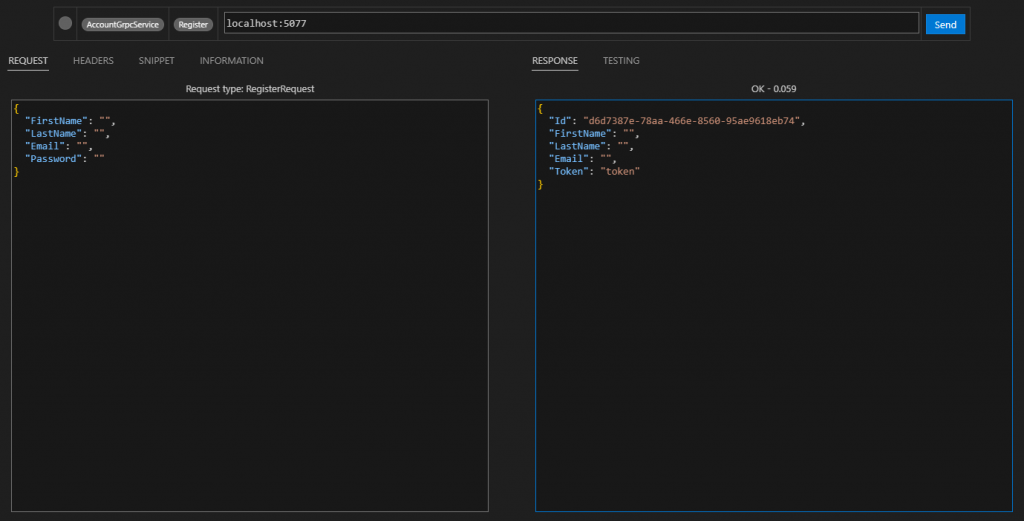
簡單測試一下
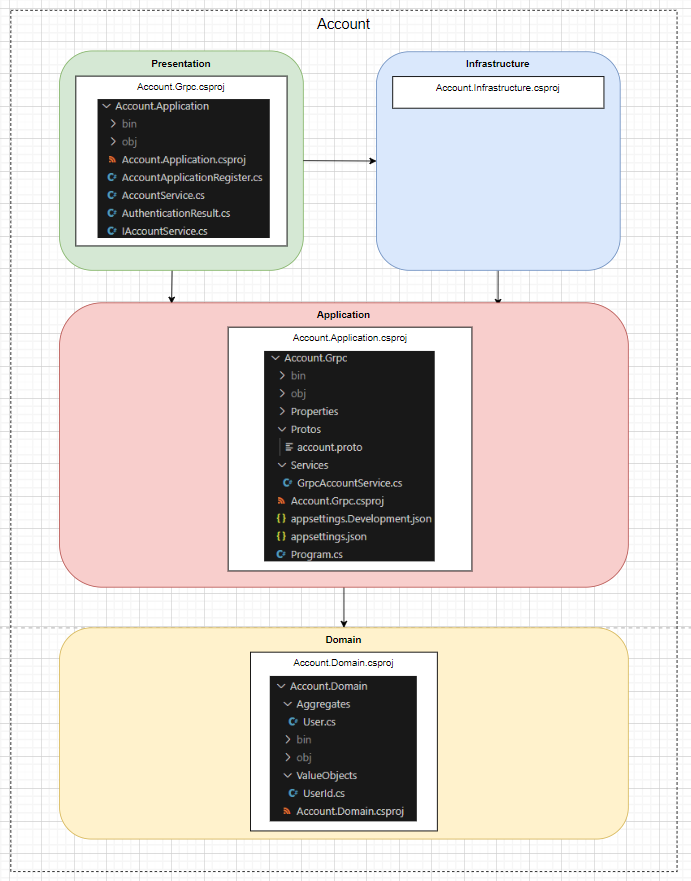
打完收工,明天繼續 Login 的實作。最後專案變成: