微服務開發中有時要開啟所有的相依服務才能 Debug,我們可以透過 Dockerfile 將實作完成的微服務進行容器化,並整合到 Docker Compose 中,以便統一管理與運行多個微服務。
整理 Port 這件事情其實是在專案建置的時候就該做了,但現在做也可以啦!
| 分類 | 編號 | gRPC Port | GraphQL Port | Gateway Port |
|---|---|---|---|---|
| Account | 1 | 5001 | 4001 | - |
| Todo | 2 | 5002 | 4002 | - |
| BFF | 0 | - | 4000 | 5000 |
整理後看起來清爽多了,我們採用了一致的端口命名規則,使得整個系統更加有序且易於管理。至於如何更改 Port 這件事情就不多贅述了。
因為我們每個專案都是使用 .NET 8 所開發,為了不要在每個專案內新增同樣性質的 Dockerfile,我們可以寫一個 Template,讓 docker-compose.yaml 來使用。
我們在 /src 底下新增 dockerfile.dotnet.template 如下:
FROM mcr.microsoft.com/dotnet/sdk:8.0 AS build-env
ARG PROJECT_FOLDER
ARG PROJECT_NAME
WORKDIR /App
COPY . .
RUN dotnet restore ./${PROJECT_FOLDER}/${PROJECT_NAME}/${PROJECT_NAME}.csproj
RUN dotnet publish ./${PROJECT_FOLDER}/${PROJECT_NAME}/${PROJECT_NAME}.csproj -c Release -o out

FROM mcr.microsoft.com/dotnet/aspnet:8.0
ARG PROJECT_NAME
ARG PORT=80
WORKDIR /App
COPY --from=build-env /App/out .
ENV ASPNETCORE_ENVIRONMENT=Production
ENV ASPNETCORE_URLS=http://*:${PORT}
RUN echo '#!/bin/bash\n\
dotnet '"$PROJECT_NAME"'.dll' > /App/start.sh && \
    chmod +x /App/start.sh
ENTRYPOINT ["/App/start.sh"]
在這邊我通過參數化 PROJECT_FOLDER、PROJECT_NAME 和 PORT 來讓 Docker Compose 來指定專案相關的路徑與 Port。
不知道你有沒有發現,我們在 docker-compose.yml 中,我們都有指定 ASPNETCORE_ENVIRONMENT=Production,預設是 Production 環境,而 launchSettings.json 只有在 Development 環境下會被使用。所以我們需要在 appsettings.json 中區分 Production 與 Development 環境,這樣的區分可以確保我們在不同環境下使用正確的配置,提高系統的可靠性和安全性。
拿 Todo.Grpc 來舉例,appsettings.development.json 內容跟之前我們開發時的內容一樣,如下:
{
  "Logging": {
    "LogLevel": {
      "Default": "Information",
      "Microsoft.AspNetCore": "Warning"
    }
  },
  "ConnectionStrings": {
    "DefaultConnection": "Server=localhost,1434;Database=db_todo;User Id=sa;Password=Passw0rd!;TrustServerCertificate=True"
  },
  "RabbitMQSettings": {
    "HostName": "localhost",
    "Port": 5672
  }
}
但 appsettings.json 則會有些許不同,我們要將 localhost 改為 container 的名稱,例如 rabbitmq,要額外注意的是,服務的 port 也要改為 container 的 port,不是 Expose 到主機的 port,所以這裡的 todo_db 的 port 還是 1433。
{
  "Logging": {
    "LogLevel": {
      "Default": "Information",
      "Microsoft.AspNetCore": "Warning"
    }
  },
  "AllowedHosts": "*",
  "Kestrel": {
    "EndpointDefaults": {
      "Protocols": "Http2"
    }
  },
  "ConnectionStrings": {
    "DefaultConnection": "Server=todo_db,1433;Database=db_todo;User Id=sa;Password=Passw0rd!;TrustServerCertificate=True"
  },
  "RabbitMQSettings": {
    "HostName": "rabbitmq",
    "Port": 5672
  }
}
還記得我們在 Day 10 - 專案建置與 docker-compose 有建立好一個 docker-compose.yml 嗎?現在要來完善它。
version: "3.8"

services:
  account_db:
    image: mcr.microsoft.com/mssql/server:2019-latest
    environment:
      - ACCEPT_EULA=Y
      - SA_PASSWORD=Passw0rd!
    ports:
      - "1433:1433"
    volumes:
      - account_data:/var/opt/mssql
    networks:
      - app-network

  todo_db:
    image: mcr.microsoft.com/mssql/server:2019-latest
    environment:
      - ACCEPT_EULA=Y
      - SA_PASSWORD=Passw0rd!
    ports:
      - "1434:1433"
    volumes:
      - todo_data:/var/opt/mssql
    networks:
      - app-network

  rabbitmq:
    image: rabbitmq:3-management
    ports:
      - "5672:5672"
      - "15672:15672"
    networks:
      - app-network

  account_grpc:
    build:
      context: .
      dockerfile: dockerfile.dotnet.template
      args:
        PROJECT_FOLDER: Account
        PROJECT_NAME: Account.Grpc
        PORT: 5001
    depends_on:
      - account_db
      - rabbitmq
    ports:
      - "5001:5001"
    networks:
      - app-network

  account_graphql:
    build:
      context: .
      dockerfile: dockerfile.dotnet.template
      args:
        PROJECT_FOLDER: Account
        PROJECT_NAME: Account.GraphQL
        PORT: 4001
    depends_on:
      - account_db
    ports:
      - "4001:4001"
    networks:
      - app-network

  todo_grpc:
    build:
      context: .
      dockerfile: dockerfile.dotnet.template
      args:
        PROJECT_FOLDER: Todo
        PROJECT_NAME: Todo.Grpc
        PORT: 5002
    depends_on:
      - todo_db
      - rabbitmq
    ports:
      - "5002:5002"
    networks:
      - app-network
    entrypoint: ["/bin/sh", "-c", "sleep 30 && /App/start.sh"]

  todo_graphql:
    build:
      context: .
      dockerfile: dockerfile.dotnet.template
      args:
        PROJECT_FOLDER: Todo
        PROJECT_NAME: Todo.GraphQL
        PORT: 4002
    depends_on:
      - todo_db
    ports:
      - "4002:4002"
    networks:
      - app-network

  graphql_gateway:
    build:
      context: .
      dockerfile: dockerfile.dotnet.template
      args:
        PROJECT_FOLDER: BFF
        PROJECT_NAME: GraphQL.Gateway
        PORT: 4000
    depends_on:
      - account_graphql
      - todo_graphql
    ports:
      - "4000:4000"
    networks:
      - app-network
    volumes:
    - ./BFF/GraphQL.Gateway/Stitching.graphql:/App/Stitching.graphql

  bff_gateway:
    build:
      context: .
      dockerfile: dockerfile.dotnet.template
      args:
        PROJECT_FOLDER: BFF
        PROJECT_NAME: BFF.Gateway
        PORT: 5000
    depends_on:
      - account_grpc
      - todo_grpc
      - graphql_gateway
    ports:
      - "5000:5000"
    networks:
      - app-network

  nginx:
    image: nginx:alpine
    volumes:
      - ./WebApp:/usr/share/nginx/html
    ports:
      - "80:80"
    networks:
      - app-network

volumes:
  account_data:
  todo_data:

networks:
  app-network:
這邊值得我們注意的是 entrypoint 這個參數,我們在 todo_grpc 有指定 entrypoint 來延遲啟動,這是因為我們的 Todo.Grpc 需要先等待 rabbitmq 啟動後才能正常運行。另外,我們在 volumes 有指定 - ./BFF/GraphQL.Gateway/Stitching.graphql:/App/Stitching.graphql,這是因為我們的 GraphQL.Gateway 需要用到 Stitching.graphql 這個檔案,而 dotnet publish 不會將這個檔案複製到輸出目錄中,所以需要我們手動指定。
而在前端 Web APP 的部分,我們則是將 WebApp 資料夾映射到 Docker 容器中,這樣我們在開發時就可以直接修改 Web App 的內容,而不需要重新 build 與重啟容器,並且使用 nginx 來作為 Web App 的反向代理伺服器,這樣我們就可以直接從 http://localhost 來存取 Web App,而且修改後會即時生效。
接著我們需要修改 WebApp 中的 index.html 和 dashboard.html,將我們 BFF Gateway 的網址給更正為 http://localhost:5000,這樣我們才能正確的存取後端微服務。
使用 docker compose up -d 來啟動所有服務,並且從 http://localhost 來存取 Web App。
可以使用 docker compose down 來一次性關閉所有服務。
如果 .NET 專案有任何修改,可以使用 docker compose -d --build 來重新 build 與重啟。
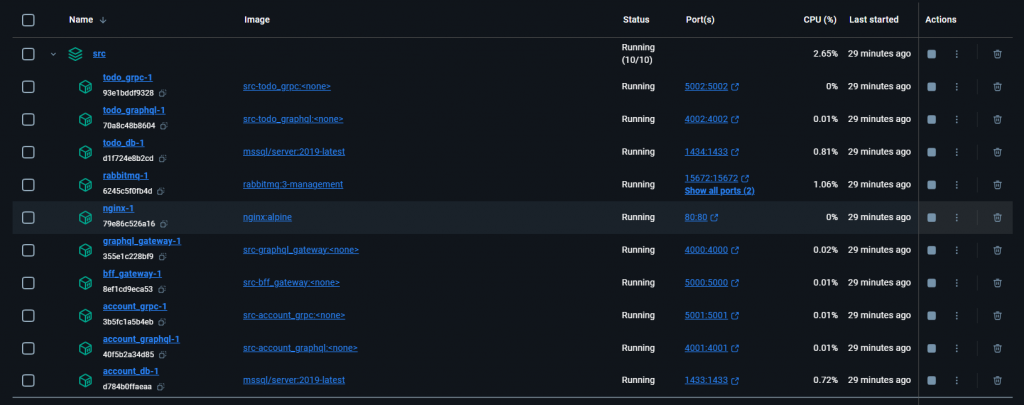
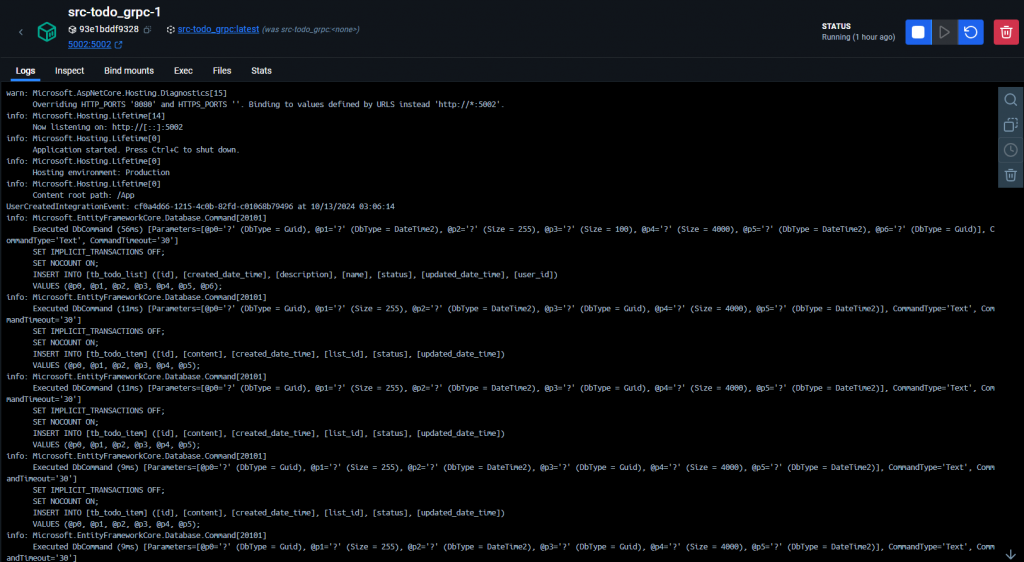
一切正常的話,你可以在 docker desktop 看到所有服務的運行狀況,以及 log 輸出。
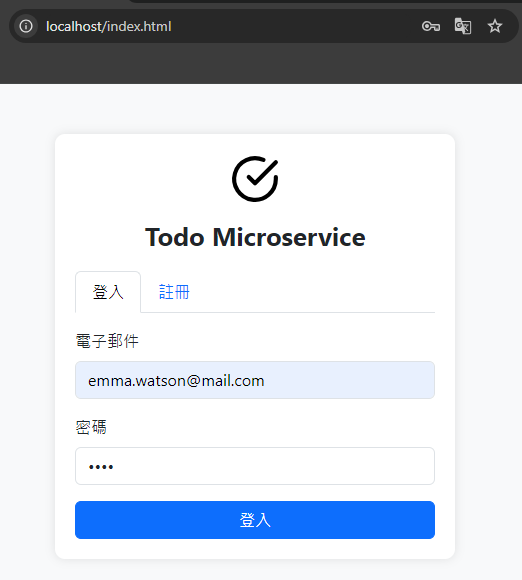
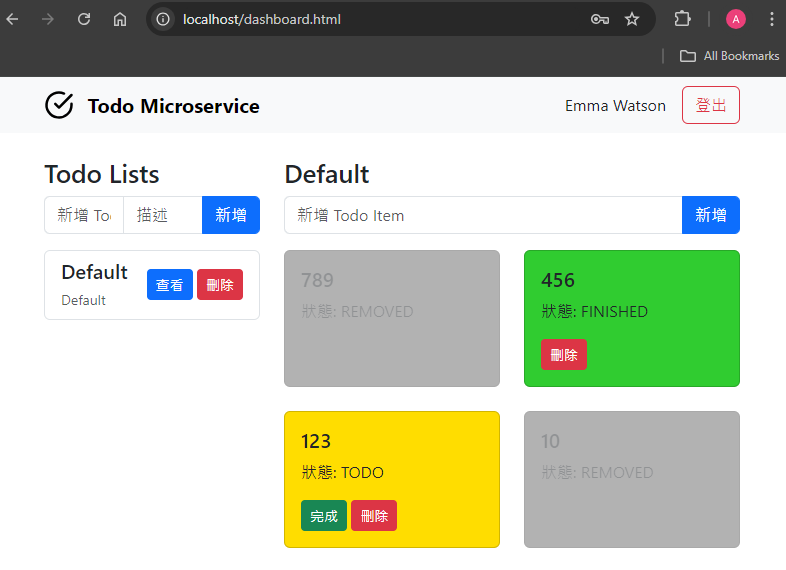
這是 localhost 的畫面。
到這裡我們全部的實作就告一段落了,我們從最初的微服務、Clean Architecture、DDD 設計,還有實戰 gRPC、GraphQL、Event、Gateway 的開發,到最後 Cursor AI 前端與容器化,一步一步帶著大家從 0 到 1 建立起一個完整的微服務架構,現在回頭看看我們到底做了多少東西。
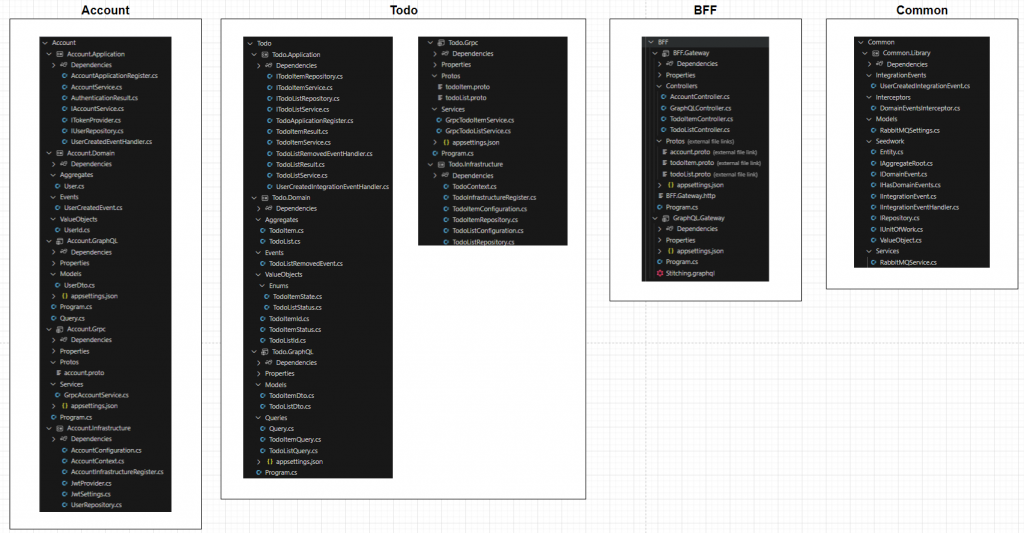
專案架構
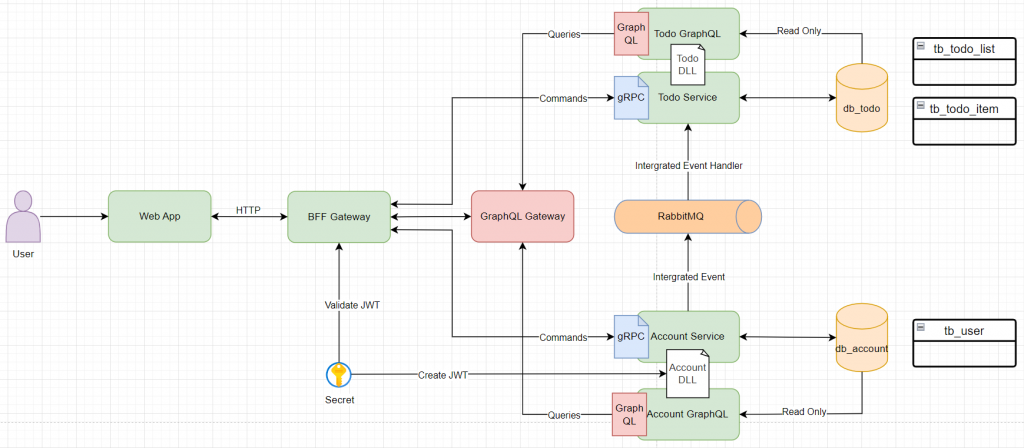
系統架構
結語
小孩感冒了,今天就先到這裡,明天再來聊聊這次開發過程中的一些心得與反思。
