在上一篇文章中,我們完成了 Account 和 Todo 的 GraphQL 服務。透過這兩個服務,我們可以輕鬆地讀取 User、Todo List 和 Todo Item 的資料。然而,這僅僅是基礎功能,今天我們要深入了解 GraphQL 的核心功能之一——Stitching。我們將使用 GraphQL Gateway 將 User、Todo List 和 Todo Item 整合起來,並且將這些服務統一在 BFF (Backend for Frontend) Gateway 內,使得所有查詢都可以通過一個單一入口點完成。
首先,我們需要在 BFF 資料夾中創建一個名為 GraphQL.Gateway 的新專案。這個專案將使用 HotChocolate.Stitching 來整合我們之前實作的各個 GraphQL 服務。
## Todo GraphQL Project
cd .\BFF\
dotnet new web -n GraphQL.Gateway
cd .\GraphQL.Gateway\
dotnet add package HotChocolate.AspNetCore
dotnet add package HotChocolate.Stitching
cd ..\..\

## Add Projects to Solution
dotnet sln add (ls -r **/*.csproj)
在 Program.cs 中,我們需要註冊並配置 HotChocolate 的服務,以實現遠端 GraphQL schema 的合併,進而達成 stitching 的功能。我們將為 Account 和 Todo 服務配置對應的 HttpClient,並將它們的 schema 整合到 GraphQL Gateway 中。特別地,我們設定 ignoreRootTypes 為 true,這樣可以忽略遠端服務的根類型,以避免因為多個類型命名為 Query 而造成的衝突,這也讓我們更好地控制我們希望對外暴露的 GraphQL 結構。
using HotChocolate.AspNetCore;

const string ACCOUNT = "account";
const string TODO = "todo";

var builder = WebApplication.CreateBuilder(args);

builder.Services.AddHttpClient(ACCOUNT, c => c.BaseAddress = new Uri("http://localhost:5068/graphql"));
builder.Services.AddHttpClient(TODO, c => c.BaseAddress = new Uri("http://localhost:5261/graphql"));
// 註冊 GraphQL 服務,並將遠端 schema 加入到當前 Gateway 中
builder.Services.AddGraphQLServer()
    .AddQueryType(d => d.Name("Query"))
    .AddRemoteSchema(ACCOUNT, ignoreRootTypes: true)
    .AddRemoteSchema(TODO, ignoreRootTypes: true)
    .AddTypeExtensionsFromFile("./Stitching.graphql");

var app = builder.Build();

app.MapGraphQL();

app.Run();
在這段程式碼中,AddTypeExtensionsFromFile("./Stitching.graphql") 是告訴 HotChocolate 從指定檔案中載入自定義的 stitching 擴展配置,以便整合不同的 GraphQL schema。
接下來,我們創建一個 Stitching.graphql 文件,定義如何將 Account 和 Todo 兩個 GraphQL schema stitch 在一起,讓不同服務之間的資料可以關聯起來。
在 GraphQL 中,extend type 允許我們擴展現有的類型,添加新的欄位或功能。在這裡,由於我們在之前的服務中設定了 ignoreRootTypes: true,原先的 Query 將會變成空的,因此我們需要使用 extend type Query 來定義所有 GraphQL Gateway 可見的查詢方法。
# 擴展 Query,這裡的方法會成為所有 GraphQL Gateway 會看到的 Queries
extend type Query {
  userById(userId: String!): UserDto @delegate(schema: "account")
  todoListById(listId: String!): TodoListDto @delegate(schema: "todo")
  todoItemById(itemId: String!): TodoItemDto @delegate(schema: "todo")
}

# 擴展 UserDto 型別,讓 User 與 Todo List 產生關係,並透過 @delegate 將資料 Stitch 連接
extend type UserDto {
  todoListDtos: [TodoListDto!]
    @delegate(schema: "todo", path: "todoListsByUserId(userId: $fields:id)")

# 擴展 TodoListDto 型別,讓 Todo List 與 Todo Item 產生關係,並透過 @delegate 將資料 Stitch 連接
extend type TodoListDto {
  todoItemDtos: [TodoItemDto!]
    @delegate(schema: "todo", path: "todoItemsByListId(listId: $fields:id)")
}

# 擴展 TodoItemDto 型別,讓 Todo Item 與 Todo List 產生關係,並透過 @delegate 將資料 Stitch 連接
extend type TodoItemDto {
  todoListDto: TodoListDto @delegate(schema: "todo")
}
這樣的設定確保了 UserDto、TodoListDto 和 TodoItemDto 之間的資料關聯,使得我們可以通過一個查詢獲取完整的資料結構,實現了 GraphQL 的強大功能。
而我們這裡只做了使用 ID 搜尋的 Query 功能,原因之一是因為這種 Stitch 的查詢如果沒有優化,資料量大的話效能會很差。其二,是因為我們的前端也不需要太彈性的查詢功能。
先跑起所有的 GraphQL 專案。
查詢看看我們新增加的 Stitch 功能。
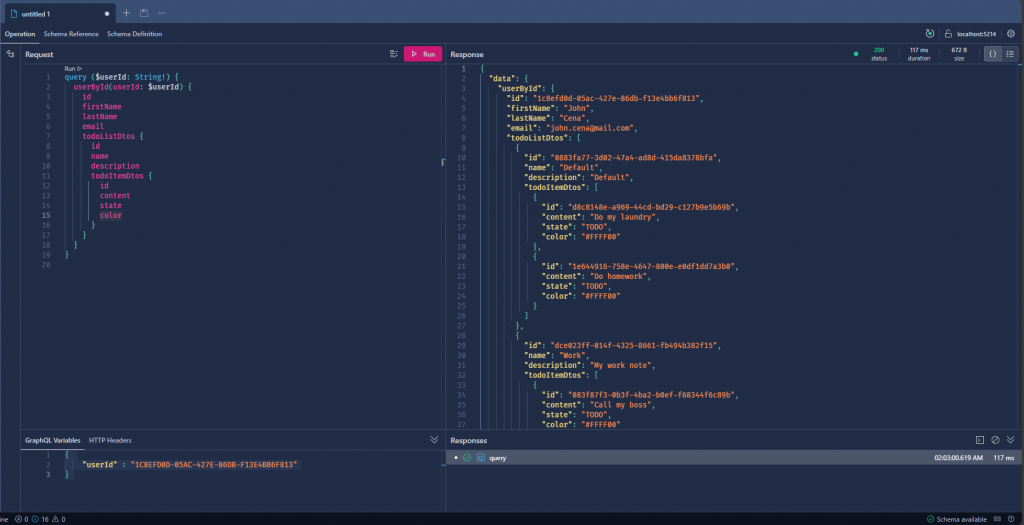
所有關聯資料都被我用一個 Query 就拿回來了,而且我還可以隨意的增減我想要的屬性,是不是開始感受到 GrahpQL 的威力了!
雖然 GraphQL 本質上是通過 HTTP 進行連線,但將 REST Gateway 整合 GraphQL 有一些顯著的優點:
統一資料入口:BFF Gateway 可以通過 GraphQL 將多個後端服務整合到單一入口,簡化前端與後端的溝通。
靈活查詢:GraphQL 允許前端自定義查詢所需的資料,減少多次請求與過度查詢的情況,提升效能。
減少 API 版本管理:GraphQL 的靈活性使後端資料結構變更時,無需頻繁更新 API 版本。
簡化前端邏輯:前端僅需針對統一的 GraphQL API,降低處理多個後端服務的複雜性。
提升開發與維護效率:GraphQL 的靈活查詢和自動文件化的特性,讓開發團隊更容易探索後端 API 並保持 API 使用的一致性。
透過整合 GraphQL,REST Gateway 可以提升效能、簡化開發流程,並且為系統擴展性提供更好的基礎。
在 BFF.Gateway 專案底下新增套件。
dotnet add package GraphQL.Client
dotnet add package GraphQL.Client.Serializer.SystemTextJson
我們在 Program.cs 內加入下面的程式碼。
using GraphQL.Client.Abstractions;
using GraphQL.Client.Http;
using GraphQL.Client.Serializer.SystemTextJson;

//...

// Register GraphQLHttpClient for DI
builder.Services.AddSingleton<IGraphQLClient>(s =>
{
    var options = new GraphQLHttpClientOptions
    {
        EndPoint = new Uri("http://localhost:5214/graphql/")
    };

    return new GraphQLHttpClient(options, new SystemTextJsonSerializer());
});
然後新增一個 GraphQLController,方便起見,這就不加 Authorize 了。
using GraphQL;
using GraphQL.Client.Abstractions;
using Microsoft.AspNetCore.Mvc;

namespace BFF.Gateway.Controllers;

[ApiController]
[Route("api/[controller]")]
public class GraphQLController : ControllerBase
{
    private readonly IGraphQLClient _graphQLClient;

    public GraphQLController(IGraphQLClient graphQLClient)
    {
        _graphQLClient = graphQLClient;
    }

    // Define a model to accept GraphQL query and variables from the POST body
    public class GraphQLQuery
    {
        public required string Query { get; set; }
        public object? Variables { get; set; } = new { };
    }

    [HttpPost("execute")]
    public async Task<IActionResult> ExecuteQueryAsync([FromBody] GraphQLQuery request)
    {
        var graphQLRequest = new GraphQLRequest
        {
            Query = request.Query,
            Variables = request.Variables
        };

        try
        {
            var response = await _graphQLClient.SendQueryAsync<dynamic>(graphQLRequest);

            if (response.Errors != null && response.Errors.Length > 0)
            {
                return BadRequest(response.Errors);
            }

            return Ok(response.Data);
        }
        catch (Exception ex)
        {
            return StatusCode(500, $"Internal server error: {ex.Message}");
        }
    }
}
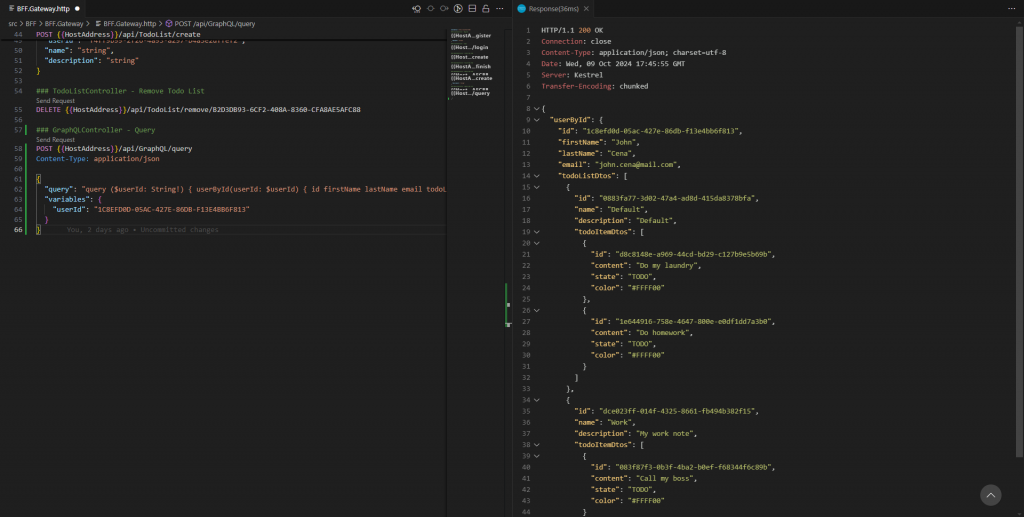
我們把先前在 GraphQL UI 上的 GraphQL Query 和 GraphQL Variables 貼到這個網址:
GraphQL to JSON Body Converter
就可以得到 JSON Body,再貼回 .http 上執行。
### GraphQLController - Query
POST {{HostAddress}}/api/GraphQL/query
Content-Type: application/json

{
  "query": "query ($userId: String!) { userById(userId: $userId) { id firstName lastName email todoListDtos { id name description todoItemDtos { id content state color } } }}",
  "variables": {
    "userId": "1C8EFD0D-05AC-427E-86DB-F13E4BB6F813"
  }
}
到此,我們的 Backend 部分到了一段落,為了接下來與前端的對接,我們需要讓我們的 BFF Gateway 允許 CORS。
CORS (跨來源資源共享) 是一種瀏覽器安全機制,其核心是由服務器端來配置,並且瀏覽器根據這些配置來執行安全策略,允許網頁從不同來源的伺服器請求資源。它通過添加 HTTP 標頭來控制哪些來源能夠訪問特定的伺服器資源,從而保護用戶免受跨站點請求偽造 (CSRF) 等攻擊。
了解 CORS 之後就來在 BFF Gateway 的 Program.cs 內加入:
//...

builder.Services.AddCors(options =>
{
    options.AddPolicy("AllowAll", builder =>
    {
        builder.AllowAnyOrigin()
               .AllowAnyMethod()
               .AllowAnyHeader();
    });
});

//...

app.UseCors("AllowAll"); // 加入這個

//...
在這篇文章中,我們成功將多個 GraphQL 服務整合到單一入口點,並實現了 GraphQL Gateway 的 Stitch 功能。這次的實作採用了集中式架構 (Centralized),所有的設定與配置都在 Gateway 端完成。這種架構簡化了多服務的整合過程,讓前端能通過單一查詢點獲取完整的資料。不過,GraphQL Gateway 還有其他架構模式,例如聯邦式架構 (Federation),能將不同服務的邏輯分散處理,進一步提升系統的彈性與擴展性。讀者若有興趣,建議深入研究聯邦式架構,進一步探索 GraphQL Gateway 的更多應用場景。
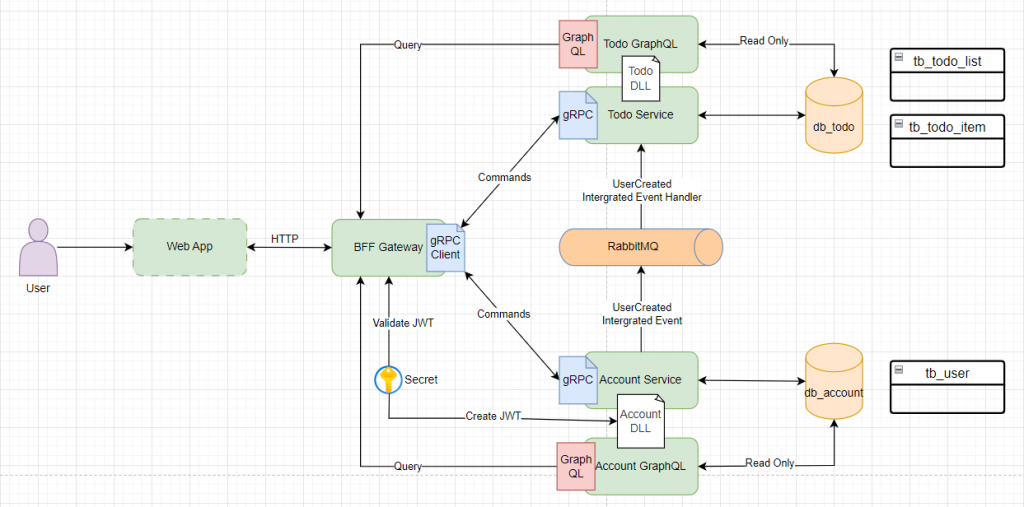
最後,做完了所有 Backend,現在的微服務架構圖會變成這樣: