之前一直看不下去原本的排版,今天決定要來大改造,雖然不知道能不能成功,想改的地方太多了,還怕會搞出更多🐛,但是既然決定要做,就應該要更符合自己的理想,還是硬著頭皮來試試看💪
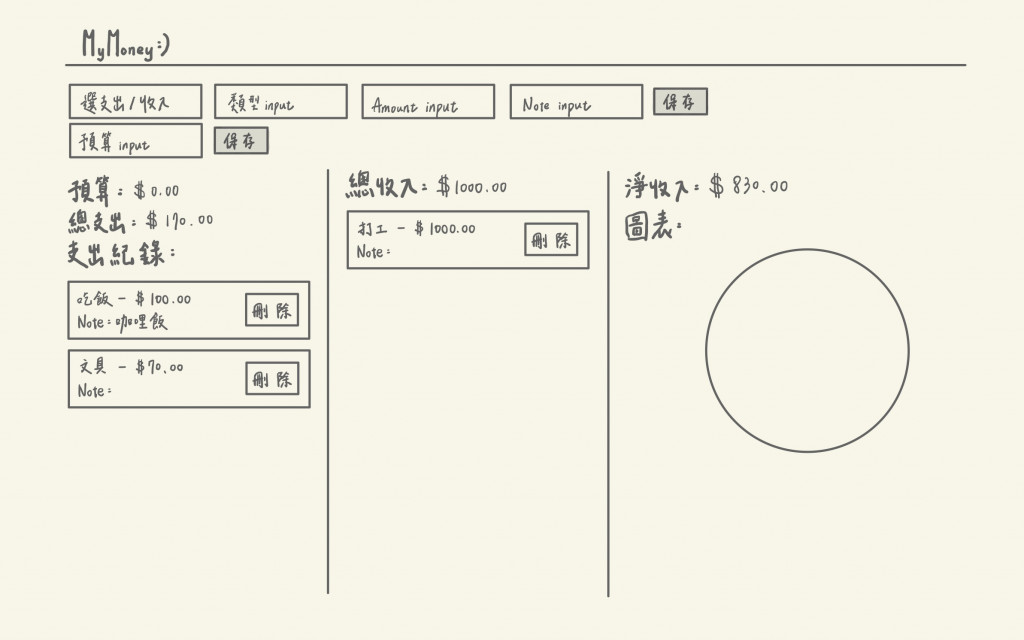
大概想了一下理想中的排版長怎麼樣,為了讓自己在重新設計的過程能更順利、更有目標,我先大概畫了希望的排版,如下。
收入和支出的部分其實需要輸入的項目都是相同的,因此我不希望把差不多的東西分成兩排,就決定直接再加一個選擇鍵來選擇這次填寫的是收入還是支出。另一個主要想大改的部分是,原本收入、支出都放在同一區,這樣會變很難辨識與對照,也浪費了右邊的區域,我覺得又醜又可惜,於是決定分成三個部分,左邊區域放支出項目,中間區域放收入項目,最右邊則是放圖表,圖表我目前還沒有提到過,那是未來會加上的功能,今天我們先劃分這一區就好了。
大概調整了一下先後順序,讓顯示的排序能接近我的想像的樣子,以及字體大小等也需要修改。
<!DOCTYPE html>
<html lang="zh-Hant">
<head>
    <meta charset="UTF-8">
    <meta name="viewport" content="width=device-width, initial-scale=1.0">
    <title>MyMoney</title>
    <link rel="stylesheet" href="style.css">
</head>
<body>
    <h1>MyMoney</h1>
    <hr>

    <div class="input d-flex">
        <!--支出收入輸入-->
            <div class="input-container">
                <div class="input-button"></div>
                <button id="expense-button">支出</button>
                <button id="income-button">收入</button>
            </div>
            <input type="text" id="description" placeholder="類型輸入">
            <input type="number" id="amount" placeholder="金額輸入">
            <input type="text" id="note" placeholder="備註">
            <button onclick="addExpense()">保存</button>
        </div>
    </div>

    <!--預算輸入-->
    <div class="inputbudget-container">
        <input type="number" id="budget-amount" placeholder="請輸入預算">
        <button onclick="setBudget()">保存</button>
    </div>

    <div class="container">
        <!-- 左側:支出 -->
        <div class="left-section">
            <h3>預算:$<span id="current-budget">0.00</span></h3>
            <h3>總支出:$<span id="total-amount">0</span></h3>
            <h2>支出紀錄</h2>
            <ul id="expense-list"></ul>
        </div>

        <!-- 中間:收入 -->
        <div class="middle-section">
            <h3>總收入:$<span id="total-income">0</span></h3>
            <h2>收入紀錄</h2>
            <ul id="income-list"></ul>
        </div>

        <!-- 右側:圖表和淨收入 -->
        <div class="right-section">
            <h3>淨收入:$<span id="net-amount">0</span></h3>
            <h2>圖表</h2>
        </div>
    </div>

    <script src="app.js"></script>
</body>
</html>
刪掉了原本輸入收入的欄位,改成用按鈕選擇此次輸入的是支出或收入,且創造了三個區塊來分別裝收入記錄、支出紀錄以及未來會加上的圖表。
這次CSS可以說是大改,加了很多代碼,也改了很多原本的數值,雖然有努力去盡量了解怎麼使用那些功能來讓版面變成我理想的樣子,不過很多都是慢慢調數值,一個一個試驗看會不會變成我理想的版面才試成功的,甚至有些部分已經和我當初所想不同了,不過我個人更喜歡實際完成的樣子。
body {
    background-color:#2e394b;
    font-family: Arial, Helvetica, sans-serif;
    color: #eddbc7;
    margin: 0;
    padding: 10px 100px;
}

h1 {
    text-align: center;
    color: #eddbc7;
}

h3 {
    color: #a88971;
}

.divider {
    width: 2px;
    background-color: #eddbc7;
    margin: 10px 20px;
}

.d-flex{
    display: flex;
    flex-direction: row;
    justify-content: center;
    align-items: center;
}

.input-container {
    display: flex;
    flex-direction: row;
    gap: 10px;
    height: auto;
    width: 50%;
}

.inputbudget-container{
    width: 100%;
    display: flex;
    justify-content: flex-end;
    flex-direction: row;
    align-items: center;
}

.container {
    display: flex;
    justify-content: space-between;
    padding: 20px;
    gap:20px;
}

.left-section {
    width: 30%;
    background-color: #eddbc7;
    color: #a88971;
    padding: 5px 20px;
    border-radius: 8px;
}

.middle-section {
    width: 30%;
    background-color: #eddbc7;
    color: #a88971;
    padding: 5px 20px;
    border-radius: 8px;
}

.right-section {
    width: 30%;
    background-color: #eddbc7;
    color: #a88971;
    padding: 5px 20px;
    border-radius: 8px;
}

input {
    margin: 10px;
    padding: 10px;
    border: 1px solid #cdc6c3;
    width: 20%;
}

button {
    padding: 10px 20px;
    margin: 0;
    background-color: #ede3d8dd;
    color: #9d806b;
    border: none;
    border-radius: 5px;
    cursor: pointer;
    width: auto;
    height: auto;
    white-space: nowrap;
    display: inline-block;
    text-align: center;
    max-width: 100px;
    max-height:40px;
}

button:hover {
    background-color: #d4b2a7;
}

ul {
    list-style-type: none;
    padding: 0;
}

ul li {
    background-color: #ede9e3;
    color:#a88971;
    padding: 10px;
    margin: 5px 0;
    border-radius: 4px;
    box-shadow: 0 2px 5px rgba(0, 0, 0, 0.1);
    display: flex;
    justify-content: space-between;
    align-items: center;
}

.chart-placeholder {
    width: 100%;
    height: 200px;
    background-color: #ede9e3;
    border-radius: 50%;
    display: flex;
    justify-content: center;
    align-items: center;
}
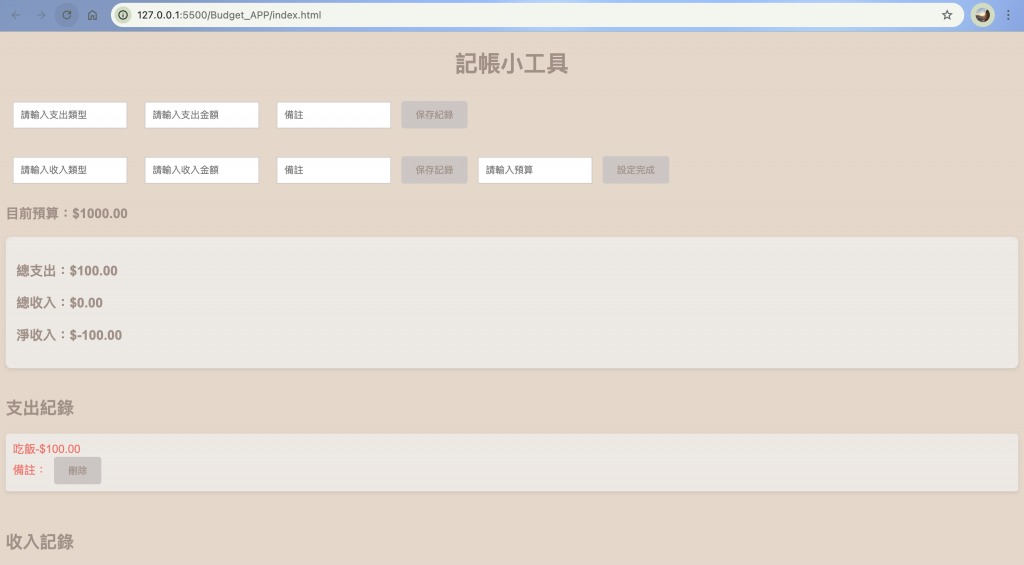
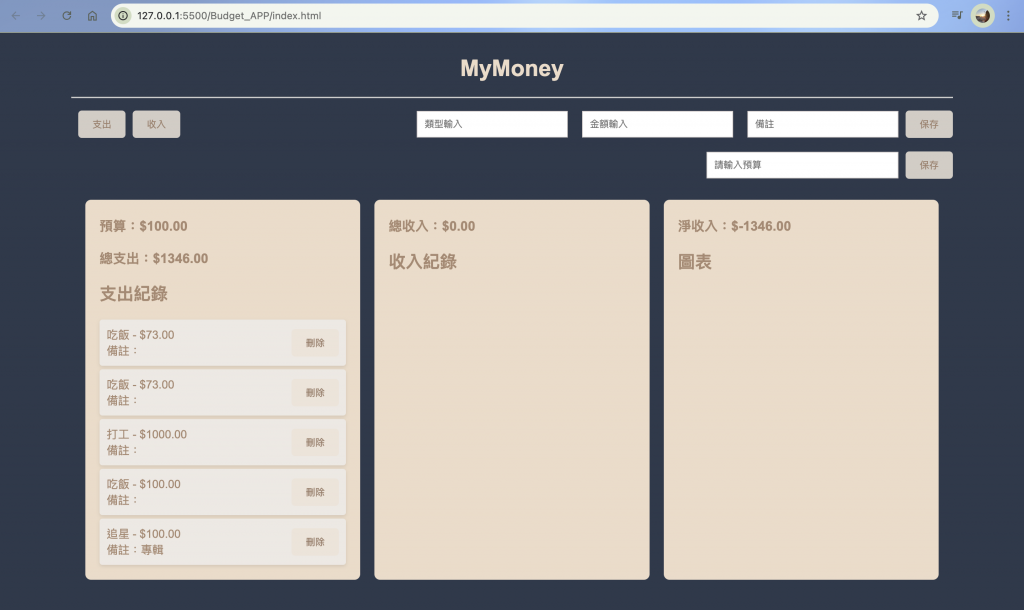
大家應該最期待的就是這一part了,感覺很像在看全能住宅改造王,我都拉到後面看before/after。廢話不多說,我就來展示我記帳小工具網站的before/after!
Before:
After:
應該多多少少會有一點進化的感覺吧?不過即使外觀改變了,眼尖的人應該有發現,裡面有滿滿的🐛🐛,像是打工的收入出現在支出記錄裡了,還有我就算刪掉紀錄,重載還是會再跑出來。所以我們之後有一天的任務就是來除🐛。
